There could be 2 reasons why you are interested in UsoClient.exe file. One is because you notice a command prompt popup that says UsoClient.exe, even though very brief, that occurs with every Windows boot up in your machine and you are curious whether this is normal or not. The other reason is that the popup is not brief and it stays indefinitely on your screen and you are fed up with it and you want a solution. Be it disabling UsoClient.exe or be it determining whether UsoClient.exe is harmful, let’s find out what UsoClient.exe file exactly is, first.
What is UsoClient.exe File
First of all, UsoClient.exe is a Windows Update component that is responsible for checking Windows updates automatically. The main purpose of UsoClient.exe is to run tasks automatically to scan, install or resume Windows Updates. USO stands for Update Session Orchestrator.
Is the UsoClient.exe command prompt popup you are getting harmful?
In most cases, UsoClient.exe is not malicious and it’s just normal to get this message at times. However, UsoClient.exe could also be a malicious file in disguise, trying to trick you with a system component’s name. There is one easy way to check whether the UsoClient.exe popup you are getting is a virus or if it’s the actual Windows Update component. Follow the steps below to find out how:
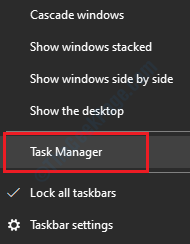
1. First of all, open task manager by clicking on an empty space in your taskbar and then by clicking on the option Task Manager.
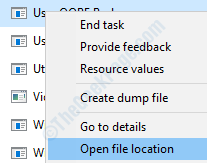
2. Now when the Task Manger opens up, under the Processes tab, look under the section Background Processes for the process named UsoClient.exe. Once you find it, right click on it and then click on Open File Location.
3. Now if the folder that opens up before you is the Windows System32 folder, then there is nothing to worry. The UsoClient.exe that is annoying you is not a virus.
If you want to be more sure, then you can surely run a virus scan using your antivirus software though. However, if the location that opens up before you is anything other than Windows System32 folder, then there is a high chance that your machine is going through a malicious attack. It is highly recommended that you run a thorough virus scan and eliminate the chances of having a malicious file in your system.
What to do if UsoClient.exe file in your machine is not malicious?
If you have figured out that the UsoClient.exe file that you have in your machine is not malicious, but still want to get rid of the annoying popup that comes up every time you boot your system up, you might want to disable it instead of trying to delete it, as this is a system file. Though it is not recommended to disable this task as it is plays a crucial role in checking for latest Windows updates automatically, if you want to disable it, you can always do it just by following the simple methods listed below.
Method 1: Disable UsoClient.exe via Task Scheduler
One simple method to disable the UsoClient.exe would be through Windows Task Scheduler. But since it is this very task that keeps the Windows Update component informed with all the latest Windows updates available, if the UsoClient.exe popup issue is not really pestering you, it is better not to disable this task. However, if you still want to go ahead with disabling it, follow the steps below:
1. Bring up the Run dialog box by pressing the keys WIN + R together. Once the Run window opens up, type in taskshcd.msc and then hit the Enter key.
2. Task Scheduler window would now be open in front of you. In the left window pane, expand the arrows and navigate to the following path:
Task Scheduler --> Task Scheduler Library --> Microsoft --> Windows
3. Now under the Windows section, in the left window pane, scroll all the way down and click on the section that says UpdateOrchestrator. In the right window pane, you will now see a task that is named Schedule Scan. Right click on it and then click on the Disable option.
4. You can now close the Task Scheduler window. Restart your machine. Check if UsoClient.exe popup issue is still present or not.
If you want to revert the changes, repeat step 3, but instead of Disable option, choose the Enable option.
Method 2: Disable UsoClient.exe Via Group Policy Editor
If you’re using Windows 10 Pro or Education or Enterprise Edition version, then this method will work for you. But if you’re using Windows Home version, then you can skip this method and try out the next method. Follow the steps below to disable UsoClient.exe through Windows Group Policy Editor.
1. Press WIN + R keys together and bring up the Run window. Once it comes up, type in gpedit.msc and then press Enter key.
2. Once the Local Group Policy Editor window opens up, navigate to the below location:
Local Computer Policy --> Computer Configuration --> Administrative Templates --> Windows Components --> Windows Update
Now click on the Windows Update folder in the left window pane, and in the right window pane, locate and double click on the group policy that is named No auto-restart with logged on users for scheduled automatic updates installations.
3. Now you will have the Edit window corresponding to the group policy No auto-restart with logged on users for scheduled automatic updates installations. Click on the radio button corresponding to the option Enabled.
4. As next, once you are all set, click on the Apply button followed by the OK button. You can now close the Group Policy Editor window and then restart your PC. Check if your issue has been resolved or not.
Method 3: Disable UsoClient.exe Via Registry Editor
If the above 2 methods were not successful for you, you can try performing a small registry tweak to solve the issue of UsoClient.exe command prompt popup from bothering you again. Even though the following steps are safe to execute if done correctly, it is always recommended to take a back up of your windows registry before making any changes to it as a corrupted registry memory can cause serious system issues.
1. Press WIN + R keys together and launch the Run dialog box. As next, type in regedit in the run command box and hit Enter key.
2. When the Registry Editor window opens up, navigate to the following location from the left window pane.
HKEY_LOCAL_MACHINE\SOFTWARE\Policies\Microsoft\Windows\WindowsUpdate\AU
Once you’re at the above location, make sure the path is correct and then click on the AU folder as shown in the screenshot below:
3. As next, right click on an empty spot in the right window pane and click on New option. And then click on DWORD (32-bit) Value.
4. Once the new DWORD value is created, click on it and press F2 key to rename it. Name the new DWORD value as NoAutoRebootWithLoggedOnUsers. Now double click on the newly created value to open its Edit window. Set the Value data field to 1.
5. Close the Registry Editor window and Restart your machine. Check if your issue is resolved.
If you ever want to revert the registry tweak that you have just done, you can always repeat the same steps, but instead of setting the value of NoAutoRebootWithLoggedOnUsers as 1, set it to 0 if you are reverting.
Please tell us in comments which method worked for you.


