System Volume Information is the folder in your Windows 11 / Windows 10 computer that contains the necessary information for recovery tools like System Restore, Reset or refresh feature. While trying a system restore some users have seen an error message popping out of nowhere – ‘C:\System Volume Information is not accessible – Access Denied‘. If you are facing this issue, then there is some problem with the permission of the System Volume Information folder.
Fix 1 – Modify Icacls for your account
Integrity Control Access Control List (Icacls) contains the file/folder access information.
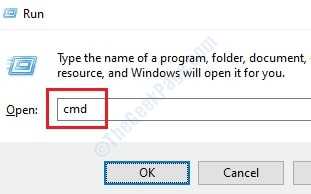
1. Right-click on the Windows icon and then click on “Run“.
2. After that, type “cmd” and press the Ctrl+Shift+Enter together.

3. When the Command Prompt window appears on your screen, copy-paste and modify this code. Finally, hit Enter.
icacls "C:\system volume information" /grant AccountName:F
NOTE– Replace the “AccountName” with the account name you are using on your system.
Example – Like, as the account name of this system is Sambit, the code will be –
icacls "C:\system volume information" /grant Sambit:F

4. Once you have done this, you have to reset the settings for all the sub-directories. Execute this code on your system.
icacls "C:\system volume information" /grant AccountName:F /t
NOTE– Just like the previous command, modify the ‘AccountName’ as the account name of your system.
icacls "C:\system volume information" /grant Sambit:F /t

Close the Command Prompt window. Restart your computer and after that try to access the System Volume Information.
NOTE– If you feel that you want to reset the changes on your system, you have to execute these codes.
1. Open the Command Prompt window.
2. When the terminal opens up, type and modify these codes. Press Enter to execute these codes one-by-one.
icacls "C:\system volume information" /remove AccountName /t

icacls "C:\system volume information" /remove AccountName

Once you have executed these codes, all the changes will be undone.
Fix 2 – Modify the access of System Volume Information
Modify the access of the System Volume Information folder.
STEP – 1 View hidden folders
1.Press the Windows key+E keys.
2. After that, in the File Explorer window, click on “View“.
3. Then click on “Options“.

4. When the Folder Options window appears, click on the “View” tab.
5. Here you need to check the option “Show hidden files, folders and drives“.

6. To view the hidden items, click on “Apply” and then on “OK“.

You can see the hidden items in your folder.
STEP – 2 Adjust Permission
You have to adjust the advanced permission of the System Volume Information folder.
1. Open the File Explorer window.
2. After that, go to this location-
C:/System Volume Information
Then, right-click on the “System Volume Information” and click on “Properties“.

3. You have to click on the “Security” tab.
4. Then, click on “Advanced“.

5. Once the Advanced Security settings appear, click on the “Change” option beside the ‘Owner:‘.
![]()
6. After that, click on “Advanced…“.

7. Next, you need to click on “Find Now“.
8. Then, click on the “Administrators“.
9. After that, click on “OK“.

10. Again, click on “OK” to save this.

11. In the next step, you need to check the option “Replace owner on subcontainers and objects“.

12. Getting back to the Advanced Security settings, click on “Apply“.
13. A message will appear on your screen. Click on “OK“.

14. Click on “Apply” and “OK“.
The Advanced Security settings will close.
Further, try to access the System Volume Information folder on your computer.
NOTE–
If you are facing trouble to run the System Restore on your system, follow these steps-
1. Again, right-click on the “System Volume Information” and then click on “Properties“.

2. Then, you have to click on the “Security” tab.
3. Then, click on “Advanced“.

4. When the Advanced Settings window, click on “Add“.

5. After that, click on “Select a principal“.

6. Then, type “SYSTEM“.
7. Click on “Check Names“. Click on “OK“.

8. As the next step, check the box beside the option “Full control“.
9. Finally, click on “OK“*.

Once you have saved the settings, close the Security settings window.
Restart your system once and further try to access the System Volume Information folder once more.
*NOTE–
If you encounter any error message or any warning prompt, just click on “OK“.

Your problem should be solved.