Many people nowadays use a variety of fonts, as well as various symbols and emojis, to make their content more appealing. As a result, people prefer to download a large number of fonts onto the system, which slows it down and isn’t always required.
However, clearing / uninstalling all the fonts that aren’t used very often is a good idea every now and again.
Please read this page, which describes how to remove certain fonts from the system.
NOTE: Administrative credentials are required for this. If you are signed in as a user, you may require administrator credentials, and this change will affect all users on the system.
How to Uninstall Fonts for in Windows 11 via Settings app
1. Go to the desktop by pressing Windows + D keys together on the keyboard.
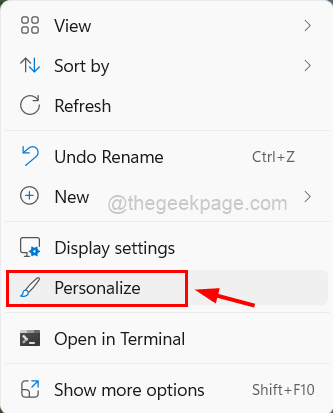
2. Right-click anywhere on the empty space on the desktop and select Personalize option from the context menu as shown below.

3. This will take you to the Personalization page on the system.
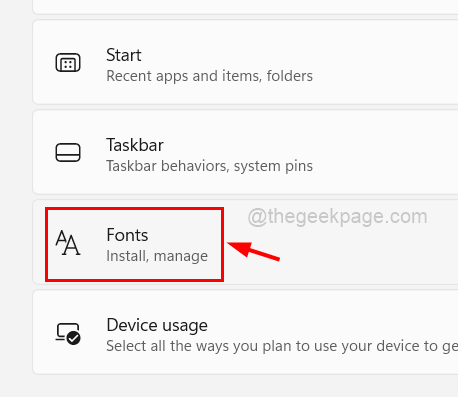
4. Next, scroll down and click on Fonts at the bottom as shown below.

5. On the fonts page, all the fonts that are installed and available will be listed down.
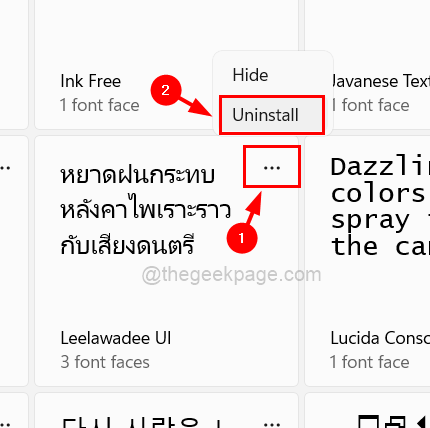
6. To uninstall the font, click on three horizontal dots (show more options) on the font.
7. Then, click on Uninstall button from the list as shown below.
NOTE: Make sure the fonts that you are going to uninstall, are not used by other programs (Word or notepad, etc.)

8. This will uninstall the font you wished.
9. This way you can uninstall all the fonts you want to, one by one.
10. After you are done, close the Fonts page.
This is how you can uninstall the fonts from the windows 11 system.
How to Uninstall Fonts in Windows 11 via Control Panel
1. Open the Control panel by typing control in the run command box (Press Windows + R keys together).
2. Hit the Enter key.

3. In the Control Panel, make sure to select Large icons from View by dropdown list.
4. Then, click on Fonts to open it.

5. It will display all the fonts that are installed on the system.
6. Press the CTRL key and click all the fonts that you wish to uninstall and click the Delete button at the top as shown in the below screenshot.

7. Once done, close the Control Panel window.
How to Uninstall Fonts in Windows 11 via File Explorer
1. Press Windows + E keys together to open File Explorer on the system.
2. In the file explorer, type C:\Windows\Fonts in the address bar and hit Enter key.
3. This opens up the fonts folder.
4. Then, select all the fonts that you wanna uninstall and tap on delete as shown in the below screenshot.

5. Close the file explorer after it’s done.