Most of the laptops nowadays have built-in wi-fi network adapter in them which helps users access the internet signal via wi-fi router that is connected to the internet. It is always recommended to turn the wi-fi off when not in use to enhance the performance of wi-fi on your laptop. Sometimes if your internet speed gets low, then as a part of troubleshoot you usually restart your modem router once. Along with restarting router, it is also better to turn on / off the wi-fi on your system. In this article we are going to show you how to turn your Wi-Fi ON / OFF on your windows 11 system in many ways.
Method 1: From Action Center
Step 1: Open Action Center
Press Win + A keys together on your keyboard.
Step 2: In the Action Center
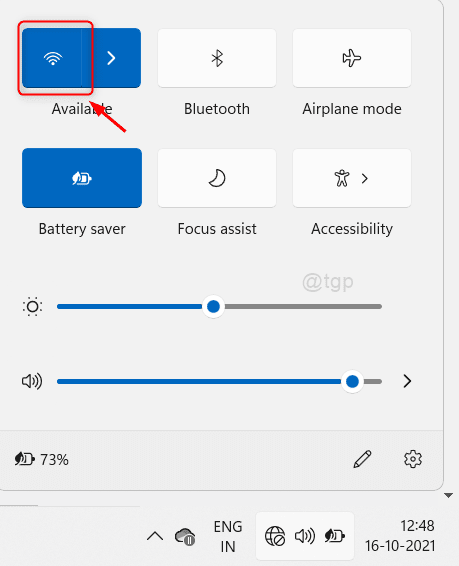
Click on Wi-fi icon on the top left corner as shown below.
This turns on / off the wi-fi when you click on it.

Method 2: Enable / Disable Wi-Fi from Control Panel
Step 1: Open Control Panel
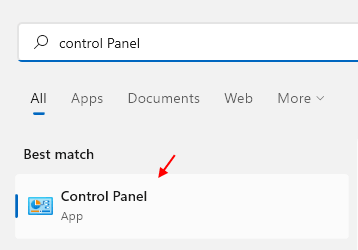
Press Win key on your keyboard and type control panel.
Hit Enter key.

Step 2: In the Control Panel window
Navigate to Network and Internet > Network and Sharing Center.
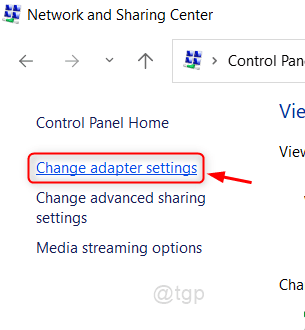
Then, Click on Change adapter settings as shown below.

Step 3: To Disable Wi-Fi
Right Click on Wi-Fi and Click Disable from the menu.

Step 4: To Enable Wi-fi
Right-Click on Wi-fi and select Enable from the list.

This way you can enable / disable the Wi-Fi on your laptop.
Method 3: Enable / Disable Wi-Fi from Device Manager
Step 1: Open Device Manager
Press Win + X keys together on your keyboard.
Click Device Manager from the list.

Step 2: In Device Manager window
To Enable Wi-Fi, Go to Network adapters and Right Click on Network adapter that has been installed on your laptop.
Select Enable device from the context menu as shown below.

To Disable the Wi-Fi, Go to Network adapters and Right Click on Network adapter that has been installed on your laptop.
Select Disable device from the context menu as shown below.

By this method, you can enable / disable the Wi-Fi on your system.
Method 4: Enable / Disable Wi-Fi using PowerShell application
Step 1: Open PowerShell application
Press Win key on your keyboard and type powershell.
Right Click on the PowerShell application from the search results.
Then, Click Run as administrator from the context menu.

Step 2: In the PowerShell window
Type netsh interface show interface and hit Enter key to see all the network cards installed on your system.
Then, To Enable the Wi-Fi
Type netsh interface set interface Wi-Fi enable and hit Enter key.

To Disable the Wi-Fi,
Type netsh interface set interface Wi-Fi disable and hit Enter key.

This way you can enable / disable the Wi-fi on your system.
Method 5: From Settings app
Step 1: Open Settings app
Press Win + I keys together on your keyboard.
Hit Enter key.
Step 2: In the Settings app
Go to Network & internet and Click on Wi-Fi toggle button to turn it on / off as shown below.

This method turns Wi-Fi on / off on your laptop.
Method 6: From Advanced network settings
Step 1: Open Advanced network settings
Press Win + I keys together on your keyboard.
Then, Click on Network & internet > Advanced network settings as shown below.

Step 2: In the Advanced network settings window
To enable Wi-Fi, Click on Enable button as shown below.

To disable Wi-Fi, Click on Disable button as shown below.

This allows you to enable / disable wi-fi on your windows 11 system.
That’s all folks!
Hope this article was informative and let us know which method you liked by leaving comments below.
Thank you for reading this article.