Activity History is one amazing feature in Windows 11, which keeps track of almost everything you do on your system like on the websites you browse, the applications you use, the files you open, etc. Activity history usually gets stored in your local machine and the admin can view them. If you have a Microsoft account linked to your account and that same Microsoft account is used in other devices as well, your activity history will be shared across all those devices to make sure you feel like you are working in one machine rather than in many. Activity history is a great feature and is considered very useful by many Windows users.
But do all of us like privacy invasions and getting all our activities stored somewhere for others to see? Read on, to learn how you can easily turn off the Activity History feature in Windows 11.
Method 1: Turn Off Activity History from Settings App
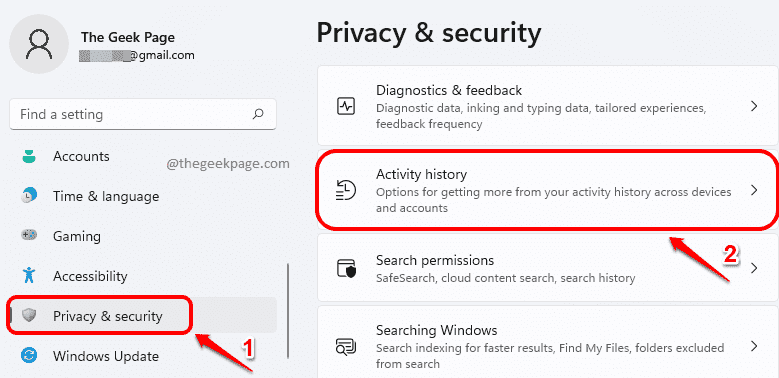
Step 1: Press Win + I keys together to launch the Settings app.
In the left window pane, click on the Privacy & security tab, and in the right window pane, click on Activity history.
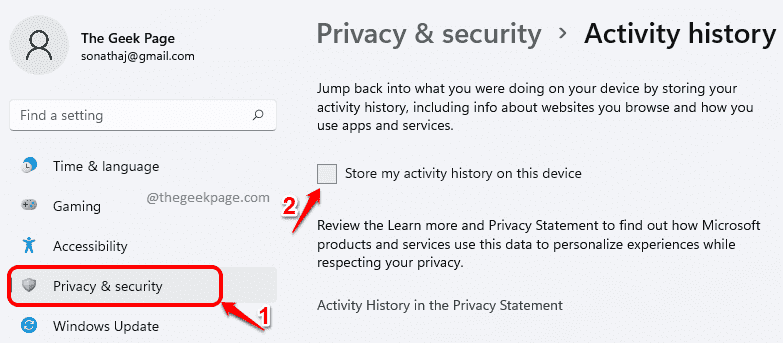
Step 2: On the next page, scroll down and find the checkbox corresponding to Store my activity history on this device.
Make sure this checkbox is unchecked.
That’s it. Your activity history is now successfully turned off.
Method 2: Turn Off Activity History Through Local Group Policy Editor
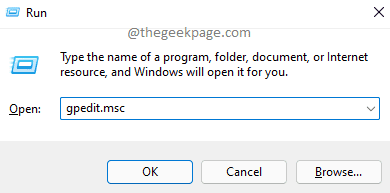
Step 1: Launch the Run window by pressing the Win and R keys together.
Type in gpedit.msc and hit the Enter key to launch Local Group Policy Editor.
Step 2: In the Local Group Policy Editor window, navigate to the following folder by double-clicking on each folder on the way.
Computer Configuration --> Administrative Templates --> System --> OS Policies
After that, on the right side of the OS Policies, click on the setting Allow publishing of User Activities.
Step 3: As next, choose the radio button corresponding to Disabled, hit Apply button, and then the OK button.
Method 3: Turn Off Activity History from Registry Editor
Step 1: Press the keys Win + R together to launch the Run window. Type in regedit and hit the Enter key.
Step 2: In the registry editor navigation bar, copy & paste the following URL and hit Enter key.
Computer\HKEY_LOCAL_MACHINE\SOFTWARE\Policies\Microsoft\Windows\System
Now make sure the System folder is selected by clicking on it.
On the right side of the window, right-click on an empty space, click on New and then click on DWORD (32-bit) Value.
Step 3: Right-click on the newly created DWORD value and then click on the Rename option.
Step 4: Give the newly created DWORD value’s name as PublishUserActivities.
Once renamed, double click on PublishUserActivities to edit it. In the Value data field, give value as 1 and hit the OK button.
That’s it. Activity history should now be turned off in your system. Hope you found the article useful.


