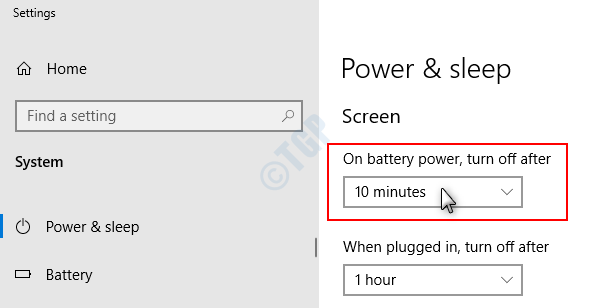
As we know , the Screen turns off automatically when the system is in idle state for certain amount of time. It would turn ON when any action (Mouse, Keyboard Click/hovers ) is detected.
For some reason , if you want to increase or decrease the waiting time, Windows provides you an option to set the the time interval. If it sees that the system is in idle state for this duration of time, it turns off the display. You have an option to set this time interval,
- When the system is on battery power
- When the system is Plugged ON
In this article , let us see different ways of doing this.
Method 1: From Settings
Step 1: Open Run window using the shortcut Windows+r.
Step 2: Type the command ms-settings:powersleep and Press OK

Step 3: In the Settings –> Power & Sleep Window that opens, Under Screen Section
Choose the time interval under On battery power, turn off after section
1. Click anywhere on the box.

2. A menu pops up with different time intervals, click on the time interval of your choice.

Choose the time interval under When plugged in, turn off after section
1. Click anywhere on the box.

2. A menu pops up with different time intervals, click on the time interval of your choice.

That’s it. The Selected time interval is set and the display turns off automatically if the system is inactive for set time interval.
NOTE:
For desktops which do not have battery power , you see only one option.
Method 2: From Control Panel –> Power Plan Settings
Step 1: Open Run window pressing the keys Windows+r together.
Step 2: Type the command control /name Microsoft.PowerOptions and Press OK

Step 3: From the Power Options Window, select Choose when to turn off the display from the right-hand side.

Step 4 : In the appearing window, Under Turn Off the display heading
Choose the time interval under On battery
- Click anywhere on the box , a drop down menu appears
- Click on the required time interval

Choose the time interval under Plugged in
- Click anywhere on the box , a drop down menu appears
- Click on the required time interval

NOTE:
For desktops which do not have battery power , you see only one option.
Method 3: From Advanced Power Plan Settings
Step 1: To Open Run window, press the keys Windows+r together.
Step 2: Type the command control.exe powercfg.cpl,,3 and Press OK as shown below

Step 3: In the Power Options window , scroll down and locate Display option.
1. Double click on Display to expand and look at the options.
2. Double click on Turn off display after
NOTE: In order to expand, you can even opt to click on + sign just before to Display or Turn off display after

Choose the time interval for On battery option
- Click on On battery
- Select the required time interval
- Click on Apply
- Press OK

Choose the time interval for Plugged in option
- Click on Plugged in
- Select the required time interval
- Click on Apply
- Press OK

NOTE:
For desktops which do not have battery power , you see only one option.
Method 4: From Command Prompt
Step 1: By holding Windows+r keys together, open the run window
Step 2: In the window that opens up , type cmd and press OK

Step 3: In the command Prompt window,
To change the value of Turn off Display after on battery, run the following command
powercfg -change -monitor-timeout-dc <time interval in minutes>
For example , if we want the PC to turn off its display if it detects inactivity for 15 minutes when it is running on Battery, we can tweak the command as follows
powercfg -change -monitor-timeout-dc 15

NOTE:
You can also use the following command to make the changes :
powercfg /SETDCVALUEINDEX SCHEME_CURRENT SUB_VIDEO VIDEOIDLE <time interval in seconds>
For Example, if we want to set the time interval as 30 minutes(1800 seconds) , we can do so with the following command
powercfg /SETDCVALUEINDEX SCHEME_CURRENT SUB_VIDEO VIDEOIDLE 1800

Another way of issuing the same command would be:
powercfg /SETACVALUEINDEX SCHEME_CURRENT 7516b95f-f776-4464-8c53-06167f40cc99 3c0bc021-c8a8-4e07-a973-6b14cbcb2b7e <time interval in seconds>
For Example, if we want to set the time interval as 30 minutes(1800 seconds) , we can do so with the following command
powercfg /SETACVALUEINDEX SCHEME_CURRENT 7516b95f-f776-4464-8c53-06167f40cc99 3c0bc021-c8a8-4e07-a973-6b14cbcb2b7e 1800
To change the value of Turn off Display after when its Plugged in, run the following command
powercfg -change -monitor-timeout-ac <time interval in minutes>
For example , if we want the PC to turn off its display if it detects inactivity for 15 minutes when it is plugged in, we can tweak the command as follows
powercfg -change -monitor-timeout-ac 15

NOTE:
You can also use the following command to make the changes :
powercfg /SETACVALUEINDEX SCHEME_CURRENT SUB_VIDEO VIDEOIDLE <time interval in seconds>
For Example, if we want to set the time interval as 30 minutes(1800 seconds) , we can do so with the following command
powercfg /SETACVALUEINDEX SCHEME_CURRENT SUB_VIDEO VIDEOIDLE 1800

Another way of issuing the same command would be:
powercfg /SETACVALUEINDEX SCHEME_CURRENT 7516b95f-f776-4464-8c53-06167f40cc99 3c0bc021-c8a8-4e07-a973-6b14cbcb2b7e <time interval in seconds>
For Example, if we want to set the time interval as 30 minutes(1800 seconds) , we can do so with the following command
powercfg /SETACVALUEINDEX SCHEME_CURRENT 7516b95f-f776-4464-8c53-06167f40cc99 3c0bc021-c8a8-4e07-a973-6b14cbcb2b7e 1800
Method 5: From PowerShell
Step 1: By holding the keys Windows+r together, open the run window
Step 2: In the window that opens up , type powershell and press OK

Step 3: In the PowerShell window , run the same commands as in Step 3 from Method 4.
The powercfg commands that were used in command prompt can be used in PowerShell as well.
That’s All. Thank you for Reading.