Using an USB device as a storage device for storing media and files is a common practice among PC users. All you need to do is to simply plug it in and start transferring media files or documents to and fro. While it’s supposed to be an easy process, some times, you may experience unexpected errors like “This device is currently in use” preventing you from removing the device safely.
The error message suggests you to close any programs or windows that might be using the device, while that’s not the case at all. This can be a tricky situation especially when you are in the mid of some important work and you need to rush. Fortunately, we can offer you 3 ways to fix “This device is currently in use“ USB error in your Windows 10 PC. Let’s see how.
Method 1 – Using Computer management
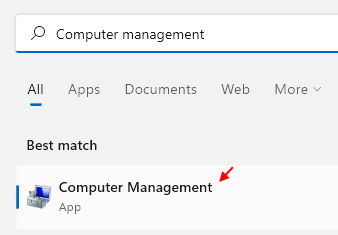
1 – Search Computer management in Windows search box and then click on the search result you get.

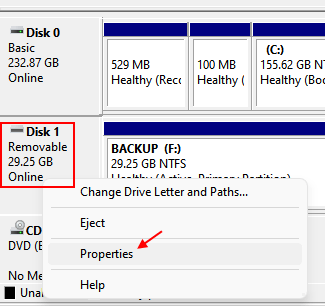
2 – Now, Once it opens up, Locate your USB Disk (Identify it with letter / Size ) . Right click and Choose properties.

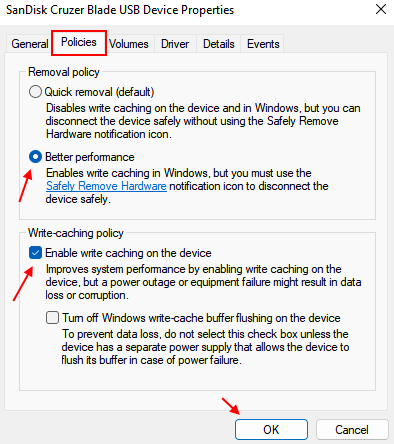
3 – Click on Policies Tab.
4 – Now, select Better performance.
5 – Now, Check Option Enable Write caching on the device.
6 – Click OK.
7 – Restart your Computer.

Method 2: By Restarting Windows Explorer
Step 1: Right-click on Start and select Task Manager from the menu.

Step 2: In the Task Manager window, under the Processes tab, locate Windows Explorer.
Right-click on it and select End task from the right-click menu.
*Note – Since I have two of them open in my Task Manager, I would close both one by one.

Step 3: Now that its successfully stopped, we would need to restart the Windows Explorer.
In the Task Manager window, go to the File tab on the upper left and select Run new task.

Step 4: In the Create new task pop-up, type explorer.exe in the search field and hit Enter.

Step 5: This will restart the Windows Explorer and your USB error should be gone now. You can now remove your USB device safely.
To eject the USB device safely, go to the bottom right of the Taskbar, expand the arrow (show hidden icons) to open the system tray. Right-click on the USB device icon and select Eject Cruzer Blade.

Step 6: You will now see a message stating “Safe to Remove Hardware“.
Simply pull out the pen drive and you are done.

However, if this doesn’t work, move over to the next method.
Method 3: Through Device Manager
Step 1: Press the Win + X keys together on your keyboard and select Device Manager from the menu.

Step 2: In the Device Manager window, locate Universal Serial Bus controllers towards the bottom.
Expand the device and select USB Mass Storage Device. Right-click on it and select Uninstall device.
*Note – When you see the error, you will see a yellow triangle next to the USB Mass Storage Device. This means that there is a problem with the storage device.

Exit Device Manager and restart your PC. Now, try removing your USB device safely once again and it should eject easily.
But, if you are still seeing the same error, you can follow the next method.
Method 4: Through Devices and Printers in Control Panel
Step 1: Go to Start and type Control Panel in the Windows search box.

Step 2: Click on the result to open the Control Panel window.

Step 3: In the Control Panel window, go to View by and select Large icons from the drop-down.
Then click to open Devices and Printers.

Step 4: Next, under Devices, find your USB device. Right-click on it and select Remove device.

Step 5: In the Remove Device pop-up, select Yes to complete the action.

That’s all. The USB device is now removed from the PC and you should not see the error anymore.