Windows automatically installs most drivers for your device and doesn’t need user interference. But, while manually updating a particular driver using the Device Manager, you may see the “Windows found drivers for your device but encountered an error while attempting to install it.” Usually, this occurs when Windows finds an incompatible driver for a particular device that you have just plugged into your system.
Workaround –
One of the quickest ways to fix the issue is to reboot the system. Once you have restarted the system, try to update the device driver once more.
Fix 1 – Manually update the driver
You can manually update the driver using the Device Manager.
Method 1
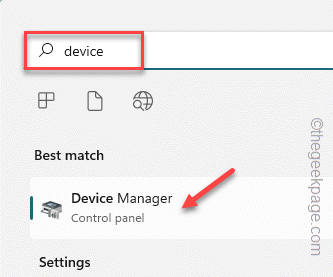
1. Press the Win key and write “device“.
2. Next, when you see the “Device Manager” in the search results, tap it.
3. When you see that the Device Manager has opened up, go to the problematic device driver.
4. Now, right-tap that device and click “Update driver“.
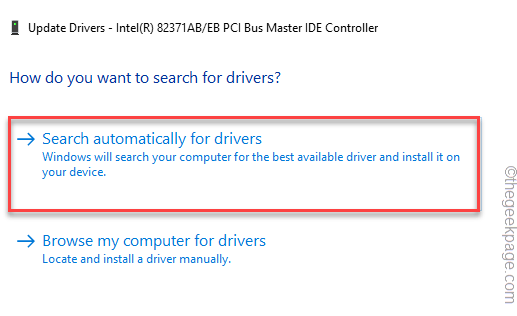
5. After that, click on the “Search automatically for drivers” option to let Windows itself perform a search through your system for the best available driver for this device and install it.
If this results in the same error message, follow the second method.
Method 2
Try this approach if the previous one has failed to fix the issue.
1. Open the Device Manager and go to the device driver again.
2. Now, right-click the driver and tap “Update driver” once more.
3. But, this time, choose the second option “Browse my computer for drivers.“.
4. On the next page, paste this address in the “Search for drivers in this location” box.
C:\Windows\WinSxS
5. Then, click “Next“.
Windows will perform a search in the WinSxS folder (this folder contains all the device drivers locally) and install the most appropriate one.
Once the driver is updated, you may close the Device Manager page and then, restart your system.
Otherwise, if the same error message re-surfaces once more, go for the next registry method.
Fix 2 – Follow the registry method
There is a registry value that may be affecting the driver installation process.
Step 1
You have to know the hardware ID of that problematic device driver.
1. Press the Win key+R keys together.
2. Then, type this and click “OK” to open the Device Manager on your device.
devmgmt.msc
3. Now, right-tap the device driver and further click on “Properties“.
4. Go to the “Details” tab.
5. Here, you will find different parameters of ‘Property’. Choose the “Class Guid” from the drop-down menu.
6. You can find a Value. Carefully note down this value.
Once you have noted the value, you may minimize the Device Manager screen.
Step 2
1. Click on the search icon beside the Windows icon to invoke the search box.
2. Here, write “registry“. Next, click on “Registry Editor” to access it.
NOTE –
This fix is quite advanced as you are supposed to locate the Class Guid of the device driver in the Registry Editor and remove a value. It is strongly recommended that you create a registry backup before you do anything. These are the steps to do so –
A. After opening the utility, click on the “File” on the menu bar and click on “Export“.
B. Now, name the backup anything you want and save it in a discrete location on your system.
3. When you have taken the backup, go to this key location –
Computer\HKEY_LOCAL_MACHINE\SYSTEM\CurrentControlSet\Control\Class
4. Now, scroll down slowly through the left-hand pane and look for that particular Class Guid value that you have noted on the Device Manager page.
5. Once you have found the exact match, select that key.
6. On the right-hand pane, look for the “UpperFilters” or “LowerFilters” multi-string value.
7. If you can see any such value and tap “Delete“.
8. You’ll be warned with a prompt. Tap “Yes” to confirm your step.
Once you have removed the value, restart the machine.
Once the device reboots up, go to the Device Manager and check that driver again. This time, it won’t through up any error message.
Fix 3 – Uninstall and reinstall the drivers
If directly updating the driver doesn’t work, try uninstalling the faulty one and reinstalling it.
1. Press the Win key+X key combination to call up the context menu.
2. Then, tap “Device Manager” to access the Device Manager page.
3. On the Device Manager page, reach the problematic driver.
4. Now, right-tap it and click “Uninstall device” to uninstall it from your system.
5. Next, click “Uninstall” to confirm the uninstallation.
Once you have uninstalled it, you should close the Device Manager.
After that, restart your computer. During the system startup, Windows will find the default driver for the device. This way, it should just work fine.
Fix 4 – Use the Hardware and Devices Troubleshooter
You can utilize the Hardware and Devices troubleshooter to fix the issue.
1. Press the Win key+R keys together.
2. Next, write down this line in the Run box and click on “OK“.
msdt.exe -id DeviceDiagnostic
This will open up the Hardware and Devices page.
4. You can find the “Advanced” option in the bottom left corner. Click it once.
Now, just follow the on-screen steps to fix the problem. Test if this works for you.
Fix 5 – Give full control to TrustedInstaller
Trustedinstaller needs to have full control to complete the installation process.
1. Open the Run window by pressing the Windows key+R keys together.
2. Then, write this address and click “OK“.
C:/Windows/
3. Now, check if you can find the “System32” folder.
4. Then, right-tap the “System32” and click “Properties“.
5. When you have access to the Properties page, go to the “Security” tab and click on the “Edit…” option.
6. Now, select the “TrustedInstaller” group.
7. Next, you have to just check the “Allow” box beside the “Full control” box.
8. After that, tap “Apply” and “OK“.
9. Now, once you come back to the main Windows folder, locate the “SysWOW64” folder.
10. Just repeat the same steps (Step 4 to Step 8) on the “SysWOW64” folder to give TrustedInstaller folder the full control.
Once you have given full control to the TrustedInstaller, you can easily install the driver.
Open the Device Manager and try it once again. Your problem should be solved.


