Are you facing any trouble running any of the applications on Windows? Does running any application gives you the error “This App Does Not Support The Contract Specified”? This might be due to a recent update of Windows, any changes in the settings, or you may need to apply the latest update, etc. In this article, we will see the different methods that can be used to solve this issue. Let us start!
Method 1: Disable VPN And Proxy
If you are using VPN, this might be one of the reasons for the error because specific region apps are not accessible or will have restrictions, so disable the VPN and then check if it works.
Disable VPN
Step 1: Open the Windows Settings using Windows + I keys together and click on Network & Internet
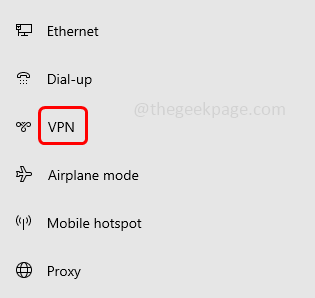
Step 2: On the left side click on VPN
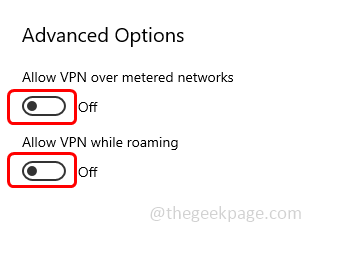
Step 3: On the right side under advanced options, disable the options “Allow VPN over metered networks” and “Allow VPN while roaming” by clicking on the toggle bar below them
Disable Proxy
Step 1: Open the Windows Settings using Windows + I keys together and click on Network & Internet
Step 2: On the left side click on Proxy
Step 3: Disable the options “Automatically detect settings“, “Use setup script” and “Use a proxy server” which is on the right side by clicking on the toggle bar
Now check if the issue is resolved.
Method 2: Change The Owner And Its Permissions In WindowsApps
Step 1: Open the File Explorer using Windows + I keys together and click on This PC on the left.
Step 2: Double click on the C: drive
Step 3: Double click on the Program Files
Step 4: To display all the hidden files, click on the view tab at the top and select the checkbox beside Hidden items
Step 5: Right-click on the Windows Apps and from the appeared list click on Properties
Step 6: In the opened WindowsApps properties go to the Security tab and click on Advanced
Step 7: Click on the Change option at the top
Step 8: Type the correct username in the “Enter the object name to select” section then click on OK
Step 9: Make sure the entered username is displayed in the Permission entries section.
Step 10: Enable “Replace owner on subcontainers and objects” by clicking on the checkbox beside it
Step 11: To save the changes click on Apply and OK
Step 12: It will take some time to change the permission, once done there appears a pop-up click on ok.
Step 13: Again the rest of the opened windows click on Ok and exit from the window
Step 14: Restart the computer and check if the issue is solved.
Method 3: Disable Windows Firewall
Step 1: Open the run prompt using Windows + R keys together.
Step 2: Type control firewall.cpl and hit enter. This will open the Windows defender Firewall
Step 3: On the left click on Turn windows defender firewall on or off
Step 4: Click on the radio button beside Turn off Windows Defender Firewall (not recommended) under private network settings
Step 5: Also click on the radio button Turn off Windows Defender Firewall (not recommended) under public network settings
Step 6: Click on OK at the bottom to save the changes. Now the Firewall is disabled, check if the issue does not exist.
Method 4: Repair System Files Using DISM And SFC Commands
Step 1: Open the command prompt in administrator mode. To do that, type cmd in the windows search and hold Ctrl + Shift keys together then hit enter.
Step 2: A user account control pop up will appear, click on yes
Step 3: Execute the below commands one by one. Copy the below commands and paste it in the command prompt then hit enter.
DISM.exe /Online /Cleanup-image /Scanhealth
DISM.exe /Online /Cleanup-image /StartComponentCleanup
DISM.exe /Online /Cleanup-image /Restorehealth
Step 4: Once the execution is done, copy the below scan command and paste it in the command prompt then hit enter.
sfc /scannow
Step 5: Wait for the execution to complete. Restart the system and then check if the issue is resolved.
Method 5: Run Troubleshooter For Windows Store Apps
Step 1: Open the Windows Settings using Windows + I keys together.
Step 2: Click on Update & Security
Step 3: From the left click on Troubleshoot
Step 4: At the right, click on Additional troubleshooters
Step 4: Scroll down and select the Windows Store Apps then click on Run the troubleshooter
Step 5: It will detect if there are any problems and suggests the fix. Apply the fix if any, once done restart the system and then check if it solved.
Method 6: Update Microsoft Store Apps
Step 1: Open the run prompt using Windows + R keys together
Step 2: Type ms-windows-store: in the prompt and hit enter. This will open Microsoft Store app
Step 3: At the right side, click on the Profile then click on App settings
Step 4: Enable the App updates by clicking on the toggle bar beside it.
Step 5: So if there are any updates for the app, it will automatically get installed.
Method 7: Reset Windows Store Cache
Step 1: Open the run prompt using Windows + R keys together
Step 2: Type WSReset.exe in the run prompt and hit enter. This will reset the windows store (Microsoft store)
Step 3: An empty command prompt will appear on the display screen and wait for it to disappear.
Step 4: Microsoft store app will open by itself. Now check if the issue is solved.
Method 8: Free Up Space Using Disk Cleanup
Step 1: Open the File Explorer using Windows + I keys together and click on This PC on the left.
Step 2: Right click on the Local Disk (C:) then click on Properties
Step 3: Click on Disk Cleanup. This will calculate how much space it could free up
Step 4: In the opened window, select which files you want to clean by clicking on the checkbox beside it.
Step 5: Click on OK and wait till the clean up process is finished
Method 9: Run The Full Scan On Your System
Step 1: Open Windows Settings using Windows + I keys together
Step 2: Click on Update & Security
Step 3: On the left click on Windows Security
Step 4: From the right, click on Virus & threat protection
Step 5: Click on the Scan options under Current threats section
Step 6: Select Full scan by clicking on the radio button beside it and then click on Scan now button
Step 7: When the scan is complete all the threats will be listed if there were any. Resolve them by clicking on the Start Actions button and then if the issue is solved.
Method 10: Re-install The Problematic App
Step 1: Open Windows Settings using Windows + I keys together
Step 2: Click on Apps
Step 3: Under the Apps & features, find the problematic app and select it. Click on uninstall. For example here I am uninstalling Microsoft teams
Step 4: When the app is uninstalled, go to the Microsoft store by typing ms-windows-store: in the Run prompt (Windows + R) and hitting enter
Step 5: Search the application in the Microsoft store app you just uninstalled. To do this type the app name in the search bar and from the list of best matches click on the needed app.
Step 6: Select it and click on Install reinstall it. Now launch the app and check if the issue is solved.
Method 11: Reset The Computer
Step 1: Open the Windows Settings using Windows + I keys together
Step 2: Click on Update & Security
Step 3: From the left side click on Recovery
Step 4: Click on Get started button at the right
Step 5: A window will be appeared having two options Keep my files or Remove everything
Step 6: Select the one which meets your requirement then follow the on screen instructions to reset the PC. As an example, here I will select Keep my files. Now check if the error is solved.
That’s it! I hope this article is helpful and let us know which of the above method you applied to solve the issue. Thank you!!


