You click to open a file on your system and bang comes an error “Windows Security message: “These files can’t be opened. Your Internet security settings prevented one or more files from being opened.” You may then face the same issue with almost all files you try to open or when you try to open the set up files. This is a common issue with Windows 7 and 8, however, similar instances have also been reported in Windows 10. Some of the causes that trigger this issue are, when the downloaded file gets blocked by download checker of IE, gets blocked by the Windows piracy protection feature, User Account Control blocks the the file, by an Internet Explore setting, or because of an issue in the Windows account profile. The good news is, “These files can’t be opened” error in Windows 10 can be fixed. Let’s see how.
Method 1: Reduce the Security Level of Unsafe Applications in Internet Properties
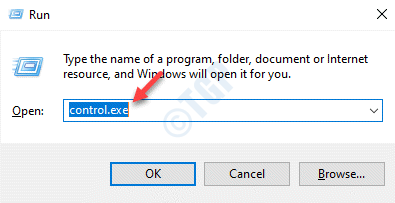
Step 1: Press the Win + R keys together on your keyboard to open Run command.
Step 2: In the Run command search box, type INETCPL.CPL and hit Enter to open the Control Panel window.

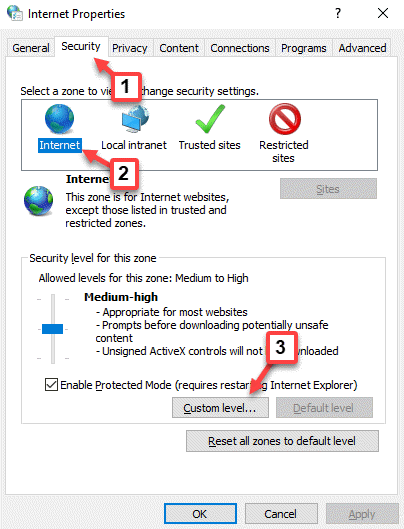
Step 3: In the Internet Properties dialogue box that opens, go to the Security tab and click on Internet (globe icon).
Now, click on the Custom level button at the bottom.

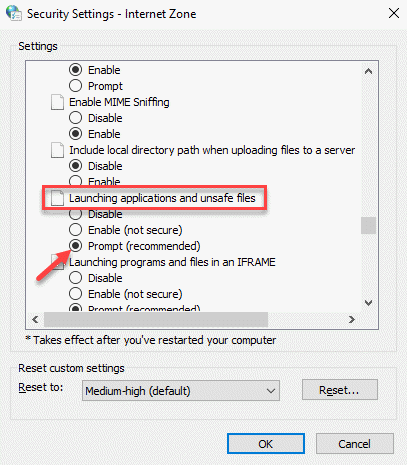
Step 4: In the next window, under the Settings list, scroll down and locate Launching applications and unsafe files.
Now, select the radio button next to Prompt (recommended).
Press OK to save the changes and go back to Internet Properties window.

Step 5: Next, click on Local Intranet and click on the Sites button.

Step 6: In the Local Intranet dialogue box, uncheck all the boxes and press OK to save the changes and return to Internet Properties.

Step 7: In the next window, under the Settings section, scroll down the list and locate Launching applications and unsafe files.
Select the radio button next to Prompt and click OK to save changes.
Click Yes in the prompt to confirm the change and then return to Internet Properties.

Step 8: Click on Trusted Sites and then press the Custom level button.

Step 9: In the next window, go the Settings section and look for Launching applications and unsafe files.
Select the radio button next to Prompt. Press OK to save changes and return to Internet Properties.

Step 10: Now, go back to the Internet Properties window.
Click on Restricted sites and press the Sites button below.

Step 11: If there are any Restricted sites , Just delete them and close the box.

Step 12: Next, click on the Custom level button below.

Step 13: In the next window, go to the Settings section and scroll down to find Launching applications and unsafe files in the list.
Click on the radio button next to Prompt (recommended) and press OK to save changes.
Click Yes in the prompt to confirm the action and return to Internet Properties window.

Now, press Apply and then OK in the Internet Properties window to save the changes and exit.
You can now try to open the file that was showing the error and it should now open easily without any errors showing up.
Method 2: Check if the File is Unblocked Through its Properties
Step 1: Go to file location, right-click on the file and click on Properties.

Step 2: In the Properties dialogue box, under the General tab, navigate towards Security and check the box next to Unblock.
Press Apply and then OK to save changes and exit.
*Note – If the box next to Unblock is check marked already, leave it as it is.

Now, exit the Properties window and click to open the file. You should now be able to open the file without seeing the error.
Method 3: Reset Internet Explorer
If you are using the Internet Explorer as your default browser, it could well be the reason for the error. Here’s how to fix the issue:
Step 1: Launch Internet Explorer and navigate to the top right corner of the browser.
Click on the gear icon (tools Al + X) and select Internet Options.

Step 2: In the Internet Options dialogue box, select the Advanced tab and under Reset Internet Explorer settings section, click on Reset.

Step 3: In the Reset Internet Explorer Settings prompt, uncheck the box next to Delete personal settings to keep the personal settings intact.
Click on Reset button below to proceed with the reset process.

Once the reset process is complete, reboot your PC and check if you can open the files that were showing the “These files can’t be opened” error.
Method 4: Change the File Name
Following the Method 1, if you found that the files were blocked, it could be due to the basic protection system by Windows. While it is good to have such protection on your system, sometimes it can interfere with the free applications.
To check if this the issue, right-click on the file and select Rename. Now, name it something different than it already was, save the changes and now click to open the file. It should now open easily without showing any error.
Method 5: Allow “Unsafe Files” Using Command Prompt in Admin Mode
Step 1: Right-click on the Start menu and select Run to open Run command.

Step 2: In the Run command, type cmd in the search field and press the Ctrl + Shift + Enter shortcut key on your keyboard to open the Command Prompt in Admin mode.

Step 3: In the elevated Command Prompt, run the below commands one by one and press Enter after each one:
reg add "HKCU\Software\Microsoft\Windows\CurrentVersion\Policies\Associations" /v "DefaultFileTypeRisk" /t REG_DWORD /d "1808" /f

reg add "HKCU\Software\Microsoft\Windows\CurrentVersion\Policies\Attachments" /v "SaveZoneInformation" /t REG_DWORD /d "1" /f
Step 4: Once the process is complete, exit the Command Prompt (admin) and restart your PC.
You can now try opening the file and you should not see the “These files can’t be opened” error again.
Method 6: Create a New User Account
Step 1: Press the Win + I shortcut key on your keyboard to open the Settings window.
Step 2: In the Settings window, click on Accounts.

Step 3: In the next window, go to the left side of the pane and select Family & other users.

Step 4: Now, navigate to the right side of the pane, scroll down and under the Other users section, click on Add someone else to this PC.

Step 5: In the window that pops up, under How will this person sign in, click on I don’t have this person’s sign-in information.

Step 6: In the Create account window, click on Add a user without a Microsoft account.

Step 7: In the Create a user for this PC window, create your preferred user name and password and click Next to proceed.
Follow the on-screen instructions to finish create the new user account.

Once the new account is created, log in with that account and try opening the file. The file should now open without any error.
Method 7: Important Internet Settings Key From an Admin Account
There are chances that the Registry keys of the Internet Settings have gone corrupt and hence, you see the error “These files can’t be opened” when you try to open an executable. Sometimes, creating a new user admin account, transferring the internet settings and then importing the same key back to your regular account, can resolve the issue. Let’s see how.
Step 1: Press the Win + R hotkey on your keyboard to open the Run command.
Step 2: In the Run command search box, type netplwiz and hit Enter to open the User Accounts window.

Step 3: In the User Accounts dialogue box, under the Users tab, click on the Add button.

Step 4: In the How will this person sign in window, click on Sign in without a Microsoft account option at the bottom.

Step 5: Next, click on Local account and follow the on-screen instructions to finish creating a new user account.

Step 6: Now, return to the User Accounts dialogue box, select the account that you just created and select Properties.

Step 7: In the Properties window, select the Group Membership tab and select Administrator.
Press Apply and then OK to save the changes and exit.

Step 8: Now, press the Win + R keys together on your keyboard to open Run command again.
Step 9: Write regedit in the Run command search field and hit Enter to open the Registry Editor.

Step 10: In the Registry Editor window, go to the following path:
HKEY_CURRENT_USER \ Software \ Microsoft \ Windows \ CurrentVersion \ Internet Settings
Right-click on Internet Settings and select Export.

Step 11: Select a location to save the file and which is also easy to locate.
Name the file as per your preference and add .reg in the end.

Step 12: Now, exit the Registry Editor, log out from the newly created user account and log back into the old user account (where you were facing “These files can’t be opened” error).
Step 13: Open the Run command again in the way as shown in Step 8.
Then, type regedit in the Run command search box to open Registry Editor.

Step 14: In the Registry Editor window, navigate to the below path again:
HKEY_CURRENT_USER \ Software \ Microsoft \ Windows \ CurrentVersion \ Internet Settings
Right-click on Internet Settings and select Delete to delete the entire key.

Step 15: Now, go to the location where you saved the exported key (.reg file) in Step 11. Double-click to run the key and click Yes in the UAC prompt.
Press Yes again in the next prompt to confirm the action.

Once the exported has been run, exit the Registry Editor and restart your computer. Now, try opening the file that was showing the error and it should open normally.
Method 8: Try and Run the Application as Administrator
Step 1: Go to the application with which you are facing the error, right-click on it and select Run as administrator.

Repeat this process whenever you need to open the application.
Alternatively, you can force the application to always run in admin mode using the below process:
Step 1: Right-click on the application you are experiencing the error and select Properties.

Step 2: In the Properties window, select the Compatibility tab and navigate to the Settings section.
Here, check the box next to Run this program as an administrator.
Then, click on Apply and then OK to save changes and exit.

Once you are done with this you can open the application as administrator every time you want to run it.
Method 9: Use a System Restore Point
Step 1: Right-click on Start and select Run from the menu.

Step 2: This will open the Run command box. Now, type rstrui in the search field and hit Enter to open the System Restore window.

Step 3: In the System Restore window, click Next to proceed.

Step 4: Next, check the box next to Show more restore points at the bottom and then from the list, select the restore point with a date before you started facing the error.
Click Next to proceed.

Step 5: Then click Finish to begin the system restore process. The process takes a while so, wait patiently till it’s over.
Once your PC restarts, your PC will be back to the previous state when it was working. You can now try opening the file and it should work normally.
Alternatively, you can also try removing any 3rd party antivirus from your system that may be blocking the application, or you can try moving the file to a different location. However, if none of the method works, you may want to perform a clean Windows install by creating a Windows installation media tool of Windows 10 and then using it.