Windows Overlay Filter or WOF is a driver file that manages virtual files in your computer. This component is crucial for several Windows dependencies. While looking for DISM scan failures, some users have found the “The WOF driver encountered a corruption in the compressed file’s Resource Table.” message in the DISM log file. As the error message conveys, there is data corruption in the system files. Usually, this error message is associated with the Windows Update process. So, removing the SoftwareDistribution folder should help you resolve the problem.
Fix 1 – Remove the SoftwareDistribution folder
You can remove the SoftwareDistribution folder and solve the problem on your system.
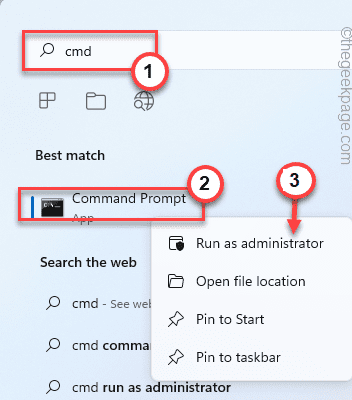
1. First of all, you have to write “cmd” in the search box.
2. After that, right-click on “Command Prompt” and choose “Run as administrator” from the context menu.
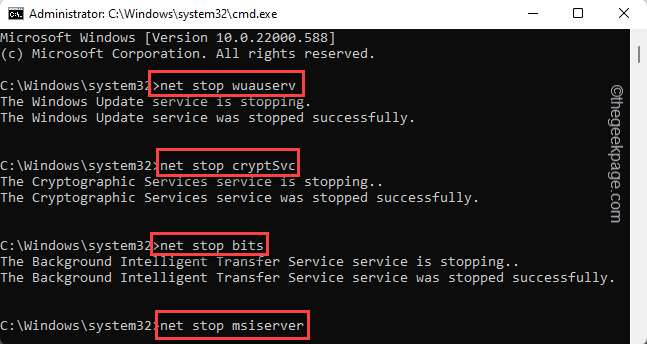
3. Now, you can easily terminate Windows Updates and other update-related services.
So, write down these commands one at a time and hit Enter to stop these four services one by one.
net stop wuauserv
net stop cryptSvc
net stop bits
net stop msiserver
4. Now, as you have stopped these services, you can easily rename the corrupted Windows Update folders.
Just execute these two commands to do that.
ren C:\Windows\SoftwareDistribution SoftwareDistribution.bak
ren C:\Windows\System32\catroot2 catroot2.bak
5. Now, once you have renamed those folders, you can easily resume those stalled update-related services.
So, copy-paste these codes and hit Enter to start these services again.
net start wuauserv
net start cryptSvc
net start bits
net start msiserver
Now, close the terminal and reboot the PC. Remember this, all these changes won’t work until you restart the machine.
After restarting the device, try to update the device and run the DISM scans. You won’t see the error message again.
Fix 2 – Use in-place Windows 11 upgrade
If you are on a Windows 11 machine, you can use the in-place upgrade system of Windows 11, where you have to download the ISO file and then use it to fix the system.
1. Go to the Windows 11 downloads center.
2. Here, go to the Download Windows 11 Disk Image (ISO) section, choose “Windows 11 (multi-edition ISO)” from the drop-down, and tap “Download” to download the ISO file.
3. Then, you have to select the language you want from a drop-down list.
4. Finally, click “Confirm” to download the ISO file on your computer.
5. Next, click on “64-bit Download” to download the file.
Wait until the file is downloaded to your computer.
After downloading the file, close the browser.
5. Now, go to the location of the ISO image file.
6. Next, double-tap the ISO to mount the image file.
7. The mounted image file will automatically open up.
8. Here, you can find the “setup.exe” application. Just double-tap this to open it.
9. It will prepare the installation media, tap the “Change how Setup downloads updates” option.
10. Then, make sure to choose the “Download updates, drivers and optional features (recommended)” option.
11. Just click “Next“.
All you have to do is patiently wait as Windows determines the version of the installed OS and download all the important update packages.
Once the process is done, tap “Restart” to restart your computer so that the installation process can take place.
Finally, when you complete the process, the problem will be gone.
Fix 3 – Run the Update troubleshooter
Try running the Windows Update troubleshooter to fix the issue.
1. Pressing the Windows key+R keys together should open the Run box.
2. Type this word and click “OK” to directly open the Troubleshooter window in Settings.
ms-settings:troubleshoot
3. On the troubleshooter page, tap “Other troubleshooters“.
4. On the same page, look for the “Windows Update” page. Tap “Run” to run the Windows Update troubleshooter.
Windows will run the windows update troubleshooter and apply the fix on your computer.
Check if this works.
Fix 4 – Run Windows 11 Update MCT
If running the Windows 11 in-place upgrades doesn’t fix your problem, you can use the Windows 11 Media Creation Tool to fix the issue.
STEP 1 – DOWNLOAD W11 MCT
You can follow these steps to down
1. At first, go to the Microsoft Software Download section.
2. Now, scroll down to the Create Windows 11 Installation Media and tap on “Download Now“.
4. Next, choose a location to save the Media Creation Tool.
5. Then, tap on “Save” to save it.
Once the downloading process is complete, close the browser.
STEP 2 – RUN the MCT
Now, you can download the Windows 11 ISO file using the MCT.
1. Open File Explorer and reach the location of the MCT file.
2. Just, double-tap the “mediacreationtool” to access it.
3. On the next screen, you can see the agreements page. Just tap “Accept” to proceed to the next step.
4. If you want you can change the “Language” and “Edition” as you want.
5. Otherwise, left the “Use the recommended options for this PC” option checked and tap “Next” to proceed.
6. Here, you have two options. You have to select the “ISO file” option.
7. After that, tap “Next” to go proceed.
Now, Windows will download the latest version of the Windows 11 ISO image.

8. When the downloading process has finished, click the downloaded ISO file to directly mount the ISO file and open it in File Explorer.

9. When the image loads up, double-tap the “setup.exe” application.
10. It will prepare the installation media. Now, tap the “Change how Setup downloads updates” option.
10. Then, make sure to choose the “Download updates, drivers, and optional features (recommended)” option.
11. Just click “Next“.
This way, the latest version of the update packages wil be installed on your computer. You won’t see the “The WOF driver encountered a corruption in the compressed file’s Resource Table.” in the DISM error log.


