While installing a new application or modifying an existing one on your computer you may face “The system administrator has set policies to prevent this installation” error message. This message appears more often when you are accessing the computer with a non-administrative account, where a system administrator has restricted installation or modification of a new application. To fix this issue simply follow these steps on your computer.
Fix-1 Use Group Policy Editor-
If the previous method didn’t work out for you, this one surely will.
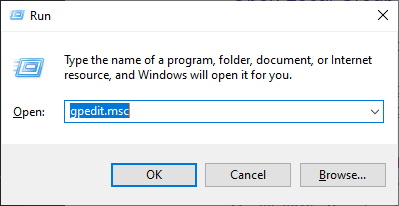
1. To launch the Run press Windows key+R keys together, and type “gpedit.msc” and hit Enter.

Local Group Policy Editor window will be opened.
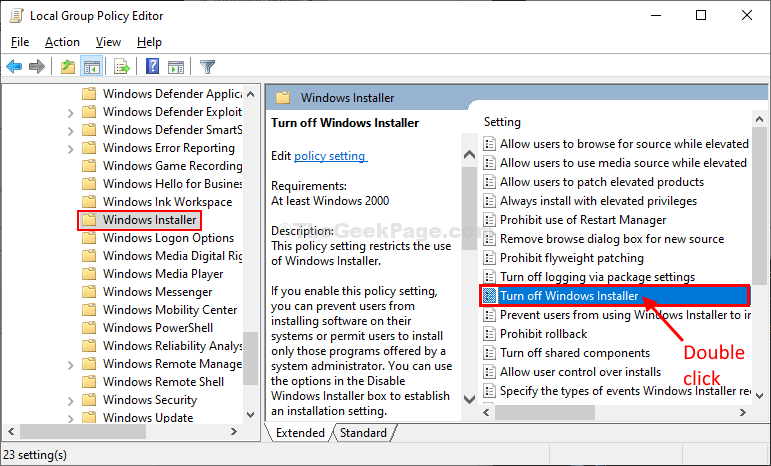
2. Now, on the left pane, visit this location-
Computer Configuration > Administrative Templates > Windows Components > Windows Installer
On the right-hand side window, scroll down and double click on “Turn off Windows Installer“.

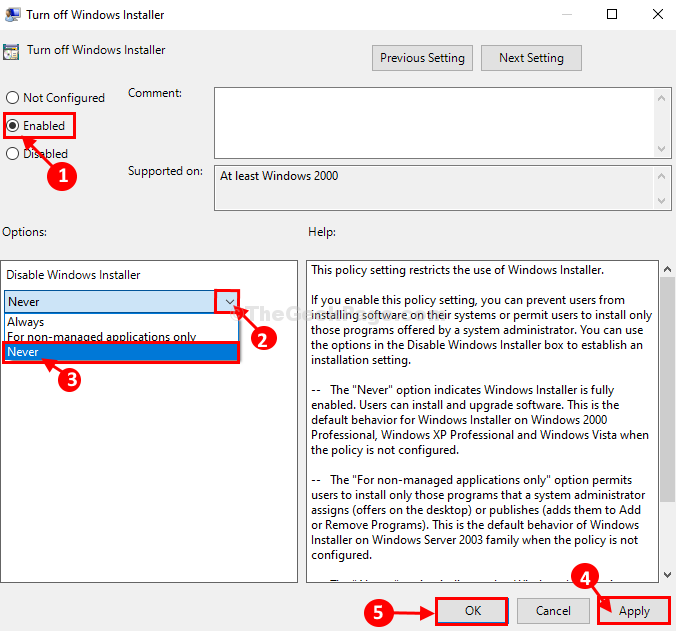
3. In Turn off Windows installer window, select the “Enabled” option.
4. Now, click on the drop-down icon in the Disable Windows Installer section and then select “Never” from the drop-down.
5. Finally, click on “Apply” and “OK” to save the changes on your computer.

6 – Now, Go to Windows Settings > Security Settings > Software Restriction Policies
7 -Right click on Software Restriction Policies and choose New Software Restriction Policies

8 – In the right side Double Click on Enforcement.
9 – Select Option All users except local administrators.
10 – Click on Apply and OK.

Close Local Group Policy Editor window on your computer.
11 – Search cmd in windows search and click on run as administrator.

12 – Now, Run the command given below.
gpupdate /force
13 -Close the cmd window.
Now, Try again.
IF it do not work, Restart PC
Fix 2 -Edit Registry keys
1- Search regedit in Taskbar search and click on registry editor to open it.

2 – Now, Go to the following path in the registry editor.
HKEY_LOCAL_MACHINE\Software\Policies\Microsoft\Windows\Installer
3- Now, in the right side Double click on DisableMSI and set its value to 0.
If there is no Installer Folder , Just create it by right clicking on Windows folder and choosing New > Key.

After that do the step 3 as shown above.
Fix-3 Set UAC to ‘Never Notify’-
Setting User Account Control (UAC) to “Never Notify” may solve this issue on your computer.
1. Click on the Search bar and then type “uac“.
2. In the elevated search result window, click on “Change User Account Control settings“.

3. When the User Account Control Settings window opens up, on the left side, slide down the bar straight to “Never Notify“.
4. After that, you have to click on “OK” to save the changes on your computer.

Once done, try to modify/ install the application again. If the problem persists go for the next fix.
Fix-4 Delete ProductName key from Registry Editor-
1. Press Windows key+S and type “regedit” and hit Enter to open the Registry Editor window.

Before you proceed further to the main process, it is better to create a registry editor backup on your computer.
In case, anything goes wrong, you can easily recover your registry.
2. In the Registry Editor window, click on “File” on the menu-bar and then click on “Export” so that you can create a backup of your registry.

3. In Registry Editor window, go this location-
HKEY_LOCAL_MACHINE\SOFTWARE\Policies\Microsoft\Windows\Installer
4. On the right-hand side of the window, check if you can find “DisableMSI” DWORD value.
5. If you see the key, then you can skip this step.
If you can’t find any key named “DisableMSI” then you have to create the key. Follow these steps to do so-
a. On the right-hand side of the Registry Editor window, right-click and then click on “New>” and then click on “DWORD (32-bit) Value“.
b. Name the new key as “DisableMSI“.

6. On the right-hand side, double click on “DisableMSI” to edit the value data of the key.
7. Now you need to set this ‘Value data:‘ to “0” and then click on “OK” to save the changes.

8. Same way, now you have to come to this location-
HKEY_CLASSES_ROOT\Installer\Products
9. Now, click on each of the keys to select it. Then check “ProductName” of the key to knowing the name of the program the key associated with it.
10. Check all the keys until you have found the key associated with the problematic program.
11. Right-click on the problematic key and then click on “Delete” to delete the key from your computer.

Close Registry Editor on your computer.
Restart your computer to let the changes take effect.
After rebooting, you will be able to install or modify the application on your computer.
Fix-3 Add an admin account using CMD-
1. Click in the Search box beside the Windows icon and then type “cmd“.
2. Now, you have to simply right-click on “Command Prompt” and choose “Run as administrator“.

3. Now, to give this account administrative permissions, write this command and hit Enter.
net user administrator /active:yes

Once you have executed this command, close the Command Prompt window.
Reboot your computer.
Now, once you have logged in with the new administrative account, try to install the program on your computer. Your problem should be solved.
After rebooting your computer, you will be able to install/ modify an application on your computer.
Your problem should be solved.