While accessing your regular account, you may be stuck on the log-in screen with this message – “Your account has been disabled. Please see your system administrator“. If this is happening then, your current account is now disabled by the system administrator or using the administrative account. You can’t log in to your system account unless you first sign in with an administrative account and then re-enable the problematic account again. There is a very easy process to do so. Just follow these instructions step-by-step.
Fix 1 – Use System registry
There are several steps to use the system registry and log in to your account and finally, re-enable the current account.
As you can’t use your account, you have to force boot the Windows Recovery Environment.
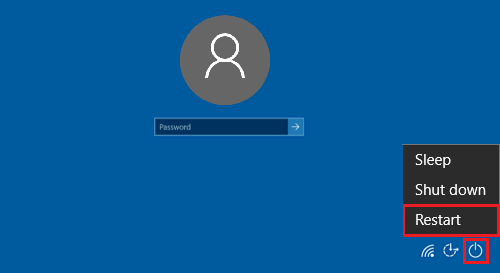
1 – Just press and hold SHIFT key from your keuyboard and without leaving the shift key , restart the PC from the lock screen

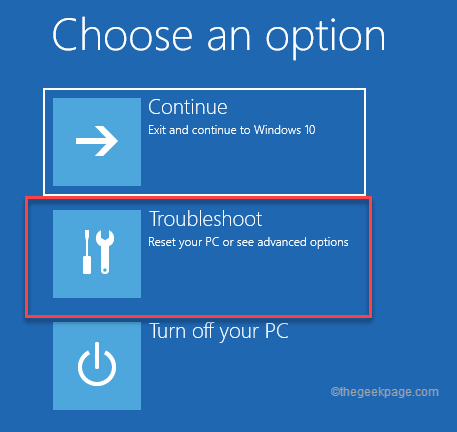
2. To troubleshoot the issue, tap on the “Troubleshoot“.

4. Tap on “Advanced options” to proceed further.

7. Now, click on the “Command Prompt” to open the terminal.

8. Then, tap on your administrative account.

9. Once you are in the CMD terminal, write this command and hit Enter key to open the Registry Editor.
regedit
10. When the Registry Editor opens up, select the “HKEY_LOCAL_MACHINE“.
11. Then, tap on “File” on the menu bar.
12. Now, click on “Load Hive…” to load the user hive.
13. In the Load Hive window, navigate this way –
Windows\System32\Config
14. Now, scroll down and select the “SAM” folder.
15. Next, tap on “Open” to access the file.
16. Give the key any name you prefer.
17. Finally, tap on “OK” to create the key.
18. Coming back to the main Registry Editor page, expand this way –
HKEY_LOCAL_MACHINE\name of the key\SAM\Domains\Account\Users
[
NOTE – Replace the “name of the key” with the name of the key you have created in Step 16. So, the location should be –
HKEY_LOCAL_MACHINE\test\SAM\Domains\Account\Users
]
19. Now, on the left-hand side, you have to select the “000001F4” key.
20. Upon selecting the key, on the right-hand side, double-tap the “F” binary value.

21. In the Edit Binary Value window, look for the “00000038” value line.
22. You will find the column is showing ’11’ as the subsequent value.
23. Set it to “10” and click on “OK” to finally save the change.
Once you have done that, close the Registry Editor window.
24. Finally, type “exit” in the shell and hit Enter.
Once you have done that, you will be back at the starting page.
25. Tap “Continue” to boot into Windows 11.
Step 3 – Sign in and re-enable the account
Now, you can easily sign in using your account and re-enable the account.
1. When Windows successfully boots up, use your account to sign in.
You should be able to boot into the system.
2. Once you are in, press the Windows key+R key to access the Run terminal.
3. Further, type “compmgmt.msc” and click on “OK“.
4. Now, expand the left-hand side, this way –
System Tools > Local Users and Groups > Users
5. You will notice the list of users and groups.
6. Now, double-click on the disabled user account.
7. Just, go to the “General” section.
8. After that, uncheck the “Account is disabled“.
9. Then, click on “Apply” and “OK” to save this modification.
Close everything and restart your system. Now, you can easily access your account without facing further issues.
Fix 2 – Create a new administrative account
If you face any issues with the previous registry fix, you can create a new administrative account to log in and fix the issue.
Step 1 – Boot in Windows Recovery modE
1. Start up your computer.
2. Once you reach the sign-in page, press the “Shift” and tap on “Restart” to restart the system in Windows Recovery Environment.
3. Now, tap on “Troubleshoot” to access it.
4. After that, click on “Advanced options” to go further.

5. Now, click on the “Command Prompt” to open the terminal.

This will bring up the Command Prompt terminal.
6. You have to create a new administrator account. So, modify this code and hit Enter.
net user /add newuseraccount
[
Replace the “newuseraccount” with a new account name you want to use. Example – Suppose the name of the new user account is “MyAdminNew”. So, the code will be –
net user /add MyAdminNew
]
7. Now, you have to add this new account to the Administrators group. So, paste, modify and execute this code.
net localgroup administrators newuseraccount
[
Again, replace the “newuseraccount” in the code with the account you have created in the former step.
Example – In our case, the command should be –
net localgroup administrators MyadminNew
]
Finally, close the terminal window.
8. Now, tap on “Continue” to continue to Windows 11.
Step 2 – Sign in with the new account
1. Once you reach the login page, select the new account from the left corner.
2. Then, tap on “Sign in“.
3. Once you log in to your account, press the Windows key+X keys together.
3. Next, tap on “Computer Management” to access it.
4. Now, expand the left-hand side, this way –
System Tools > Local Users and Groups > Users
5. You will find all the accounts in the middle pane.
6. Once you have seen your disabled account, double-click on it.
7. Just, go to the “General” section.
8. Make sure the “Account is disabled” box is unchecked.
9. Then, click on “Apply” and “OK” to save this modification.
Close the Computer Management window. Then, restart your system and that’s it! Now, you can use your account without getting the “Your account has been disabled. Please see your system administrator“.
Fix 3 – Try a system image restore
There is another way, that you can use if none of the two methods actually offers a permanent resolution.
1. Restart the system.
2. Once you reach the sign-in page, press the “Shift” and tap on “Restart” to restart the system in Windows Recovery Environment.
3. Now, follow these steps –
Troubleshoot > Advanced options
4. Now, click on “System Restore“.
5. Now, toggle the “Recommended restore:” option.
6. You can also choose a different restore point option by opting for “Choose a different restore point“.

7. In the next screen, you can check the “Show more restore points” box.
8. Now, choose a restore point when your account wasn’t disabled at all.
9. Next, tap on “Next” to proceed.
10. Finally, tap on “Finish” to complete the process.
When your PC is restored to a previous restore point, you can successfully log in to your account without facing any further difficulties.