System administrators can place some restrictions over some applications, and settings so that normal domain users can’t just alter the feature on their own. So, if have seen the “This setting is managed by your administrator” message on Windows Security or Windows Defender page, you can’t tweak its settings. There are some ways you can take care of this problem, but before you do that make sure to go through the warning message.
Warning – Network Administrators place these policies for a definite reason. If you have seen this message on your Office laptop/PC, don’t enact any of these solutions without proper administrative consent.
Fix 1 – Edit the Group Policy settings
Group Policies can be placed on users to block them from using/ altering the Windows Security settings.
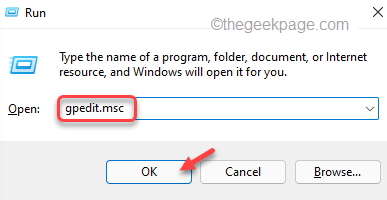
1. At first, press and hold the Win and R keys together.
2. In that Run box, type this in there and hit Enter.
gpedit.msc
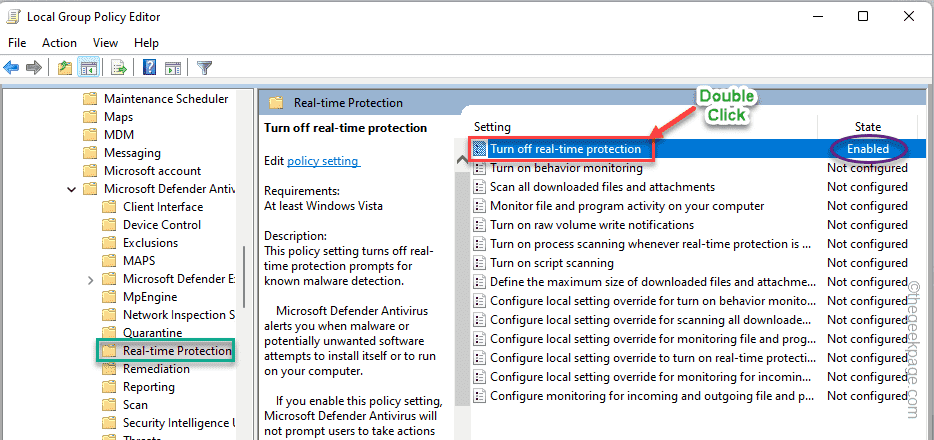
3. Coming to the Local Group Policy Editor screen, head on to this point by expanding the left-hand pane.
Computer Configuration > Administrative templates > Windows components > Microsoft Defender Antivirus > Real-time Protection
4. Once you reach that place, you can find several Windows Defender-related policies.
5. Look on the right-hand pane, for any policies that are set to “Enabled“. You can see the “State” tab for each policy.
6. If you can see an enabled policy, just double-tap that to open it.
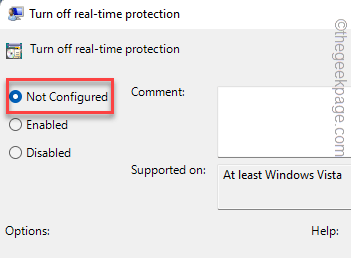
7. Simply, set the policy settings to the “Not configured” setting.
8. Then, click “Apply” and “OK” to save the changes.
After lifting this policy from the domain systems, close the Local Group Policy Editor.
Then, restart your computer. After restarting the system, open Windows Security and test whether you can activate the real-time protection or not.
Fix 2 – Update the Registry settings
Deleting a certain value from your device registry does help you resolve the problem.
1. You can open the Registry Editor using the search box.
2. So, click on the search icon beside the Windows icon and type “regedit“. Next, tap “Registry Editor” to access the Registry Editor.
3. On the Registry Editor page, reach this location along this way –
Computer\HKEY_LOCAL_MACHINE\SOFTWARE\Policies\Microsoft\Windows Defender
4. On the left pane, once you have reached the location, right-click the “Windows Defender” key and tap “Export” to export the backup.
5. Now, set the ‘File name:’ to “Windows Defender” in the box.
6. Create a new directory in any location (like on the Desktop) and click “Save” to save the file there.
7. On the left-hand section, you may find several sub-keys associated with the Windows Defender.
8. So, right-click on the “Policy Manager” key and click “Export” to export the sub-key.
9. Go to the folder that you have created in Step 6.
10. Now, name the backup registry as “Policy Manager” and tap “Save“.
11. This way, export the “Real-Time Protection” key as well.
In case, if your machine runs into a problem, you can just import these backup keys into your system.
12. Now, coming to the main step, right-tap the “Windows Defender” key and click “Delete” from the right-click context menu.
13. When you are asked, “Are you sure you want to permanently delete this key and all its subkeys?” confirmation message, click “Yes“.
Once you have deleted the Windows Defender key from your computer, restart the machine.
The problem should be fixed.
Fix 3 – Uninstall the third-party antivirus
Antiviruses tend to take control of Windows Security features like Real-time protection, Cloud-delivered protection, etc. So, if your system came with pre-installed antivirus software, follow these steps.
1. At first, press the Windows key+R keys together.
2. Then, type “appwiz.cpl” and hit Enter.

3. This leads you to the Programs and Features window.
4. Next, right-click on the antivirus and tap “Uninstall” to uninstall it from your computer.

Usually, all the antivirus uninstallation process requires a system restart. Restarting the system deletes any instances of antivirus left in the system.
Now, if you open Windows Security and you can easily tweak the settings as you want. Your problem should be solved.


