If you are seeing the error message “The service did not start due to logon failure” on your system then there is a problem with the password data of the associated service is damaged. Don’t worry. Follow these simple fixes on your computer and the problem will be solved very quickly.
Fix-1 Change Service properties-
Changing the service properties may work out for you.
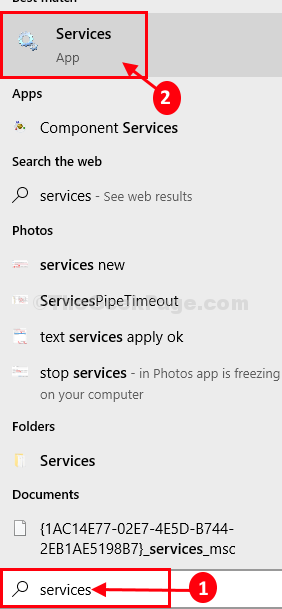
1. Search for the “Services” from the search box.
2. Then, click on the “Services“.

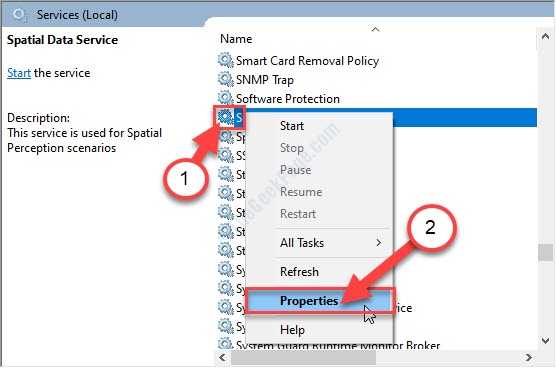
3. In the Services window, find out the “SQL Server” service.
4. Right-click on the “SQL Server” service and then click on “Properties“.

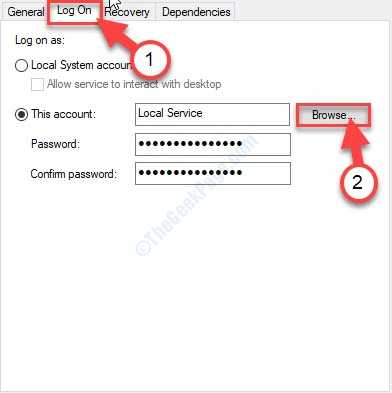
5. After that, click on the “Log On” tab.
6. Now, click on “Browse“.

7. Click on “Advanced“.

8. You now need to click on “Find Now“.
9. Then scroll down through the list of groups or users, select the user name(along with the domain name).
[ Example– For this computer, the domain is “MYPC“. So the term it is “MYPC/Sambit“.)
10. Click on “OK“.

12. After that, click on “OK“.

14. Enter the designated password in the “Password” box.
15. Do the same for the “Confirm Password” box.

16. You have to save it by clicking on “Apply” and then click on “OK“.

This should solve your issue.
Fix-2 Arrange the service to use your system account-
Configuring the service to use your system account may solve this issue.
1. At first, press Windows key+R.
2. You need to type “services.msc” and then click on “OK“.

3. You need to look out for the “Application Identity” service.
4. Right-click on the “Application Identity” service and then click on “Properties“.

5. You need to go to the “Log On” tab.
6. After that, choose the “Local System account“.
7. Finally, check the “Allow service to interact with desktop” option.

8. Now, click on “Apply“.

9. Click on the “General” tab.
10. A simple click on “Start” and the service will be started.

11. Finally, click on “Apply” and then click on “OK“.

Now try to connect to the service again.
Note– This fix will work for any service. So, if you are facing this problem with specifically any service, you can try the same steps with the problematic service.
Fix-3 Change user’s right policy-
In case if the logon request from the service was denied from the user account, you can restore the same on the designated server.
1. Search for the “Local Security Policy” from the search box.
2. After that, click on “Local Security Policy“.

3. Simply expand “Local Policies“.
4. Then, click on the “User Rights Assignment” header to select it.

5. Now, on the right-hand side, scroll down and double click on the “Log on as a service” policy.

6. In the Log on as a service Properties window, go to the “Local Security Settings” tab.
7. Here, click on “Add User or Group…“.

8. After that, click on “Advanced“.

9. Now, click on “Find Now“.
10. Then scroll down through the list of groups or users, select the user name for which you want to restore the permission. (For this computer it is “Sambit“.)
11. Click on “OK“.

12. Again click on “OK“.

13. Coming back to the Properties window, click on “Apply” and then click on “OK” to save the changes on your computer.

Close the Local Security Policy window.
Try to start the service once more. This time it should work out.