Are you seeing “PAGE_FAULT_IN_NON_PAGED_AREA” BSOD error on your computer? Is your computer not booting up Windows 10 or from your USB recovery drive? If that is the case you don’t need to worry further. The crash of virtual memory on your computer is the main reason behind this error. Follow these simple fixes on your computer and the problem will be solved in no time at all.
Workarounds-
1. Eject out any unnecessary peripherals (like- USB devices, WiFi adapter, Bluetooth adapter, etc). Then, restart your computer.
2. Check if there are any crucial Windows Update pending.
Fix- Adjust Virtual Memory on your computer-
The virtual memory on your computer may cause this issue on your computer.
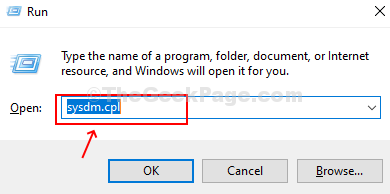
1. Press Windows key+R together.
2. To open the System Properties window, type this command and then hit Enter to open System Properties.
sysdm.cpl

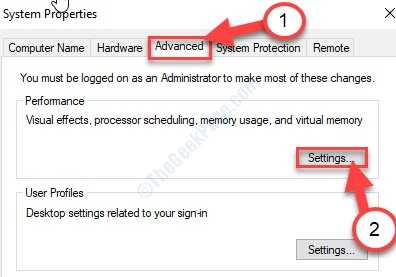
3. Simply click on the Advanced” tab.
4. After that, go to the “Settings“.

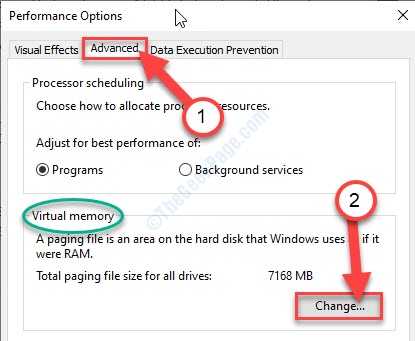
5. When you see that the Performance Options panel has appeared, go to the “Advanced” tab.
6. After that, under the ‘Virtual memory‘ section, click on “Change“.

7. At first, uncheck the option “Automatically manage paging file size for all drives“.
8. After that, select “C:” drive.

9. Then, click on the “No paging file” option.
10. After that, click on “Set” to set it.

11. If you see a warning message, click on “Yes” to confirm the change.

13. Finally, click on “OK” to modify the settings.

14. To save the changes, click on “Apply” and click on “OK“.

Now, reboot your computer.
After rebooting your computer, the error message won’t pop up again.
Fix-2 Try Startup Repair-
Startup Repair can solve this issue on your device.
Pre-requisites–
A. You are going to need the Windows 10 installation DVD. If by chance you don’t have one near you, you need to create a bootable installation media.
B. You have to change the boot priority on your computer. To change the boot options follow these steps-
Changing boot priority to the right order will boot your computer from the flash drive/ CD-ROM drive.
1. Switch on your computer.
2. As your device is booting up, press the “F12” key. This will open up the boot settings on your computer.

3. When BIOS settings will open on your computer, go to “BIOS” settings.
Simply put the “Removable Devices” (or “CD-ROM Drive” if you have the Windows installation disk) at the top as it will be of the highest priority.
NOTE- In some PCs, this term may be different. Just put USB/ CD-ROM Drive at the top of the Boot Menu.

Once you have done it, save and exit BIOS settings to boot your computer from the Windows 10 installation drive.
1. Plugin the installation media you have created (or the Windows 10 installation DVD) on your computer.
2. Press any key from your keyboard to boot from the DVD.
3. Simply, click on “Next“.

4. Just a simple click on the “Repair your computer” and Windows RE mode will kick in.

5. Once the Advanced options window appears, click on the “Startup Repair“.

Wait patiently as Windows will take care of startup issues itself.
This should solve the problem on your computer.