As we all know, to run some applications in Windows, we need to have .NET Framework installed in our systems. Most of the time, the .NET Framework is bundled along with the application and is installed when we install the application in our system. At times, we might have to manually download and install the .NET Framework so that the application runs smoothly.
While installing some applications, you might have seen an error that says,
Blocking Issues: The .NET Framework 4.7.2 is not supoorted on this operating system.
This error would not let the installation of the application as well. Even if you manage to install the application without .NET Framework, you will face issues running the application. If you are wondering how to get rid of this, then read along. In this article, let us discover different ways to overcome the ” .NET Framework is not supported in this operating system” error in Windows 10 and windows 11
Fix 1: Turn Off the Previous Versions of .NET Framework
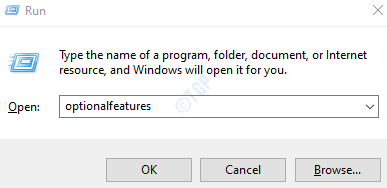
Step 1: Hold the Windows Key and press R
Step 2: Enter optionalfeatures and hit Enter

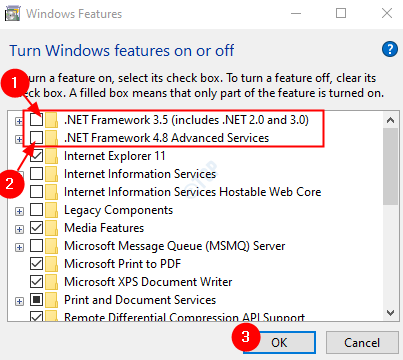
Step 3: Uncheck any other versions of .Net Framework from the list and click on OK

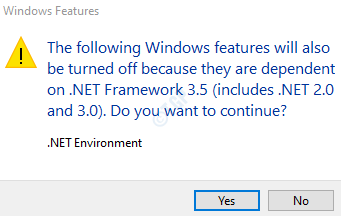
Step 4: If you Windows Features prompt when you untick, just click on Yes

Step 5: Restart the system. Now check if the .Net Framework installs smoothly in the system
In case this does not help, try the next fix listed.
Fix 2: Tweak Registry Entries
Step 1: Open the run window. Hold the keys Windows+r
Step 2: Enter regedit and press OK

Step 3: If you see a UAC popping up, just click on Yes
NOTE: Registry editing can be risky and can have an adverse effect on the system even with the slightest mistake. It is advised to take the backup of the registry settings before proceeding. To take a backup, In the Registry Editor window –> Go to File –> Export –> Save your Backup file.
Step 4: In the Editor window, type or copy-paste or navigate to the following location,
HKEY_LOCAL_MACHINE\SYSTEM\ControlSet001\Control\Windows

Step 5: Now, double click on CSDVersion to modify its value

Step 5: In the Edit DWORD window set the value to 100 and click on the OK button

Step 6: Restart the System and see if this starts installing the .NET Framework
Fix 3: Make sure that Windows is updated
Step 1: Press the Windows key and then press R
Step 2: In the Run Dialog, type winver and hit Enter

Step 3: Note the Windows version. It will be displayed as shown below

Step 4: Visit this link and check if the .NET Framework 4.7.2 is compatible your version of Windows.
For example, .NET Framework is compatible with Windows 10 version 1803 and above. In case your system has a version number lesser than 1803, you might have to update your windows first.
Step 5: In order to update your Windows version, Open the Run Dialog (Win+R)
Step 6: Type ms-settings:windowsupdate and hit Enter.

Step 7: Click on Check for updates.
Step 8: Windows will now check for any new updates. If any new updates are found, those will be downloaded and installed.
Step 9: Click on the Restart now button for the changes to take over.
If this fix does not fix your problem. Try the next one.
That’s All.
We hope this article has been informative. Thank you for Reading.
Kindly comment and let us know if you were able to fix the issue. Also, let us know which particular fix helped you.