Windows 10 is known for its range of useful apps, however, these apps need access to certain features like Camera, Microphone, Location, Contacts, Phone calls, Email, etc. to function properly. Calendar is also one such feature that certain apps like People, Mails or the Cortana needs access to. Therefore, these apps have access to the Calendar and its events by-default. The Calendar then makes use of the contact list to schedule emails and appointments, and then displays the day’s appointment to you.
However, sometimes the access to the Calendar may be not necessary, but the apps would still keep asking for permission. So, if you think that you do not need the apps to access your calendar on Windows 10, you can disable the access to keep your calendar and events private from the apps. Here are a few methods using which you can block apps to access your calendar.
Method 1: Turn Off App Access to Calendar Through the Settings App
This method will help you to prevent apps to access calendar when you think it’s not required. You can also turn on or turn off the access only for individual apps like Cortana, Mail and Calendar or People, or for all of them. You can also disable the access to calendar for a 3rd party application if listed in the settings window. Let’s see how to turn off app access to calendar:
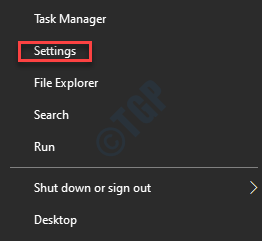
Step 1: Go to Start, click on it and click on the gear icon to launch the Settings app.

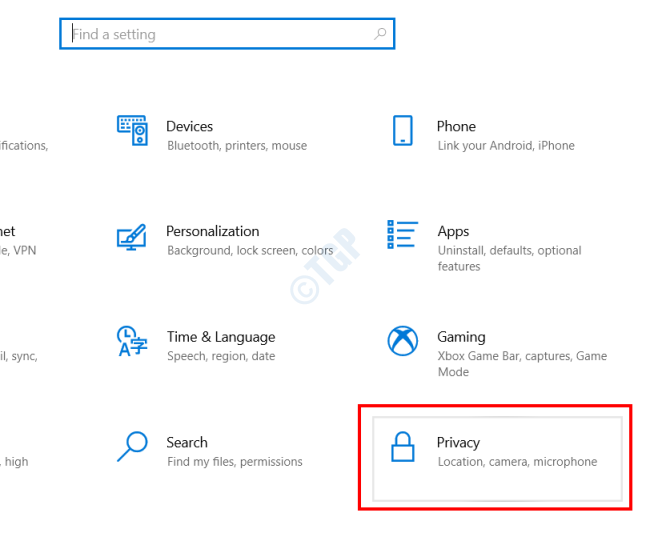
Step 2: In the Settings window, click on Privacy.

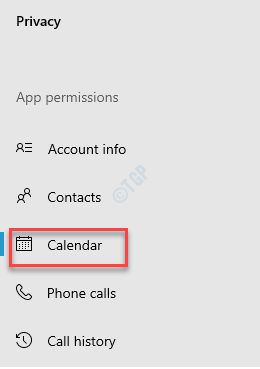
Step 3: In the next window, go to the left side, scroll down and App permissions section, click on Calendar.

Step 4: Now, go to the right side of the pane and under the Allow apps to access calendar section, turn the slider to the left to turn it off.
This will disable the access to calendar for all apps.

Step 5: If you want to disable access to calendar for specific apps, go to the Choose which apps can access your Calendar section and turn off access to calendar for the app you don’t want to.
This will disable access to calendar for only individual apps as chose by you.

Step 6: If you do not want your device to be able to access the calendar and the events, go to the Allow access to calendars on this device and click on the Change button.

Step 7: In the Calendar access for this device pop-up, turn the toggle off.
This will disable the access to calendar for the entire device.

Method 2: Turn Off App Access to Calendar Through Group Policy Editor
Step 1: Right-click on Start and select Run to open the Run command.

Step 2: In the Run command window, type gpedit.msc in the search field and hit Enter.

Step 3: It opens the Local Group Policy Editor.
Now, navigate to the below path in the Local Group Policy Editor window in the same order as shown below:
Computer Configuration > Administrative Templates > Windows Components > App Privacy

Step 4: Now, go to the right side of the window and double-click on Let Windows apps access the calendar.

Step 5: In the dialogue box that opens, select Enabled.
Go to the Options section below and type in the Package Family Name (PFNs) of the app in the Force deny these specific apps blank box.

Step 6: To find the Package Family Name (PFNs) of a specific app, you have to go to the Windows PowerShell.
Press the Win + R keys together on your keyboard to launch the Run command window.
Step 7: In the Run command window, type powershell and press the Ctrl + Shift + Enter hotkey on your keyboard to open Windows Powershell in admin mode.

Step 8: In the Windows Powershell (admin) window, execute the below command to get the package name for the specific app:
Get-AppxPackage -AllUsers | Select Name, PackageFullName

Step 9: Now, note down the name of the app from the Name section.
For instance, we want to disable calendar access for the Microsoft People app, so the app Name is Microsoft. People.

Step 10: Now, type the below command and hit Enter:
Get-AppxPackage -Name "Microsoft.People"
Note down the PackageFamilyName of the app.
*Note: Here, replace the “Microsoft.People” (app name ) with the name of the app you want to block for calendar access.

Step 11: Now, go back to the Let Windows apps access the calendar window as shown in Step 5 and type in the Package Family Name (PFN) you noted down in the above step, in the Force deny these specific apps box.
Press Apply and then OK to save changes and exit.

The app will not have access to the calendar app anymore.
*Note – The Package Family Name (PFN) entered in Step 11 is an example. You must add the PFN for the app for which you want to prevent calendar access.
Method 3: Turn Off App Access to Calendar Through Registry Editor
If you were able to follow the Local Group Policy Editor, it will automatically add the specific settings in the Registry. However, if you do not have access to the Local Group Policy Editor in your Windows 10 version, then you can directly modify the settings in the Registry Editor. For this, you would need to add the required keys and the value on your own.
*Note – Each option has different values, so if you need only an individual value for example, if you just want the value to be “force deny” for all apps, then you must add only that value and not any other value.
Let’s see how to edit the Registry:
Step 1: Right-click on Start menu and select Run to open the Run command box.

Step 2: Type regedit in the Run command search box and press OK to open the Registry Editor window.

Step 3: In the Registry Editor window, navigate to the below path to reach the AppPrivacy key:
HKEY_LOCAL_MACHINE\Software\Policies\Microsoft\Windows\AppPrivacy
*Note – If the AppPrivacy key is missing, then follow the below steps to add the key:
1: Right-click on the Windows folder, select New and then select Key.

2: Rename the new Key as AppPrivacy.

Step 4: Now, go to the right side of the window, right-click on an empty area, select New > DWORD (32-bit) Value.

Step 5: Rename the new DWORD value as LetAppsAccessCalendar and double-click on it.

Step 6: In the Edit DWORD (32-bit) Value dialogue box, go to the Value data field and set the value to 2.

*Note – 0 is for user in control, 1 is for force allow, and 2 is for force deny.
Step 7: If you want to change the value to 2 (force deny) for all the options of the Local Group Policy Editor, you will need to create the three different values.
For this, go to the right side of the window, right-click on an empty area and select New > Multi-String Value.

Step 8: Rename the new value as LetAppsAccessCalendar_UserInControlOfTheseApps. This is for user in control option in the Local Group Policy Editor.
Double-click on it.

Step 9: Now, in its Edit Multi-String dialogue box, go to the Value data field and type the Package Family Name (PFN) of the app that you want to stop having access to the calendar.
Press OK to save the changes and exit.

Step 10: Create another Multi-String value and rename the value as LetAppsAccessCalendar_ForceAllowTheseApps for the force allow option in the Local Group Policy Editor.
Double-click on it.

Step 11: In the Edit Multi-String window that opens, input the Package Family Name (PFN) of the app that you want to stop having access to calendar.
Press OK to save the changes and exit.

Step 12: Create the 3rd Multi-String value and rename this value as LetAppsAccessCalendar_ForceDenyTheseApps for the force deny option in the Local Group Policy Editor.
Double-click on it.

Step 13: Now, in the Edit Multi-String dialogue box, type the Package Family Name (PFN) of the specific app in the Value data field.
Press OK for each box to save the changes and exit.

This will disable the calendar access for that specific app only.
Once done, exit Registry Editor and restart your PC for the changes to be effective.
The specific app should not have access to the calendar anymore.
*Note – Prior to editing the Registry Editor, make sure that you create a backup of the Registry Settings, so that, in case you lose any data during the process, you can recover the same.