While upgrading the version of your computer, an error report may appear in the Windows Setup box, saying – “The computer stated using the Windows Installation media.” If you are experiencing this issue at your end, the first thing you should do is detach the device from your computer and then, restart it. Even if rebooting the device doesn’t fix the issue, follow these steps.
Fix 1 – Own the registry key
A particular registry key is causing this problem. Due to the lack of proper permission, you can’t just delete it easily. Follow these steps to adjust the permissions and then delete it.
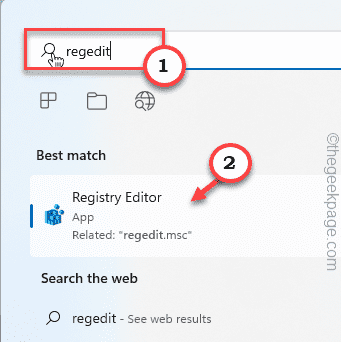
1. You can open the Registry Editor easily. To do that, type “regedit” in the search box.
2. There, tap “Registry Editor” to open that.
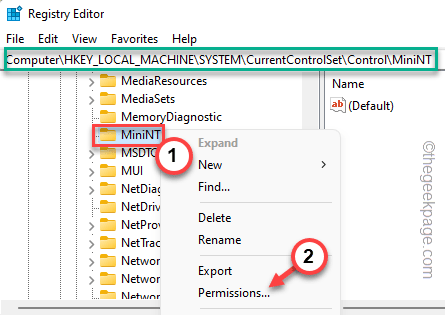
3. When you have opened the Registry Editor page, get to this point –
HKEY_LOCAL_MACHINE\SYSTEM\CurrentControlSet\Control
4. On the left-hand pane, try to identify a key named “MiniNT“.
5. Now, right-click that key and tap “Permissions“.
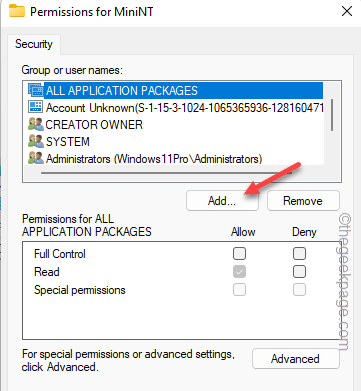
6. You will see the ‘Group or user names:’ pane there. Check whether you can see your username in that list.
7. If you can’t find it there, tap “Add” to add your account.
8. Then, tap “Advanced” to proceed.
9. After that, click “Find now” to open the full list of user groups.
10. Here, select your account name and double-tap it to proceed.
11. Then, click “OK” to complete the process.
12. Coming back to the main permissions page, select the account that you have just added from the list.
13. Then, check the “Allow” box beside the Full Control option.
This way, you are allowing your user account complete privilege over this key.
14. Finally, click “Apply” and “OK” one after another to save the change.
15. Now, as you have owned the key, you can easily remove it from your computer.
16. Just, right-click the key and tap “Delete” from the menu.
17. Then, tap “Yes” to remove the key from your device.
After this, close the Registry Editor tool and restart the system. Next time you restart the system, you won’t face the error again.
Fix 2 – Format the drive
Formatting the drive where you are trying to Windows may help as this eliminates any possibilities of contradiction between the old and new installation files.
1. Plug the installation media device into the computer.
2. Then, boot your computer.
2. Once you see the “Press any key to boot from CD…” message, hit any key to boot using the CD/USB device.
The Windows Setup process will begin.
3. Now, if you want you can change the ‘Language to install:’ and other parameters on the first screen.
4. Now, tap “Next” to proceed.
5. Now, click on “Install now“.
6. Now, tap “I don’t have a product key” to proceed to the next step.
7. Choose which version of Windows you are installing and tap “Next“.
8. Continue the setup process and in the Which type of installation do you want prompt, select the “Custom” option.
8. On the following page, you can see a prompt with Where do you want to install Windows? prompt.
Here, you can view all the disk drives.
9. Select the volume where you are trying to install the OS, and tap “Format” to format it.
Once the drive is formatted, you can easily upgrade to Windows without any more trouble. Test if this works.
Fix 3 – Upgrade using Windows 11 ISO
There is another way around this problem. You can directly run the W11 ISO file on your existing OS and it will automatically install the latest version of it.
Step 1 – Download Windows 11 ISO
1. Go to the Windows 11 downloads center.
2. Here, go to the Download Windows 11 Disk Image (ISO) area, select “Windows 11 (multi-edition ISO)” from the list, and tap “Download” to download the ISO file.
3. Select the language of installation as you prefer. Or, just leave it be.
4. Finally, click “Confirm” to download the ISO file on your computer.
5. Next, click on “64-bit Download” to download the file.
Patiently wait for the ISO file to download. You may close the browser once the download is complete.
Step 2 – Run the Setup file
You can now load up the ISO and run the setup file to install the updates.
1. You can open File Explorer. Just press the Win key+I to open that.
2. Now, go to the location of the ISO image file.
3. Next, double-tap the ISO to mount the image file.
When Windows mounts Windows 11 ISO, it should automatically open it up.
4. Locate the “setup.exe” tool. Just double-tap this to start the installation.
5. Wait for the installation media to load up.
Now, tap the “Change how Setup downloads updates” option.
6. Now, choose the “Download updates, drivers, and optional features (recommended)” option.
7. Just tap “Next“.
After this, let this installer install the latest version of the Windows


