Active Directory Domain or ADD is the directory that stores information on various objects on a network domain. This ADD service is important for network administrators and users during times, such as sharing the printer over the network. If this ADD service fails you can’t get your printing job done, and this error message shows up “The Active Directory Domain Services is currently unavailable.“. Don’t worry. Following these easy fixes, you can solve the problem quite easily.
Fix 1 – Reset the Printer Spool settings
Corrupt printer Spool files can cause this problem for your printer.
1. You can easily reset the Printer Spool settings.
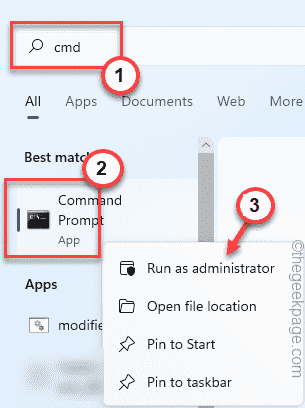
2. But, before you do anything, you have to stop certain services. So, click the Win icon and begin to type “cmd“.
3. Now, in the search results, right-click the “Command Prompt” and further click “Run as administrator“.
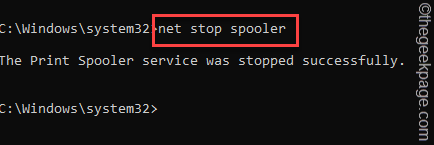
4. Coming to the main CMD screen, input this command and hit the Enter button from your keyboard.
net stop spooler
Now, you can minimize the CMD window for later use.
5. Next, directly press the Win key+E keys together or open the File Explorer.
6. After that, go down to here –
C:\Windows\system32\spool\PRINTERS
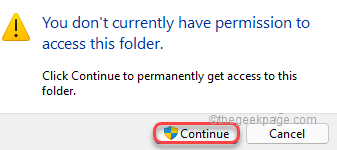
7. You may see a permission-related prompt on your screen. Click on the “Continue” button.
8. Once you are inside the folder, select all the files and folders at once.
9. Press the “Delete” key from your keyboard to empty the folder.
Now, you may exit the File Explorer page.
10. Maximize the terminal page.
10. Once you have done that, write these three words and hit Enter to resume the printer spooler service.
net start spooler
Within a few seconds, you can see the “The Print Spooler service was started successfully.” message has appeared on the terminal.
Exit from there. Now, try to print something from any computer on the network. It should print without showing the Active Directory Domain error message.
Fix 2 – Try removing the driver and re-adding it
The next thing you should try is to remove the printer driver from your computer and try re-adding it to the system.
Step 1
1. There is a shorcut that leads directly to all the printers and devices on your computer.
2. Just press the Win key+R keys together and type this in the box.
control printers
3. Then, hit Enter.
4. When the page opens up, you can see all your printer devices there.
5. Now, right-click on the troublemaking printer and click “Remove device“.
6. A confirmation message will appear on your screen. Just, tap “Yes” to confirm this.
This way, you have successfully removed the problematic printer device.
7. Now, you have to manually add this printer again. So, tap “Add a printer” while you are on the same screen.
8. This opens up the printer wizard on your screen.
All you have to do is to wait for the printer device to show up in the wizard. Once Windows detects the removed printer device, it will automatically install it on your computer.
Step 2
Now, you have to update the printer driver.
1. Open a browser and go to the printer manufacturer’s website.
2. Look at what printer model you are using. Now, type the printer model in the search box and “Submit“.
3. Now, look for the latest printer driver in the list of available downloads.
4. Tap “Download” to download the driver.
Close the download folder on your computer.
5. At first, press the Win key+R keys together.
6. Then, type this code and click “OK“.
devmgmt.msc
7. Once the Device Manager page opens up, tap the “Print queues” to expand it.
8. Here, you can see the printer driver that is causing the problem. So, right-tap the driver and click “Update driver“.
9. Now, click on the first option “Browse my computer for driver software” on the next screen.
10. Tap “Browse” so that you can browse for the printer driver.
11. Next, go ahead to the location of the printer driver that you have just downloaded.
12. Now, select the folder that contains the driver package and click “OK” to install the printer driver.
13. Now, click “Next” to proceed to the final installation step.
Now, just wait for Windows to install the printer driver.
After you have installed the printer driver, try to print a test page and check it out.
Fix 3 – Check the permissions of the printer port
Printer ports do need sufficient permission to work properly.
1. At first, press the Win key and type “regedit“.
2. Then, tap “Registry Editor” to access it.
3. After you have opened the Registry Editor page, go to this section –
HKEY_CURRENT_USER\Software\Microsoft\Windows NT\CurrentVersion\Devices
4. Once you are there, right-tap the “Devices” key on the left-hand pane and click “Permissions“.
5. In the Permissions for Devices Properties window, select your account from the list of ‘Groups or user names:’ section.
6. Then, check the “Allow” box beside the ‘Full Control’ parameter to give full control to your account.
7. After that, tap “Apply” and “OK” to save the change.
8. Once you have saved this setting, you should be back on the Registry Editor page.
9. On the same left-hand side, look for the “PrinterPorts” key.
10. When you see it, right-tap the key and click “Permissions“.
11. Just like the previous key, choose your account name from the list.
12. Then, make sure to tick the “Allow” box in the ‘Full Control’ permission.
13. Now, once you have given full control, save the changes.
14. Following the same steps, now give full control to the “Windows” key as well.
Once you are done setting proper permissions for the aforementioned keys, you can exit the Registry Editor page.
You can restart your system after this as registry modifications require a system restart to work properly.
Fix 4 – Use the app to print directly
You can directly use the application (like Adobe Acrobat) to print the document.
1. Open the document.
2. Once the application has opened, press the Ctlr+P buttons together to print the document.
Otherwise, you can click on the “File>” on your menu bar and tap “Print“.
3. Once the Print page appears, you can directly click on “Print” to print it directly.
4. If you can’t view your printer there, click on “Find Printer…” to look for the printer.
This should help you resolve the printing issues.
Fix 5 – Run the printer troubleshooter
You can run the printer troubleshooter to find and fix the printer issues.
1. You can find the Printer Troubleshooter on the Settings page.
2. Just press the Win key+I keys together.
3. When the Settings page opens up, tap “System” on the left-hand pane.
4. Now, just scroll down a little bit and click the “Troubleshoot” settings.
5. Then, click on “Other troubleshooters“.
6. You can see the full list of troubleshooters now. Find the “Printer” troubleshooter. Click “Run” to run the printer troubleshooter.
7. Going to the next step of the troubleshooting process, select the problematic printer.
8. Now, click on “Next“.
9. Allow the troubleshooter a while to let it detect the problem and prescribe some solutions.
10. So, tap “Apply this fix” to apply the solution.
After applying the solution, try to print using the printer once more. Test if this works for you.
Fix 6 – Uninstall the printer driver and reinstall it
If nothing is working for you uninstall the printer driver and reinstall it.
1. At first, press the Win key+X keys together.
2. Then, click on the “Device Manager” to access it.
3. After opening the Device Manager, tap the “Print queues” area.
3. Try to find the printer with the problem [In our system, it is HP DJ 1110 series]. Then, right-click that device and click on “Uninstall device“.
4. Simply click on “Uninstall” to uninstall the driver.
Windows will now uninstall the printer driver from your system. Restart your computer after this.
Restarting the device reinstalls the printer driver.
This should help you resolve the printer-related issue.
Additional Tips –
1. Update your system. Sometimes, updating the system can be very helpful for these kinds of issues.
2. Some users have fixed the issue by updating the Office suite on their system.


