System restore feature in windows is quite useful when your machine gets stuck with major issues like Blue Screen of Death errors. System restore helps restore your system back to a point in time where your system was error free and everything was working fine. However, sometimes the system restore feature itself might fail and leave you stranded. There are many reasons why the system restoration process might fail for you. Here we have compiled the best working solutions for you to try out and fix this issue.
Method 1: Enable System Restore Through Group Policy Editor
The very first thing that you have to make sure is that system restore functionality is enabled in your machine. If it is not enabled, none of the methods would yield a result.
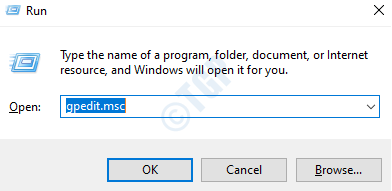
1. Hit WIN and R keys simultaneously to launch the Run windows. Then type in gpedit.msc and hit Enter key. This will launch the Local Group Policy Editor window.
2. As next, navigate to the following path:
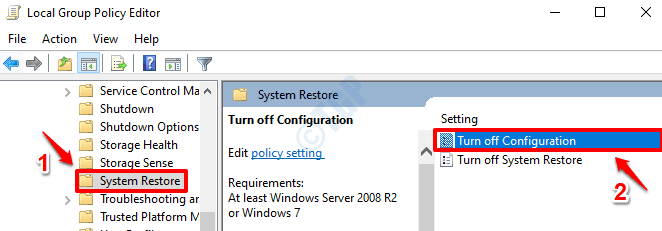
Computer Configuration --> Administrative Templates --> System --> System Restore
From the left window pane, click on the folder System Restore. Now in the right window pane, double click on the Turn off Configuration setting.
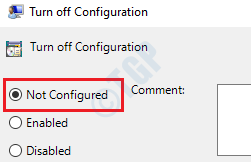
3. Next you have to click on the radio button corresponding to Not Configured. Once done, hit Apply button and then OK button.
4. As next, from the same Settings list, double click on the one that says Turn off System Restore. Please refer the screenshot below if you have any doubts.
5. Here also, enable the radio button corresponding to Not Configured option. Hit Apply button followed by OK button.
6. Now you can close the Local Group Policy Editor window. Go to Desktop and right click on This PC. From the right click context menu, click on Properties.
7. From the left window pane, click on the link that says System Protection.
8. First click on System Protection tab. Then under Protection Settings section, select C Drive and then click on Configure button.
9. Under Restore Settings section, click on the radio button corresponding to Turn on system protection. Next, under Disk Space Usage section, for Max Usage, drag the slider and make it a value between 5 GB and 10 GB.
Once you are done, hit Apply button and then OK button.
You can also make sure that drives other than C have at least 300 MB of space reserved for system restoration, to make sure space issues are not the cause of your problem.
Restart your computer for the changes to take over. Check if your issue is resolved.
Method 2: Try Creating Manual Restore Point
Follow the steps below to create a manual restore point in your windows:
1. Type in create a restore point in windows start menu search bar. From the results, click on Create a restore point option.
2. As next, click on System Protection tab first. Make sure Windows C Drive is selected and then click on the Create button at the bottom.
3. Give a name for your system restore point and then click on Create button.
4. You will now get the following alert box saying your system restore point is created successfully.
If your issue is still not resolved, please head on to the next method.
Method 3: Disable Your Third Party Antivirus Software
Sometimes the reason why system restore fails in Windows 10 is because of the interference of third party antivirus software. Try disabling your antivirus software and check if that resolves your issue. If not, you can enable it back.
Method 4: Perform System Restore From Safe Mode
Sometimes, performing system restore through safe mode works if everything else fails.
1. Click on Restart from power options while pressing down SHIFT key.
2. As next, choose the Troubleshoot option.
3. Now from the Troubleshoot options, click on the Advanced options tile.
4. As next, click on the tile System Restore.
5. When the System Restore window launches, click on Next button.
6. Enable the checkbox Show more restore points. Then choose a restore point from the list of available restore points and click on Next button.
7. Click on Finish button to initiate the system restore process.
Check if system restoration is a success now.
Method 5: Run CHKDSK Command
Bad sectors in hard disks could be the reason why you are having issues with system restoration. Run the CHKDSK command line tool to locate and fix the bad sectors and corrupt files in your hard disks.
1. Type in cmd to start menu search bar. Right click on Command Prompt and click on Run as administrator.
2. When the command prompt launches in elevated mode, execute the following command and hit Enter key.
chkdsk C: /f /r /x
Parameters:
- C: – Drive to scan.
- /f – This parameter will attempt to fix any errors that are found.
- /r – This parameter will look for bad sectors and recovers any readable information.
- /x – This parameter will forcefully dismount the volume that you are about to check before the scan begins.
You will get the prompt Would you like to schedule this volume to be checked the next time the system restarts? (Y/N), press Y for this and hit Enter key.
Restart your machine for CHKDSK to perform the scan. Verify whether the issue is fixed or not.
Method 6: Perform System File Checker Scan
If the issue is still not resolved, try running the SFC scan to find and fix any corrupt registry files in your system.
1. In windows start menu search bar, type in cmd. From the results, right click on Command Prompt and choose the Run as administrator option.
2. Execute the following command next.
sfc /scannow
Restart your machine once the scans runs to completion.
Method 7: Check if Services are Running Properly
1. Launch Run dialog box by pressing WIN and R keys together. Type in services.msc and click on OK button.
2. The Services window would now open. From the list of services, locate and double click on the service named Volume Shadow Copy.
3. Click on General tab. Make sure Startup type is set to Automatic. If not, choose Automatic from the dropdown menu.
Also, make sure that Service Status is Running. If not, click on the Start button and get it running.
Once done, Click on Apply button and then OK button.
4. Just like how it was done for Volume Shadow Copy service, make sure that Service type is set to Automatic and that Service status is set to Running state for the following services as well.
Task Scheduler
Microsoft Software Shadow Copy Provider Service
System Restore Service
Restart your PC once done. Check if your issue is gone.
Method 8: Run DISM Tool
DISM (Deployment Image Servicing and Management) is a more advanced troubleshooting tool for finding and fixing corrupt system files.
1. Click on windows start menu search and type in cmd. Right click on Command Prompt from the results and then click on Run as administrator option.
2. When command prompt launches, execute the following command:
DISM /Online /Cleanup-Image /RestoreHealth
Wait for the scan to run to completion. Restart your machine and check if the issue is resolved.
Hope one of the above listed methods fixed the issue for you.


