Are you a Steam user encountering the error code 102 or 137 while trying to use the Steam Store or Community pages in the application on Windows?
If you are seeing the error code 102 in Steam, it means there is a connection error. You will be seeing the following error message in case of error code 102:
“Error Code 102:
Unable to connect to the server. Server may be offline or you may not be connected to the internet.”
The main reason for error code 102 is either the server is offline or there are issues with your internet connectivity.
Whereas, error code 137 is encountered while trying to load a page in Steam through Steam’s overlay web browser. The error message displayed is:
“Error Code 137 :
Failed to load web page (unknown error).”
In this case, the causes that raise this error code 137 are as follows: –
- corrupt cache of Steam
- Certain issues in the Steam server itself (you need to wait until it is fixed by Steam engineers)
- application issues due to long idle period
- If you are using a 3rd party firewall, it may be blocking the outgoing Steam connection
- permissions to steamservice.exe may be incorrect
- network adapter issue
In this article, we have discussed strategies recommended by other users that will help you troubleshoot the error code 102 and 137 in Steam. Before moving ahead with the fixes, try the workarounds mentioned below.
Workarounds
1. Check your internet connection: Make sure you have a stable and good internet connection. Check whether switching to a different network helps resolve the error.
2. Check the Server Status: You can check the current server status at SteamStat.us. Also, you can contact Steam support to know if there is server downtime. In case of server downtime, you need to wait until the server issues are fixed by Steam engineers.
3. Use Steam’s Big Picture Mode: To enter the Big Picture mode, click on the icon at the top left corner of the Steam client. Check whether this resolves the issue.
Method 1 – Whitelist Steam / Uninstall 3rd Party Firewall
If you are using a third-party firewall, try to whitelist the Steam application in your Firewall settings. The method of whitelisting will differ from one firewall to another. In case you don’t have a 3rd party firewall, try the steps below to whitelist in Windows Firewall to check if it fixes the issue.
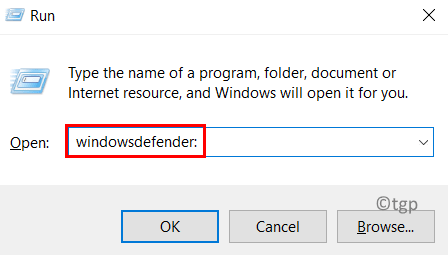
1. Open Run (Windows + R) and type windowsdefender: to open Windows Security Settings.
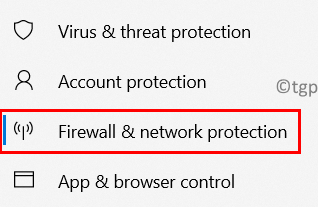
2. Select Firewall & Network protection on the left.
3. Click on Allow an app through the firewall on the right side.
4. Click on the Change Settings button to select any application in the list.
5. Search for Steam and select it. You can also select the type of network access for the app (Private or Public Network).
6. Click on OK.
5. Restart Steam and check if this has helped fix the error.
If you don’t find any whitelisting option for your firewall, then it is better to uninstall the 3rd party firewall.
1. Press Windows + R to open Run.
2. Type appwiz.cpl to open Programs and Features.

3. Right-click on your 3rd party firewall in the list of apps and select Uninstall.

4, Follow the on-screen instructions to finish the uninstallation process.
5. Restart your PC and check if Steam is still showing the same error while trying to access its overlay browser.
Method 2 – Clear Steam’s Web Browser Cache
Some users have reported that deleting browser cache and cookies through Steam Web browser settings has helped them overcome the issue.
1. Launch Steam and sign in with the account throwing the error.
2. Select the Steam menu in the ribbon bar at the top.
3. Click on Settings.
4. In the Settings window, go to the Web Browser tab on the left.
5. On the right, click on Delete Web Browser Cache and then click on OK to start the process.
6. Once the cache has been cleared, click on Delete all Browser Cookies and then on OK.
7. Restart Steam Client and check whether the error has been fixed.
Method 3 – Enable Permissions to steamservice.exe
At times it is seen Windows treats Steam as an application from an unknown publisher even though it is signed by Valve. Users have found out that giving permissions to steamservice.exe by manually retrieving the certificate data has helped to clear the error.
1. Press Windows + E to open File Explorer.
2. Go to your Steam directory. Inside the root directory, go to the bin folder.
3. Right-click on steamservice.exe and select Properties.
4. Go to the Digital Signatures tab in the newly opened window.
5. Select Valve under Signature List and click on the Details button.
6. In the Digital Signature Details window, click on View Certificate in the General tab.
7. Now click on Install Certificate in the Certificate window.
8. In the Certificate Import Wizard window, select the Local Machine option under Store Location. Click on Next.
9. Now select the option Automatically select the certificate based on the type of the certificate. Click on Next.
10. In the last window, click on Finish to complete the Valve Certificate Installation process.
11. You will see a message saying The import was successful.
11. Relaunch Steam and check if the error code is still appearing while trying to access the overlay browser in the Community pages and Store.
Method 4 – Enable Beta Participation
1. Open Steam and select Steam menu and then Settings.
2. Go to the Account tab on the left.
3. On the right, click on the Change… button next to Beta participation.
4. In the Beta Participation window, open the dropdown and select Steam Beta Update.
5. Click on OK to save the settings.
6. Click on Restart Steam in the Steam – Restart required window.
7. Access the Store or Community tab in Steam and see if this fix has helped resolve the issue.
Method 5 – Clear DNS Settings
1. Press Windows + R to open Run.
2. Type cmd and press Ctrl + Shift + Enter to open Command Prompt as admin.

3. Type the command below and press Enter.
ipconfig /flushdns
4. Wait till you see a message “Successfully flushed the DNS Resolver Cache”.
5. Restart your system. Launch Steam to check if the error is fixed.
Method 6 – Change DNS Settings
Many users facing this error have reported that changing the default DNS assigned by the ISP (Internet Service Provider) to Google’s public DNS has cleared the error.
1. Open Run by just holding Windows and R keys together.
2. Type ncpa.cpl to open Network Connections.

3. In the Network Connections window, select the connection that you are currently using Wi-Fi or Ethernet.
4. Right-click on the connection being used and select Properties.
5. Go to the Networking tab.
6. Select Internet Protocol Version 4 (TCP/IPv4) and click on the Properties button.

7. Select the toggle associated with Use the following DNS server address.
8. Set the Preferred DNS Server to 8.8.8.8 and Alternate DNS Server to 8.8.4.4.
9. Click on OK to save the changes.
10. Restart your network connection. Open Steam to check if the error is resolved.
Method 7 – Refresh the Network Adapter
One final method suggested by users facing this error is to reset the network adapter to the default configuration.
1. Open Run (Windows + R).
2. Type cmd and press Ctrl + Shift + Enter to open the Command Prompt as an administrator.

3. Click on Yes when prompted by UAC.
4. Type the following command and press Enter.
netsh winsock reset
5. Restart your PC and check whether the problem is fixed at the startup.
Thanks for reading.
You must now be able to access Store and Community tab in Steam without receiving error code 102 or 137. Comment and let us know the fix that worked for you.


