Are you one of those users encountering error code 16 or 80 while using the Steam application? You will be seeing a runtime error code 16 when you try to open a game and the Steam app stops and fails to execute. The message seen when this error is encountered is “Timeout – operation timed out”. This error can occur due to reasons related to internet connectivity, old graphics drivers, or memory problems.
Many users have reported seeing the error code 80 when they try starting a game and the error dialog with the message “Fallout 3 failed to start (error code 80)” is displayed. The reason for this error being triggered can vary among users due to different hardware and software specifications used by them. Go ahead and get down into the article to know the troubleshooting strategies which can be used to resolve the above error codes.
Fix 1 – Check Network Connectivity
One of the most common reasons for this error is network connectivity. So make sure your internet is stable and there are no issues with the connection. Try using the browser to check whether you are able to open and browse other websites.
Fix 2 – End Incompatible Processes in Task Manager
There can be some running applications that are interfering with the proper working of Steam. It is recommended by users to end running programs and check if this helps resolve the error.
1. Press Shift + Ctrl + Esc to open Task Manager.
2. Go to the Processes tab. Right-click on the running process and select the option End Task in the list.
3. Do the above step for all running programs. Check whether it fixes the error code in Steam.
4. Try to identify the process that is conflicting with the functioning of Steam.
Fix 3 – Update Graphics Drivers
Click on Update Graphics Drivers to see if outdated drivers in your system were causing Steam to throw this error code.
Fix 4 – Reinstall Runtime Libraries
At times, improper installation or corrupted files associated with Microsoft Visual C++ can cause Steam to throw the above errors. Try to uninstall and reinstall the Visual C++ Package on your system to see if it helps you fix the issue.
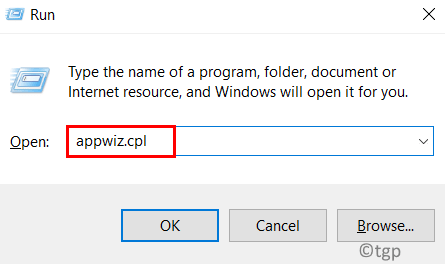
1. Press Windows + R to open Run. Type appwiz.cpl to open Program & Features.
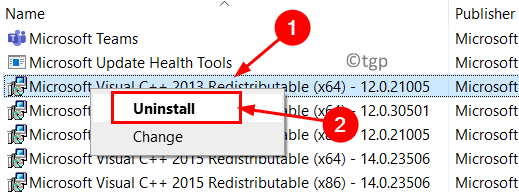
2. Locate Microsoft Visual C++ Redistributable Package.
3. Right-click on it and click on Uninstall.
4. Wait for the uninstallation process to complete. Restart your system.
5. Click on Microsoft Download Center to download the latest version of the Visual C++ Redistributable Package.
6. Download the executable file based on your system configuration and continue the installation process.
7. Once the installation process completes, restart your PC and check if Steam still shows the error.
Fix 5 – Perform Disk Cleanup
Some users have seen that removing unused files to free up space has helped them to overcome this error in Steam. The reason is that the files in the cache may be affecting the proper functioning of Steam. Click on Run a Disk Cleanup and check whether it resolves the issue for you.
Fix 6 – Authenticate the Integrity of Steam Files
1. Press Windows + S and type Steam in the search box. Right-click on the search result and select Run as administrator.
2. Click on the Library tab.
3. You will see your games here. Right-click on the game throwing the error and choose Properties.
4. Go to the Local Files tab on the left.
5. Click on the Verify Integrity of Game Files button on the right.
6. Wait for some time until Steam finishes checking your files and replacing them if there is an issue with their integrity.
7. Once done you will see a prompt indicating that validation is complete.
8. Now press Shift +Ctrl + Esc to open Task Manager.
9. Make sure to end all processes related to Steam. Right-click on a process and click on End Task.
10. Relaunch Steam using the option Run as administrator. Check whether the problem has been resolved with the game throwing the error.
Fix 7 – Check Steam Folder’s Security Permissions
1. At the first end all running processes related to Steam on your system using Task Manager. Use Steps 7 and 8 in Fix 1 above.
2. Press Windows + E to open File Explorer.
3. Navigate to the Steam folder in your system. The location is C:\Program Files(x86) by default.
4. Right-click on Steam and choose Properties.
5. In the General tab, make sure the box next to the Read-only option is unchecked.
6. Click on Apply and OK to save the changes.
7. Restart Steam with administrator permissions and check whether the error is resolved.
Fix 8 – Change System Regional settings
1. Press Windows + R to open Run. Type control to open Control Panel.
2. In the search box at the top, type Date.
3. Click on the option Date and Time.
4. Go to the Internet Time tab. Click on the Change settings… button.
5. Check the box next to Synchronize with the Internet time server. Then click on the Update now button.
6. Once the time is updated, click on OK.
7. Relaunch Steam and check if the error code is resolved.
Fix 9 – Check for Conflict with Data Execution Prevention (DEP)
Data Execution Prevention is a feature that obstructs and closes any application/program which can be a threat to your system. You need to check the settings of DEP so that it doesn’t interfere with Steam’s functioning
1. Open Run (Windows + R) and type control.
2. In the Control Panel, look for System settings.
3. Scroll down and click on the option Advanced system settings in the new window.
4. Go to the Advanced tab. Choose the Settings button under the Performance group.
5. In the Performance Options window, go to the Data Execution Prevention tab.
6. Choose the option Turn on DEP for all programs and services except those I select.
7. Click on Add… button.
8. Now move to the location of Steam in your system and select the Steam executable file (C:\Program Files (x86)\Steam).
9. Click on OK in the prompt that says DEP is enabled and cannot be turned off.
10. Select Apply and then OK to confirm the settings.
11. You will see a prompt to restart your PC. Click on OK.
After rebooting, launch Steam to check if the issue is fixed.
Fix 10 – Disable Windows Defender
1. Press Windows + R to open Run.
2. Type gpedit.msc to open Local Group Policy Editor.
3. Select Computer Configuration and choose Administrative templates under it.
4. Go to the Windows Components folder.
5. Now choose Microsoft Defender Antivirus on the right side.
6. Look for the option Turn off Microsoft Defender Antivirus and double-click on it.
7. In the new window that appears, choose the option Enabled so that Windows Defender is turned off.
8. Click on Apply and then on OK.
9. Restart your system and relaunch Steam with admin permissions. Check if the problem is solved.
Fix 11 – Perform a Clean Boot
1. Open Run (Windows + R).
2. Type msconfig to open System Configuration.
3. Go to the General tab and choose Selective Startup.
4. Make sure to check the option Load system services and Load startup items.
5. In the Service tab, check the box next to Hide all Microsoft services.
6. Now click on Disable all button.
7. Click on Apply and then on OK to save the settings.
8. Restart your system. Launch Steam and check whether the problem has been fixed.
Fix 12 – Delete Corrupted Files in Steam
1. Using Task Manager end all running processes that are a part of Steam using Steps in Fix 1.
2. Open Run by pressing Windows and R keys together.
3. Type or copy-paste the default location of Steam in your system C:\Program Files(x86)\Steam in the Run box.
4. Look for the SteamApps directory here. Select it and press Delete.
5. Start Steam using the run as administrator option. It starts downloading the files that are missing from the internet.
Check if this resolves the error code while launching the game in Steam.
Fix 13 – Reinstall Steam
If none of the above fixes helped you then you need to reinstall the application while saving all your previous game data.
1. Go to the Steam folder in your system which is C:\Program Files(x86)\Steam by default.
2. Delete all the files and folders in the Steam directory except the ones below:
SteamApps
Userdata
Steam.exe
Ssfn
3. Restart your PC and relaunch Steam.
4. It will start updating to download required files from the internet. Check if the error is resolved after updating.
Thanks for reading.
You must now be launch any game in the Steam application without receiving the error code 16 and 80. We hope this article has helped you resolve the issue and continue with your gaming session. Comment and let us know the fix that worked for you.


