Steam is one of the most popular online gaming platforms that provides its users with a desktop gaming experience. Once you have a Steam account, you can use any computer to play the games that you have downloaded/bought using the Steam account.
Excited to spend some time playing games on Steam and you are welcomed with an unexpected error that doesn’t allow you access to the games in your account. Recently, a connection error has been reported by Steam gamers due to which they are not able to log in to their account and access their games. The error message that is displayed to the users is as below
Connection Error
Could not connect to the Steam network.
Are you seeing the above message and unable to access the games in your account? Then, you have reached the right post which will help you resolve this error. Read ahead into this article to see the troubleshooting methods that you can use to overcome the Could not connect to Steam network error on your Windows PC. Before moving ahead with the fixes below, check whether your internet connection is working fine by trying to access some web page on the browser.
Fix 1 – Disable VPN or Proxy
If you are making use of any VPN client on your system, then disconnect the client from the VPN server. Open the VPN client currently running from the taskbar and click on the Disconnect option.
In case, you don’t find any VPN client running on your Windows PC, there are chances that you are using a VPN connection through the Windows Network & Internet Settings. Follow the steps below to disconnect any VPN connection from the Windows VPN Settings.
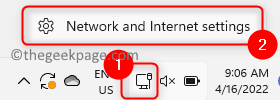
1. On the right-end of your taskbar, right-click on the network connection and choose Network & Internet settings.
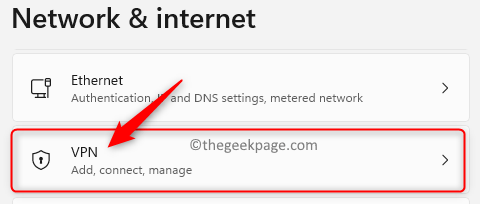
2. In the Network & internet settings page, scroll down and select VPN.
3. Here, below VPN Connections if your PC is connected to any VPN connection then there will be a Disconnect button next to it.
Click on this Disconnect button to disconnect your PC from the VPN server.
4. Now, check if you are able to connect to your Steam account.
If this does not work, then check if you have set up any proxy server address.
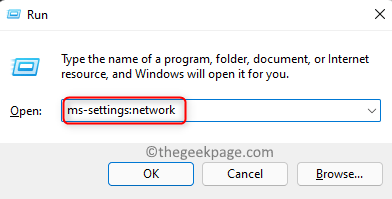
1. Open the Run box using the combination of Windows and R on your keyboard.
Type ms-settings:network and hit Enter to open Network & internet settings.
2. This opens up the Network & internet page in Windows Settings.
Scroll down and click on the box labeled as Proxy.
3. Go to the Manual proxy setup section.
Here, if you see “On” under Use a proxy server, then it means that you have set up a proxy server.
4. Now, click on the Edit button associated with Use a proxy server.
5. In the Edit proxy server window, turn off the toggle below Use a proxy server.
Once you turn this off, the proxy IP address and Port options are greyed out.
6. Then, click on the Save button to save this change.
7. Now, you see that the Use a proxy server option in the Manual proxy setup section is Off.
8. Open Steam and check if you are facing a connection error.
Fix 2 – Force Close and Restart Steam Application
1. Right-click on the Windows button (Start menu) on your taskbar and choose the option Task Manager.
2. If the minimized version of the Task Manager is seen, then click on More details.
3. Here, select the tab named Processes to see the list of processes that are currently running on your system.
4. Locate the process Steam(32-bit) in the list.
Select it and then click on the End Task button at the bottom right corner of the Task Manager’s window.
5. Check if there are any other Steam-specific processes that are running like Steam Client Service or Steam Client WebHelper. If any, then end them as mentioned in Step 4.
6. Now, launch Steam and try to log in and check if the error is fixed.
Fix 3 – Add TCP in Steam Executable File Properties
1. Click on the blue Windows button on your taskbar.
Type Steam in the Windows search box.
2. In the search result that is displayed, right-click on Steam and select Open file location.
3. This opens the File Explorer with the location of the Steam application shortcut.
Right-click on the Steam shortcut and select the option Properties in the context menu.
4. In the Steam Properties window, go to the Shortcut tab.
5. Here, you will see a textbox next to the text Target with the Steam executable files location.
At the end of this text after the double quotes, give a space and type -tcp.
6. Now, click on Apply and then OK to confirm and save the changes.
Note: If you see an Access Denied window saying that you need administrator permission to change the settings, then click on Continue.
7. Open Steam and see if you are able to connect to the Steam server and access your games.
Fix 4 – Run Steam as an Administrator
1. On your desktop, locate the shortcut for the Steam app.
Right-click on this Steam shortcut and choose Properties.
Note: If there is no shortcut on your desktop, then perform Steps 1 – 3 as stated in Fix 4 above to open the Steam Properties.
2. Select the Compatibility tab in the Properties window for the Steam app.
3. Here, check the box next to the option Run this program as an administrator in the Settings section.
4. Then, click on Apply and then OK to save these changes to the app shortcut.
5. Try to launch the Steam app and check if the connection error is resolved.
Fix 5 – Allow Steam Through the Firewall
1. Press the Windows and R keys together to open Run.
2. Type windowsdefender://Network/ and hit Enter to open Firewall & network protection in Windows Security.
3. Here, click on the link Allow an app through firewall.
4. This opens up the Allowed apps window with a list of apps that are allowed to communicate through the Windows Defender Firewall.
To make changes here, click on the Change settings button.
5. In the box with the title Allowed apps and features, scroll down and locate Steam in the list.
Make sure to check the box next to Steam to allow it through Steam.
Also, for the Steam app check the box under the columns Private and Public.
Note: If you are not able to find Steam in the list of allowed apps, then click on the Allow another app… button.
In the Add an app window, click on Browse. Go to the location of the Steam executable. By default, the location is C:\Program Files (x86)\Steam.
Here, select the file steam.exe and then click on Add button. Now, you will find Steam in the list of allowed apps.
6. Click on OK once you are done to save the changes.
7. Launch the Steam application and check if you are able to play your games without any connection errors.
Fix 6 – Update Your System Network Driver
1. Press Windows + X and click on Device Manager in the list.
2. In the Device Manager window, expand the Network adapters by clicking on the small arrow next to it. This displays a list of network adapters on your system.
3. Right-click on the adapter that you want to update and choose the Update driver option.
4. You will now see the Update Drivers window for the selected network adapter with options on how you want to search for the drivers.
Here, click on the option Search automatically for drivers.
5. On clicking this option, it checks for new updates to the driver and installs them if any updates are found.
6. Restart your computer once the network driver is updated.
7. Launch Steam and check if the connection error message is still being displayed.
Fix 7 – Uninstall and Re-install Steam Client
1. Just press and hold the Windows and R keys together to open the Run dialog.
2. Type ms-settings:appsfeatures to open Apps & features in Windows Settings.
3. On this page, in the textbox below the text App list, type Steam to look for the Steam application in the list of installed apps on your system.
4. Now, click on the three vertical dots at the right end of Steam and select the option Uninstall.
5. In the small confirmation window that pops up, click on Uninstall again.
6. Wait for some time for the application to be uninstalled.
7. Next, go to the Official page to download the Steam client installer onto your PC.
8. Now, double-click on the downloaded file to run the installation file.
9. Follow the on-screen instructions to install the Steam application again on your system.
10. Once the app installation completes, try to launch the Steam app and check if the connection error is fixed.
That’s it!
Hope this article has helped you to resolve the Could not connect to Steam network error on your Windows PC. Comment and let us know the fix that worked in your case.


