A few Windows users are facing ‘A StartDocPrinter call was not issued’ error when trying to print any document. It is rather a system issue and not any particular application like Microsoft word doc, Acrobat reader, etc related issues most of the time. Reasons for the error might be an interruption in the print queue, print spooler service not responding, issues with printer ports, etc. Yeah, this error is definitely annoying but there are different methods by which the error can be solved. In this article, we will get into the details of how to solve the ‘A StartDocPrinter call was not issued’ error.
Method 1: Restart The Print Spooler Service
Step 1: Open Windows Services. To do that open the run prompt using Windows + R keys together and type services.msc and hit enter.
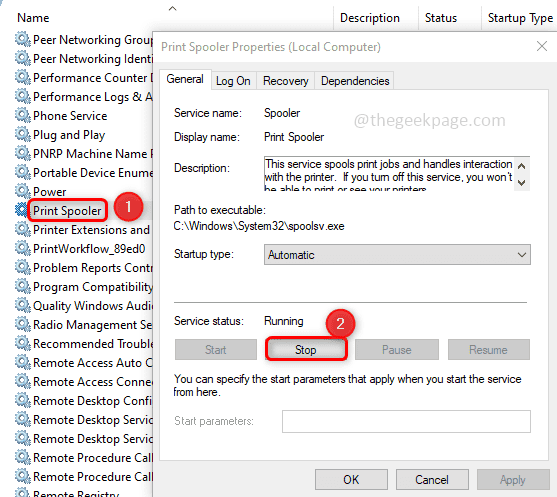
Step 2: In the services window search for Print Spooler and double click on it. Click on Stop. It will stop the service
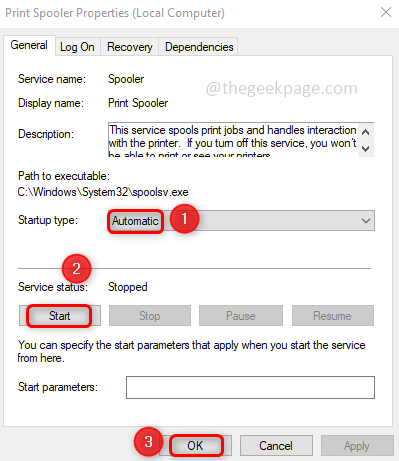
Step 3: Then from the startup type dropdown menu, select Automatic. Now click on Start and then click on OK.
Step 4: Close the Services window and check if the problem is solved.
Method 2: Use The Windows Troubleshooter
Step 1: Open Troubleshoot settings by typing troubleshoot in the windows search bar and clicking on the troubleshoot settings from the result.
Step 2: On the right, click on Additional troubleshooters.
Step 3: Select the Printer option and there appears Run the troubleshooter button click on it.
Step 4: It will take a few minutes. If there are any suggestions, check if it is for the printer that you are troubleshooting and apply them. Click on Apply this fix.
Step 5: The fix will be applied in a few minutes, once done a window appears saying troubleshooting has been completed. Click on the Close button. Check if the error disappeared, if not try with the next method.
Method 3: Repair The Print Spooler Service Using Commands
Step 1: Open the command prompt in administrator mode, to do so type cmd in the windows search bar and press the ctrl + shift keys together, and hit enter.
Step 2: Execute the below commands one by one. To do so, copy the below commands and paste them into the command prompt one after the other. Hit enter to execute it.
cd\Windows\System32\spool
cacls.exe PRINTERS /E /G administrator:C
Step 3: Restart your computer
Method 4: Re-install The Print Drivers
Step 1: Open the Device Manager. For that open the run prompt by clicking on Windows + R keys together.
Step 2: Type devmgmt.msc in the run prompt and hit enter.
Step 3: In the device manager window scroll down and find Print queues.
Step 4: Expand the print queues by clicking on the dropdown at its left. There will be a list of print drivers.
Step 5: Right-click on the driver which you are finding problematic and click on uninstall device.
Step 6: Restart your computer and now the system will install the generic printer drivers automatically and the issue will be resolved.
Method 5: Reset The Print Environment
If none of the above methods work for you, then try to reset the whole print environment. That is to uninstall the print drivers and their traces as well. Then re-install the print device.
Note: Before performing this method take the backup of the registry in case you modify the registry incorrectly there might occur problems. Hence follow the steps carefully.
Step 1: Open Windows Services. To do that open the run prompt using Windows + R keys together and type services.msc and hit enter.
Step 2: Scroll down and find Print Spooler right-click on it and click on Properties.
Step 3: Then in the startup type select Automatic and click on ok.
Step 4: Restart the Print Spooler service by right-clicking on Print Spooler and clicking on Restart.
Step 5: In the windows search bar type Print management, from the appeared search result click on it to open.
Step 6: On the left, click on All Printers. On the right side, select all the Print drivers by using Ctrl + A keys together.
Step 7: Right-click on the selection and click on Cancel All Jobs which deletes all the pending print jobs.
Step 8: Open Windows Settings by clicking on Windows + I keys together. And click on Devices.
Step 9: On the left click on Printers & scanners. On the right, if there are any third-party scanners select them and click on Remove device.
By any chance you are not able to remove the device, alternatively, you can do it through the Windows registry.
Open the registry editor by typing registry in the windows search bar and hitting enter.
Navigate to the below path and right-click on the third party print queue entries, click on delete.
Computer\HKEY_LOCAL_MACHINE\SYSTEM\CurrentControlSet\Control\Print\Printers
Note: Only remove third-party print queues. Do not delete Fax, Microsoft Print to PDF, Microsoft XPS Documents Writer, OneNote print queues.
Step 10: In the windows search bar type Print management and click on it to open. And select the All Drivers option from the left.
Step 11: Right-click on the third-party driver from the list and click on Remove driver package.
Note: Remove only third-party drivers and do not remove any Microsoft-related print drivers.
Step 12: If there are any third-party print drivers uninstall them from the Add or remove programs. To do this open the run prompt using Windows + R keys together and type appwiz.cpl then hit enter.
Step 13: Search for all the printer-related OEM or third-party software, right-click on them and click uninstall.
Step 14: Also remove third-party print monitors, to do so open the registry editor by typing registry in the windows search bar and hitting enter.
Step 15: Navigate to the below location, and delete third-party monitor entries from this location.
Computer\HKEY_LOCAL_MACHINE\SYSTEM\CurrentControlSet\Control\Print\Monitors
Note: Do not delete the print monitors like Local Port, LPR Port, Microsoft Shared Fax Monitor, Standard TCP/IP Port, USB Monitor & WSD Port, AppMon
Step 16: Make sure the startup type is Automatic [As mentioned in Step 2] and restart your system.
Step 17: Now reinstall the printer. To do so open settings using Windows + I keys. Click on Devices.
Step 18: On the left side click on Printers & scanners then click on Add a printer or scanner and follow the on-screen instructions to add the device.
Step 19: Now that we have a clean setup the issue will be resolved. Go ahead and print the document.
That’s it! Hope this article helped you to solve the issue. Share your thoughts on which method worked for you. Thank you !!!


