Spotify, one of the best music streaming platforms, supports all devices across various platforms. So, if you are experiencing problems opening the Spotify app and seeing the error message “The Spotify application is not responding.” on the screen, don’t worry. Spotify Windows client crashes often and with the latest update, it should be fixed.
Workarounds –
1. If you are experiencing this issue for the first time, you should close Spotify and relaunch the Spotify app.
2. If only relaunching the Spotify app doesn’t work, restart your computer and check if that works.
Fix 1 – Check the Internet Connection
You can’t start Spotify in Offline mode, even when you have downloaded a playlist of songs on your computer. So, you have to make sure that your computer is properly connected to the internet before you startup Spotify.
Usually, Spotify verifies your identity and automatically logs in while you start the app for the first time. Do that and test. Spotify should open up just fine.
Fix 2 – Kill the Spotify process
If there is a Spotify process is already running on your system, try killing it first and then relaunching Spotify.
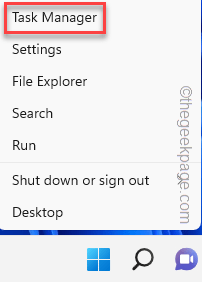
1. At first, press the Win key+X keys together.
2. Then, tap “Task Manager” to open the Task Manager window on your computer.
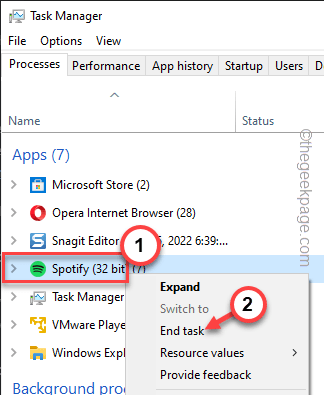
3. Here, in the Apps section, look for the “Spotify” process running.
4. Just, right-tap such process and click “End task” to kill that.
5. Even after ending the Spotify app process in the foreground doesn’t end all the app threads.
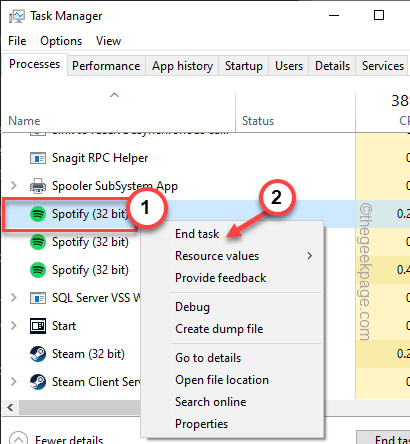
6. Next, go to the Backgrounds section, and look for any Spotify-related processes.
7. If you can locate any such processes, right-tap it and tap “End task” to kill it.
This way, make sure there aren’t any Spotify processes running on the system.
Close the Task Manager utility.
Next, restart the system. Then, when you are back, relaunch Spotify. It will launch without any further issues.
Fix 3 – Clear Spotify files and reinstall it
You should clear the Spotify cache and uninstall and reinstall the app.
Step 1 – TerMinate SPOTIFY
Exit Spotify and kill any Spotify processes.
1. Close the Spotify app.
2. Even if you close the app, some app services carry on running in the background.
3. So, right-tap the Windows icon and tap “Task Manager“.
4. Look for any Spotify-related process thread running in the background.
5. Select the such process and tap “End task” to kill that.
After ending Spotify processes close the Task Manager window.
Step 2 – Uninstall the Spotify app
Stop Spotify and uninstall the Spotify application from your computer.
1. At first, press the Windows key along with the X keys together.
2. Next, tap “Apps and Features“.
3. Coming to the Programs & Features page, look for the “Spotify” app.
4. Then, click on the three-dot menu and tap “Uninstall“.
Now, just follow the steps on your screen to completely uninstall the app from your system.
Step 3 – Empty the Cache
Even uninstalling the Spotify app doesn’t empty some of the app files.
1. At first, press the Windows key along with the R keys together.
2. Then, type this in the Run box and click “OK“.
control folders
3. When you reach the Folder Options screen, head on to the “View” tab.
4. Here, in the ‘Hidden files and folders’ paragraph, make sure that you toggled the “Show hidden files, folder and drives” check mark.
5. Finally, click “Apply” and then tap “OK” to save and apply the changes.
6. Now, open the File Explorer page.
7. On the File Explorer screen, go down to this point –
C:\Users\%username%\AppData\Roaming\
8. When you have reached the Roaming page, look for the “Spotify” folder inside there.
9. Then, select the folder and tap the “Delete” key from your keyboard to remove the folder completely.
Once you have deleted the Spotify folder, close File Explorer.
Step 4 – Reinstall Spotify
Now, just download the Spotify installer and install the Spotify desktop client.
1. Go to the Spotify website to download the installer on your device.
2. Tap “Download“.
3. After downloading the installer, double-tap the “SpotifySetup” to start the installer.
Now, just follow the on-screen steps to complete the Spotify installation.
Once you have installed the Spotify desktop client, go ahead and test it out. You won’t see the “The Spotify application is not responding.” error message while launching Spotify.
Fix 4 – Update the Spotify app
It is quite easy to update the Spotify app. Usually, these updates patch bugs and stabilize the app’s performance.
1. Open Microsoft Store.
2. Go to the “Library” from the left-hand side.
3. Here, just scroll down through the right-hand pane to find the “Spotify” app.
4. Tap “Update” to update the app on your computer.
Once you have updated the app, close the Store window and check if this helps.
Fix 5 – Disconnect from the network
You can turn off the network connection before you launch the Spotify app and test.
1. Disconnect from the WiFi network or any kind of internet connection you are using.
2. Then, turn off the WiFi on your device.
3. Then, unplug the network adapter from your computer.
4. Next, launch Spotify.
When the Spotify app is launching, connect to the WiFi again and test.
Fix 6 – Disable the Hardware acceleration feature
You can do this only if you can open the Spotify app following the solutions we have mentioned before.
1. Open the Spotify app.
2. When it launches, tap on your username in the left-top corner.
3. Then, click on “Settings“.
4. Just scroll down through the right-hand pane, and tap “SHOW ADVANCED SETTINGS“.
5. Then, scroll down and set the “Enable hardware acceleration” to “Off“.
After this, close Spotify and relaunch it once more. This way, you won’t see the same error message again.


