Are you seeing barrages of spam emails with no sender address in your main email inbox? This can be quite frustrating as your important mails may get mixed into all those useless spam mails. Another infuriating thing is that you can’t even reply back to an email with no sender email address. So, if you have found yourself in this situation, nothing to worry. Follow these solutions to get sort this problem out as soon as possible.
Fix 1 – Create a new rule to filter no sender
You have to create a new rule to filter out all the emails with no sender address. You can either move these emails or delete those completely.
Step 1 – Open the Outlook and go to your Inbox.
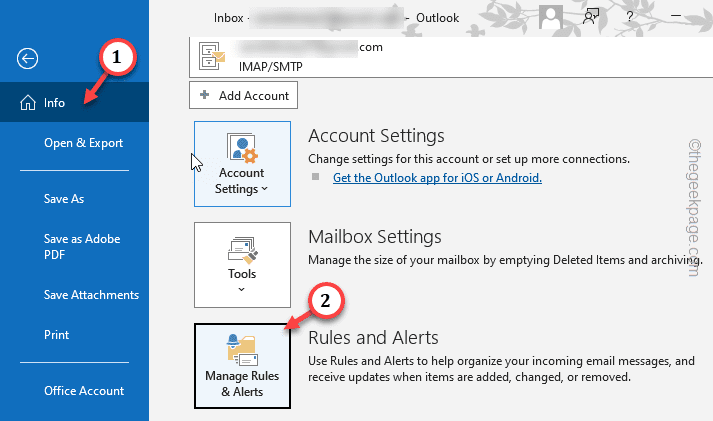
Step 2 – Now, tap the “File” and then, go to the “Info” tab on the left ribbon.
Step 3 – On the right-hand pane, you will see the ‘Rules and Alerts’ section. Tap “Manage Rules & Alerts” to access that.
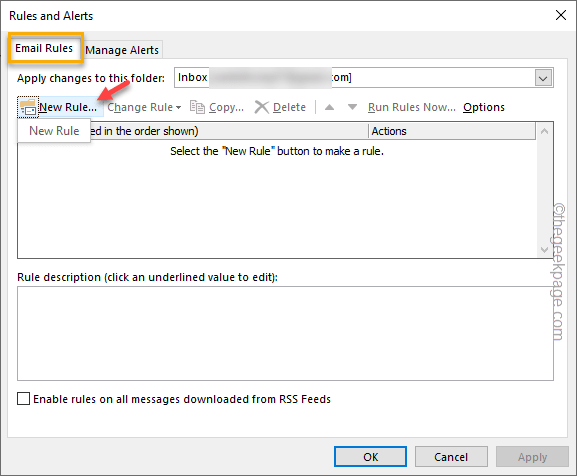
Step 4 – In the Email Rules section, tap “New Rule…” to start the process of creating a new rule.
This will open the Rules Wizard where you can configure the rule to filter out the No Sender emails.
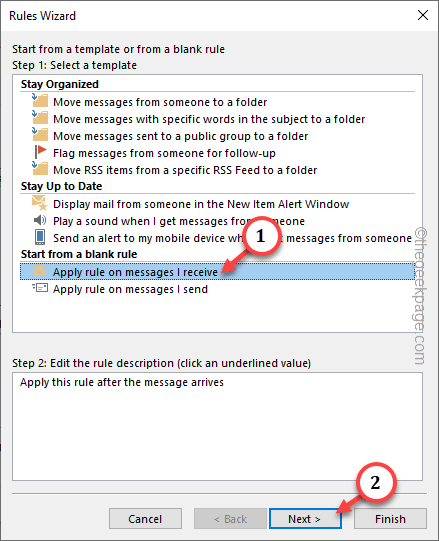
Step 5 – In the Start from a blank rule box section, tap “Apply rule messages I receive” option.
Step 6 – Then, tap “Next” to proceed.
Step 7 – In Step 1: Select conditions tab, check the “from people or public group“.
Step 8 – Now, go to the Step 2: Edit the rule description box and tap the “people or public group” hyperlink.
Step 9 – Now, find the “No Sender” from the address book. Additionally, you can search for “No sender” using the search box.
Step 10 – Once you have located the “No Sender” in the list, double-tap that and tap “OK“.
Step 11 – This will take you back to the Rule Wizard page. Just tap “Next” to proceed.
On the next step, you have to decide whether you want to move those messages to the Junk/Trash/Spam folder or delete those completely.
Step 12 – In the What do you want to do with the message prompt, tick mark the “move it to the specified folder” or “Delete it“.
NOTE – We recommend you use the moving option as that way there aren’t any risk of losing an important mail.
Step 13 – Now, get down to the Step 2 section and tap “specified” folder to specify that.
Step 14 – A small dialog box consisting your inbox breakup should overlay on your screen.
Step 15 – Choose either the “Spam” or “Trash” folder. Click “OK” to complete the selection process.
Step 16 – Reverting to Rules Wizard page, tap “Next” to proceed.
Step 17 – The next step is adding some exceptions to the rule. It is completely up to you whether you want to allow some exceptions or not.
Go through the entire list of exceptions and decide. If want to put some exceptions, you have to specify the conditions as well (just like before).
Step 18 – Then, tap “Next” to proceed.
Step 19 – This way, you should reach the final step. Here, give a name to the rule (like, we have given “No Sender“).
Step 20 – Make sure to check these boxes –
Run this rule now on messages already in 'Inbox'
Turn on this rule
Step 21 – If you want to apply the rule to other account inboxes, tick the “Create this rule on all accounts” box.
Step 22 – Finally, click “Finish” to complete the process.
This rule will filter out all the emails from No Sender and move them to Spam/ Trash box.
Fix 2 – Block the email address
Block the email address manually from the main inbox page to get rid of this issue.
Step 1 – Just open the inbox in the Outlook.
Step 2 – Look for the “No Sender” mail. Then, right-click the email and tap “Junk“.
Step 3 – From the context menu, tap “Block Sender” to block the sender.
This way, you won’t receive any further No Sender emails again.
Fix 3 – Use the highest level of Junk Filter
Use the highest level of Junk filter to get rid of the No Sender emails.
Step 1 – In the Outlook app, go to the “Home” tab.
Step 2 – Tap the “Junk” button and choose “Junk E-mail Options“.
Step 3 – In the “Options” tab.
Step 4 – Choose this option –
High: Most junk email is caught, but some regular mail may be caught as well. Check your Junk email folder often.
Step 5 – Finally, tap “Apply” and “OK” option to set the junk filter.
Once you have done this, there won’t be any No Sender emails in your main inbox. But, as it already mentioned, using the high filter mode may take some of your mail to the Junk box. So, do have a look in the bin once in a while.
Fix 4 – Are these emails stored in Junk
Outlook has a default filter that sieves out all the unwanted emails directly to the Spam or Trash folder. So, if you are seeing these No Sender emails in the Spam or Trash folder in your account, that is nothing to be worried about. Just ignore these mails.
Fix 5 – Use Email filtering third-party tools
Though we have mentioned the rule creation steps to easily filter out No Sender emails in your account, it may not be enough for a handful of users. There are a few third-party tools that can be helpful managing spam emails real time –
You can use the filtering tools to filter out the No Sender mails.


