The error code 0x80049d is bound with the voice typing feature. Some users have faced this issue while trying to voice type in Windows 11. Mainly when the audio device driver malfunctions or it does have an old, corrupted driver, this error message shows up “Something went wrong 0x80049dd3“. So, without wasting any more time, follow these steps to fix the problem quickly and start to use the microphone again.
Fix 1 – Run the Recording Audio troubleshooter
You should run the recording audio troubleshooter so that it can determine the problem and fix the issue accordingly.
1. Open the Settings by right-clicking the Windows icon and clicking on “Settings“.
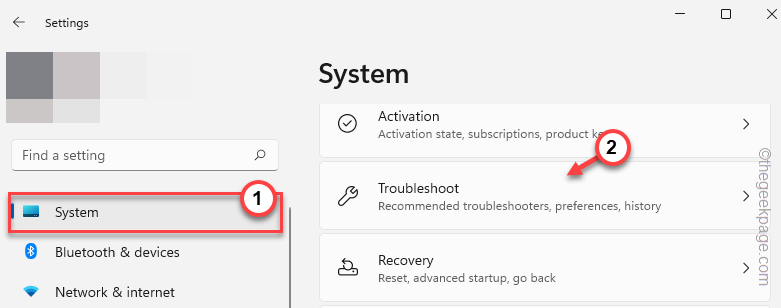
2. When you reach the Settings page, click on “System” settings.
3. On the right-hand pane, click “Troubleshoot” to open that.
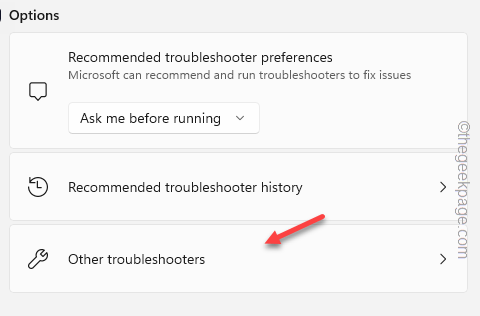
4. Now, if you look on the same side of the screen, you can find the “Other troubleshooters” option. Tap it to open that.
5. Go through this list and find the “Recording Audio” troubleshooter. Tap “Run” to run that troubleshooter.
Wait for this troubleshooter to run diagnostics on the microphone and prescribe a solution to the issue. The troubleshooter will automatically apply the solution.
Now, exit the Settings page and try to voice type a line. Proceed to the next solution if this one doesn’t work.
Fix 2 – Enable the Speech Recognition
The voice typing feature can run into this problem if the Windows Speech Recognition feature is disabled on your computer.
1. Open Settings. You can do it by pressing the Win key+I keys together.
2. Then, click on “Accessibility” on the left-hand pane.
3. Next, tap “Speech” to access that.
4. Now, on the right-hand section, set the “Windows Speech Recognition” option to “On” mode.
Now, once you have enabled the Speech Recognition feature, try to use the voice typing feature.
This time it should work without any further issues.
Fix 3 – Allow the microphone access
Microphone access is needed for the apps to access it and work properly.
1. Right-click the Windows icon on your taskbar and tap “Settings” to open it.
2. On the Settings page, click “Privacy & Security” on the left-hand pane.
3. Now, tap “Microphone” settings.
4. Now, on the right-hand pane, you can see the “Microphone access“.
5. Turn it On.
6. Next, make sure the “Let apps access your microphone” option is toggled On.
7. You may see several apps in the list under the specified option. Look for your app there and make sure that specific app is turned “On“.
Close the Settings.
Then, try to use the voice typing feature on your computer.
Fix 4 – Setup the mic
Set up the microphone from Settings to quickly fix the microphone issue.
1. Launch the Settings window.
2. Then, click on the “Time & Language” settings.
3. After that, go to the right-hand pane, and tap “Speech” to access that.
4. Now, look for the “Microphone” option.
5. Then, tap “Get started” to start the speech recognition process.
Now, just follow the on-screen instructions and complete the process.
Fix 5 – Use another account
This problem seems to be related to your main account on your computer. Add a separate account and voice type from there.
1. Open the Settings page. To do that, press the Win key+I keys together.
2. Click on “Accounts“.
3. After that, scroll down through the right-hand pane and tap “Family & other users” settings.
4. You can add accounts as a family member or another user.
5. After this, tap “Add account” to add a new account on your computer.
6. On the next page, you will be asked the ‘How will this person sign in’ option. So, tap the “I don’t have this person’s sign-in information” option.
7. Now, select this “Add a user without a Microsoft account” option.
8. Now, input various information like username, and account password.
9. Then, tap “Next” to proceed to the final step.
10. After creating the account, click on the account that you have created to expand it.
11. Then, click “Change account type“.
12. Then, click on the drop-down and tweak the account type to “Administrator“.
13. Next, click “OK” to save the account type change.
After altering the account type, close the Settings page.
Now, press the Ctrl+Alt+Delete keys together.
14. Later, tap on “Sign out” to sign out from the system.
15. You will come to the lock screen page.
16. Input the password and log in using this account.
Fix 6 – Install the Microphone driver
Update the microphone driver to the latest version.
1. Press the Windows key once and type “device” using the keyboard.
2. Then, click “Device Manager” to access it.
3. When the Device Manager opens up on your system, click the “Audio inputs and outputs” section to see all the audio input options.
4. Then, right-tap the microphone device and tap “Update driver” to update the driver.
5. Here, you can see two options to update the audio driver.
Either you can choose the “Search automatically for drivers” option. This way, Windows performs a search for the latest driver and install it.
6. Otherwise, you can also choose “Browse my computer for drivers“.
7. Comin on to the next page, and click on “Let me pick from a list of available drivers on my computer“.
8. Then, tap “Next” to choose an available driver for the microphone device.
This way, wait for Windows to install the latest available driver.
Once Windows does that, close the Device Manager screen and restart the device.
Then, retry using the text-to-speech option or voice typing feature. Check if this solves your problem.
Fix 7 – Uninstall and reinstall the mic driver
Uninstall the microphone driver from your computer and reinstall the driver on your computer.
1. Search for the “device” using th search box.
2. Then, click on “Device Manager” and access the Device Manager page.
3. When on the Device Manager screen, expand the “Audio inputs and outputs“.
4. Then, right-tap the problematic microphone device and tap “Uninstall device“.
5. Additionally, you have to delete the driver software also. So, check the “Delete the driver software for this device“.
6. Then, tap “Uninstall” to uninstall the driver.
After that, close the Device Manager. Then, restart your computer.
Restarting the system reinstalls the uninstalled device driver. So, when the system boots up, type something using your voice and check.
Your problem should be solved.


