Windows 10 would have now become the part and parcel of your digital life. All the features and enhancements developed exclusively on Windows 10 are ,in fact, highly appealing. One of its major features is the System File Checker or SFC. This is mainly used to do a thorough scan on the complete file system of your PC. This can easily detect any corrupted files and the missing contents of file. Whenever you find that a file doesn’t open properly, or there are any corruptions with the file that gets downloaded from browsers, then they need to be scanned or the browser needs to be reset. This can happen mainly due to network traffic congestion or the involvement of viruses in the files. Also, another cause may be due to the improper service running behind the Windows Module Installer.
To overcome such issues, a very easy way is to open up the command prompt in Admin mode. Once the window opens up, type in the command sfc/scannow. The scan begins immediately and you will have to wait for about 5 minutes till the verification phase completes. But many a times you do this, an error given below pops up.
“Windows Resource Protection could not start the repair service”
Here, I will show you how to tackle such situations. Once you follow the below given steps, you will never find the error again. Also, the scan will run appropriately as intended.
STEPS TO OVERCOME THE ERROR IN SYSTEM FILE CHECKER
STEP 1
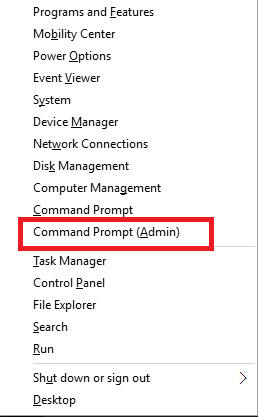
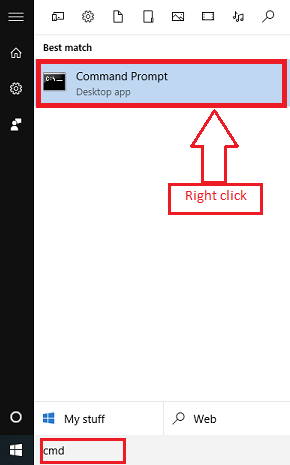
- Press the Windows+X keys together. This will open up a series of options. You will have to choose the option Command Prompt(Admin) to open in Administrator mode. Alternatively, typing cmd in the search bar, right clicking on command prompt and choosing the option Run as Administrator will also work.
Alternatively,
Right click on Command prompt and run it as admin.
STEP 2
- Once the command prompt opens up, if it prompts you to provide the username and password, type it and press the Enter key. This grants permissions for the Admin to make changes in the system.
STEP 3
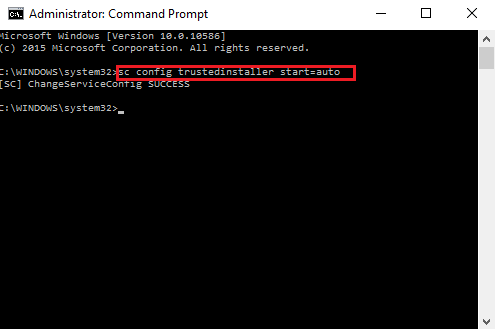
- Now type the command that is given below and press the Enter key. when you do that, you must get a success message.
sc config trustedinstaller start=auto.
This command is to start the configuration installer for the software checker.
STEP 4
- Again, you will have to type the next command provided below and press the Enter key. You will now get a message on successful start of the intended service.
net start trustedinstaller
STEP 5
- Type the command sfc/scannow. It will start working properly without showing any errors.
Hope this article is helpful to you.!


