Microsoft Software Protection Platform service or sppsvc.exe always runs in the background to check the legitimacy of the Windows Activation keys, Office license keys, etc. Usually, this service consumes a negligible amount of hardware resources (less than 5%). But, in some unusual cases, this sppsvc.exe seems to eat up a huge chunk of computer resources.
Fix 1 – Suspend the sppsvc.exe process
You can use the Resource Monitor to suspend the sppsvc.exe process.
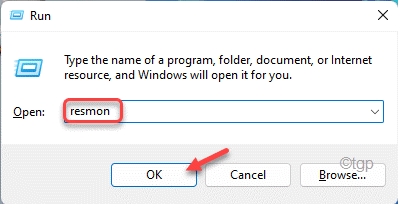
1. At first, press the Windows key+R keys together.
2. Then, type “resmon” and hit Enter.

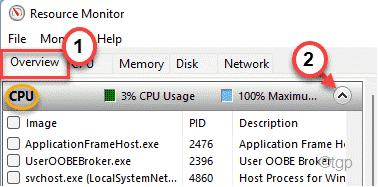
3. When the Resource Monitor appears, go to the “Overview” tab.
4. Then, expand the “CPU” tab.

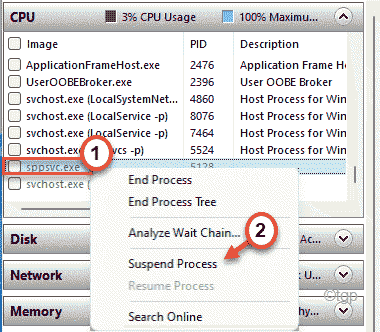
5. Then, look for the “sppsvc.exe“.
6. After that, right-click on the process and tap on “Suspend Process“.

After suspending the process, close the Resource Monitor window. Open the Task Manager and check whether it is still eating up your resources.
Fix 2 – Stop the sppsvc service
If suspending the service doesn’t work out, you can try to stop the Software Protection service.
1. At first, press the Windows key and start to type “services“.
2. Then, tap on the “Services” in the search result to open the Services.

3. When the Services opens up, look for the “Software Protection” service.
4. Then, right-click on the service and click on “Properties“.

5. You can not change the ‘Startup type:’ i.e. you can’t disable this particular service.
6. If the service is ‘Running’, tap on “Stop“.

7. Finally, click on “Apply” and “OK” to save the changes.

After that, close the Services screen.
Fix 3 – Disable the sppsvc permanently
You can disable the Software Protection service.
1. At first, press the Windows key along with the R key.
2. Then, type “regedit” and hit Enter to open the Registry Editor.

Disclaimer – You are going to alter a particular registry key on your computer. This changes may cause further issues, even irreversibly brick the system. So, pay close attention to these instructions.
After opening the Registry Editor, click on “File“. Then click on “Export” to make a new backup on your computer.

3. After taking the registry backup, go to this location –
HKEY_LOCAL_MACHINE\SYSTEM\CurrentControlSet\Services\sppsvc
4. Now, on the right-hand side, you will see a value named “Start“.
5. Carefully note down the value of this ‘Start’. It will be useful later.
[In our case, it is “2”]

6. Simply, double-click on the value to modify it.

6. Set the value to “4“.
7. Finally, click on “OK” to save it.

Once you are done, close the Registry Editor and restart your computer.
After restarting, sppsvc won’t run in the background as it is already disabled.
WARNING –
Disabling the Software Protection service or the sppsvc permanently will cease the software protection system the legitimatize the activation keys, dynamic licenses. So, you will see this – “Windows could not start the Software Protection service on Local Computer” error message on your screen.
Moreover, you will see the ‘Windows is not activated’ watermark on your computer. Word, OneNote, Excel will stop functioning. So, if you decide to re-enable the Software Protection again.
1. At first, press the Windows key and type “regedit” and hit Enter.

This will open up the Registry Editor.
2. Then, again steer to this location from the left-hand side ~
HKEY_LOCAL_MACHINE\SYSTEM\CurrentControlSet\Services\sppsvc
3. Now, on the right-hand side, double click on the “Start” value to edit it.

4. Now, input the value that you had noted before altering it.
[In my case, it was set to “2“. ]
5. Then, click on “OK“.

Finally, close the Registry Editor and reboot the system once. Upon rebooting, the software protection service will start up again.
Fix 4 – Remove the task from Task Scheduler
Windows do create a task of running the Software Protection service in a certain interval of time.
1. At first, press the Windows key+R keys together.
2. Paste this UTR command and hit Enter.
taskschd.msc

3. When the Task Scheduler opens up, expand the left-hand side this way ~
Task Scheduler Library >> Microsoft >> Windows >> SoftwareProtectionPlatform
4. Now, on the right-hand pane, you will find the “SvcRestartTask“.
5. Then, right-click on the task and tap on “Disable“.

Once the task is disabled, you can close the Task Scheduler.
Now, restart your computer.
Fix 5 – Update your system
If the system is not updated to the latest version, follow these steps.
1. At first, press the Windows key+I keys together.
2. Then, click on the “Windows Update” at the end of the left-hand side.
3. Then, on the right-hand side, click on the “Download Now“.

Windows will now download the update for your system and install it. Restart your computer once it is done.
Your problem will be solved.