Are you having trouble connecting a USB device to your computer? Is none of your USB devices working on your computer? If you have recently upgraded your computer to Windows 10 and you are facing this same issue, you are not the only one.
Many users are facing this trouble. Doesn’t matter which USB device you connect, your computer just wouldn’t detect it. We have found the solution to this problem. We will be showing you a number of ways to fix this problem. Simply perform them one by one until the issue is fixed.
Also Read: USB ports not working
How to Fix USB Ports Not Working
The reason behind this issue can be anything from outdated drivers to wrong settings. That’s why, to fix this issue, you may have to perform a number of methods. Just start with the first method, and try each one until you are able to use your USB ports again.
⭐ Preliminary Fix
1 – Unplug charger and power supply from the laptop.
2 – Restart the laptop.
3 – Reconnect the USB device to the laptop.
4 – Connect charger and power supply to the laptop.
This should fix the problem. If it didn’t, perform the methods mentioned below.
Fix 1 – Update all USB driver
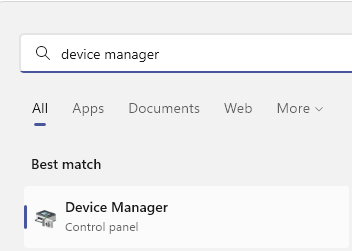
1 – Search Device manager in Windows search box.
2 – Now, Click on device manager from the search result to open it.

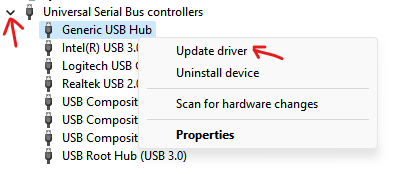
3 – Now, Once the device manager window pops up, Just Double click on Universal serial bus controllers to expand it.
4 -Now, next step is Update all the USB items from the list.
So, starting from first, Just right click on it and choose Update driver

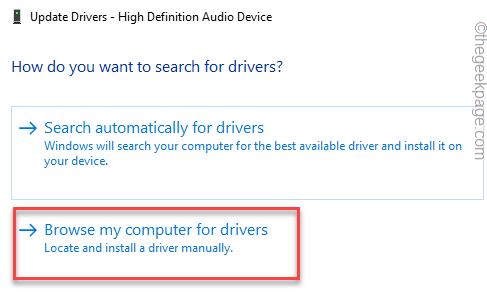
5 – Now, click on Browse my computer for drivers

6 – Now, Click on Let me Pick from a List of available drivers on My computer

7 -Now, Select the first Item from the list.
Note: – If there is only one item in the list , then select that only one item.If there are more than one , then select the top item from the list.
Now, click Next

Repeat these steps for all the USB items in the list starting from step 4 given above.
Problem solved
Fix 2 Check Power Management Settings
Windows 10 tries to save power by switching off USB controllers when they are not needed. It turns them on, only when they are required for use. But, sometimes this doesn’t work the way this power saving system is intended to work, and the computer fails to turn USB Controllers on.
This could be the issue for you as well. This method has worked for many users. Simply follow the steps mentioned below to perform this method.
Step 1. Right-click on the Start menu button and select Device Manager.

Step 2. Expand Universal Serial Bus controllers

Step 3. Look for the first USB Root Hub. In some computers, it could be just one. Right-click on it and select Properties.

Step 4. Go to Power Management tab. Here, unmark the box beside Allow the computer to turn off this device to save power. Click on OK.

Step 5. Repeat Step 3 and Step 4 for other USB Root Hub devices under Universal Serial Bus controllers.
This should fix the problem. Connect your USB device to the USB port and check if your computer recognizes it. If nothing happens, try the next method.
Fix 3 Check Power Supply (for laptop users)
Sometimes, the power supply fails to supply the power to USB ports. This can result in USB ports to stop working. Follow this method to fix this issue.
Step 1. Unplug your laptop’s power supply, along with the charger plug.
Step 2. Now, restart the laptop.
Step 3. Reconnect the USB device to the USB port of your laptop.
Step 4. Plug charger and power supply back on your laptop.
This should fix the problem. If you are still facing the same issue, follow the next method.
Fix 4 Uninstall Drivers
In this method, we try to fix the issue by uninstalling the drivers for Universal Serial Bus controllers. The Windows will automatically reinstall the drivers after restarting the computer. Follow the steps to perform this method.
Step 1. Right-click on the Start menu button and select Device Manager.

Step 2. Expand Universal Bus Controllers. Here, right-click on the USB Root Hub select Uninstall device.

Step 3. Repeat the above step for remaining USB Root Hub.
Step 4. Restart your computer.
After performing the restart, the Windows will recognize USB Root Hubs as new device and will install its drivers automatically. This should fix the problem. Connect your USB device and check if it works properly. If it doesn’t, try the next method.
Fix 5 Update Drivers
As reinstalling the drivers didn’t work for you, updating them might. In this method, we will update all the USB Root Hubs. Follow the steps to perform this method.
Step 1. Right-click on the Start menu button and select Device Manager.

Step 2. Expand Universal Bus Controllers. Here, right-click on the USB Root Hub select Update driver.

Step 3. Now click on Search automatically for updated driver software. This will download and install the updated drivers for USB Root Hub on your computer.

Step 4. Repeat the above two steps for remaining USB Root Hub.
Step 5. Restart your computer.
Now, connect the USB device and see if your computer recognizes it or not. If you are still facing trouble connecting your USB device, follow the next method.
Fix 6 Turn Off Fast Startup
Windows 10 boots up very quickly and this happens due to new fast startup feature. But, sometimes the computer doesn’t detect some devices while booting because there isn’t enough time. This may have caused the issue. In this method, we will turn off fast startup and check if this solves the problem. Follow the steps to perform this method.
Step 1 – Press Windows key + R together to open run.
Step 2 – Write powercfg.cpl in it and click OK.

Step 3. On the left side of the window, click on Choose what the power button does.

Step 4. Now, select Change settings that are currently unavailable. This will let you change the shutdown settings.

Step 5. Under Shutdown settings, unmark the box beside Turn on fast startup (recommended). And click on Save changes.

Step 6. Restart your computer.
After your computer restarts, connect the USB device to a USB port and check if it works now. If it’s still not working, then go back to Shutdown settings and turn on fast startup as it isn’t causing the problem and it helps your computer in waking up quickly. After that, perform the next method.
Fix 7 Disable USB Selective Suspend Setting
Many users have reported that simply disabling the USB Selective Suspend setting has worked for them. In this method, we will do the same and see if this resolves the error. Follow the steps mentioned below to perform this method.
Step 1 – Search Edit Power Plan in windows search box and Now, click on edit power plan from the search result.

Step 2. Select Change advanced power settings.

Step 3. Look for USB Settings and expand it. Here, change the USB selective suspend setting to Disabled. Now click on OK.

Check if this fixes the problem. If it didn’t, perform the next method.
Fix 8 Change Registry
In this method, we will perform a few changes in your computer’s registry. Before playing around with the registry, you should perform a backup of the registry. After that, we will continue with the method. Follow the steps below to do so.
Step 1. Right-click on the Start menu button and select Run.
Step 2. Here, type regedit and click on Ok.

Backup: To perform a backup of the registry, simply go to File drop-down menu and select Export. After that, save the backup file at your desired location. Do select Export Range as All before saving the file.

Step 3. Now, you need to follow the path mentioned below.
HKEY_LOCAL_MACHINE > SYSTEM > CurrentControlSet > Control > Class > {4d36e965-e325-11ce-bfc1-08002be10318}

Step 4. On the right side, look for LowerFilter and UpperFilter. Right-click on them and select Delete. If none of these is available on your computer, then this solution won’t help you. You can skip this method.
Step 5. After deleting them, perform a restart.
After the restart, check if this method has fixed the problem for you or not. If it didn’t help, perform the next method.
Fix 9 Troubleshoot the issue
In this method, we will try to fix the issue using troubleshoot. The Windows will try to solve the problem by itself. Follow the steps mentioned below to perform this method.
Step 1. Go to Cortana and type Troubleshoot. Select the same from results.

Step 2. Click on Hardware and Devices.

Step 3. The Windows will check for issues. When done, click on Apply Repair Automatically or Apply this Fix, whichever appears.
Step 4. Restart your computer.
This should fix the problem. If troubleshooting didn’t help in fixing the issue, perform the next method.
Fix 10 Install Important Updates
If none of the above-mentioned methods worked for you, maybe there is an important Windows update pending, and installing it may fix the problem. Why? Because Microsoft releases updates regularly with fixes to many bugs and errors, and your problem’s fix might be in it. Follow the steps to install important pending updates (if any).
Step 1. Right-click on the Start menu button and select Settings.
Step 2. Go to Update & Security.
Step 3. Select Check for updates. If there are any pending updates, download and install them.
Step 4. After installing the updates, restart your computer.
This should fix the issue. And, if even this didn’t help your case, then there is something wrong with the USB device or your USB port. For USB Port, take your computer to the nearest authorized service centre and get it repaired.
We hope we were able to help you fix this problem using our methods. If you were able to solve the issue using some other method, or if you have any questions regarding this issue, please mention them below in comments.