You record your screen. You hit stop. And then Snipping Tool throws up “failed to save” and the whole clip is gone. Minutes of recording. Vanished. And it doesn’t even tell you where things went wrong.
Why This Happens
Short version? Snipping Tool doesn’t save your recording straight to disk.
It writes the clip to a temporary staging folder first. A holding pen. Only after that does it commit the file to your Videos folder.
So the failure can come from a few different spots. Maybe that staging folder has a corrupted leftover file jamming things up. Maybe your Videos folder got moved and the app has no idea where to put the finished clip.
And sometimes it’s the GPU. Snipping Tool leans on your graphics card to encode video. When that hand-off glitches, the save just dies.
One more. Windows can suspend the app in the background before it finishes writing. Annoying, and easy to miss.
Fix 1 – Repair the App First
Start here. A repair fixes a broken save path without touching your settings.
1 – Press Windows + I to open Settings.
2 – Click Apps in the left sidebar.
3 – Click Installed apps.
4 – Type Snipping in the search box at the top.
5 – Then, click the three dots (⋯) next to Snipping Tool, then click Advanced options.
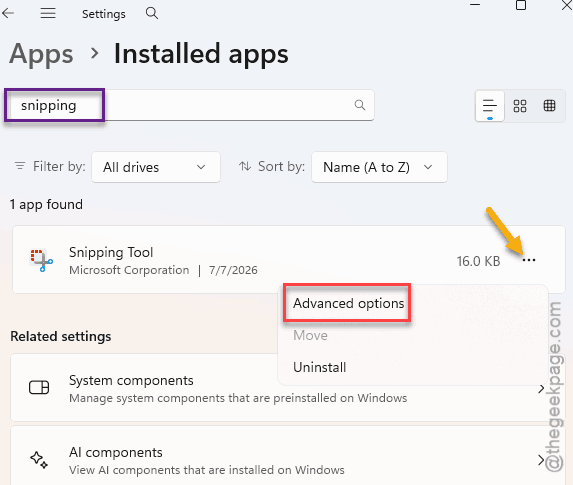
6 – Scroll down and click Repair. Wait for the checkmark to appear next to it.
7 – Still failing? Click Reset right below it. This one wipes the app’s settings, but not your saved clips.
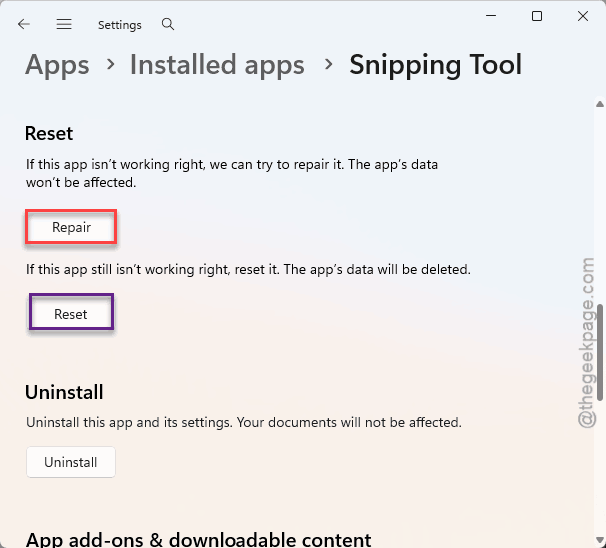
Try a short recording after each button. If Repair alone fixes it, you never need to touch Reset.
Fix 2 – Clear the Staging Cache
Remember that holding pen the recording gets written to before it’s saved? If a file in there is corrupted, every new save fails on top of it.
1 – Press Ctrl + Shift + Esc to open Task Manager.
2 – Find Snipping Tool in the list. Right-click it and choose End task.
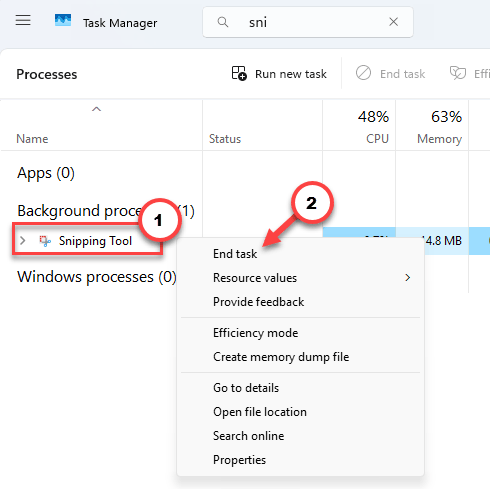
3 – Press Windows + R to open the Run box.
4 – Paste this exactly, then press Enter:
%localappdata%\Packages\Microsoft.ScreenSketch_8wekyb3d8bbwe\LocalState
5 – Open the TempState folder.
6 – Select everything inside it (Ctrl + A) and delete it. You’re only deleting temp junk here, not your real recordings.
7 – Restart your PC and record again.
Check if this works.
Fix 3 – Try Restoring to Default settings
Did you ever move your Videos folder to another drive to save space? Restore it to the default settings.
1 – Press Windows + E to open File Explorer.
2 – Click This PC on the left, then right-click the Videos folder.
3 – Click Properties.
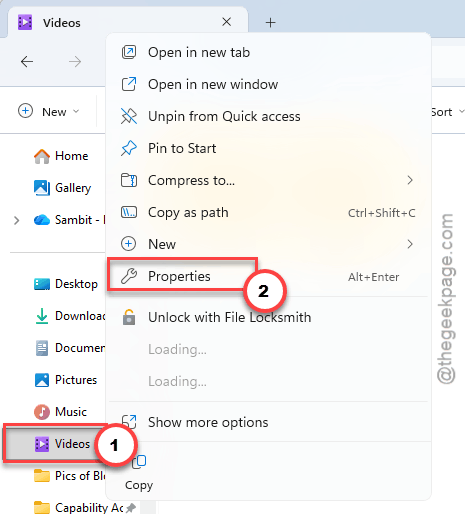
4 – Click the Location tab at the top.
5 – Click Restore Default, then click Apply.
6 – If it asks to move your files back, let it.
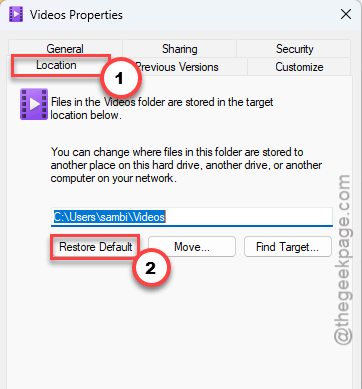
Now the app knows exactly where to drop the finished clip.
Fix 4 – Turn Off GPU Scheduling
This one’s for the GPU glitch. Turning off hardware-accelerated scheduling forces Windows to encode the video with software instead. Slower, sure. But it sidesteps the graphics conflict entirely.
1 – Press Windows + I to open Settings.
2 – Click System, then Display.
3 – Scroll down to Graphics and click it.
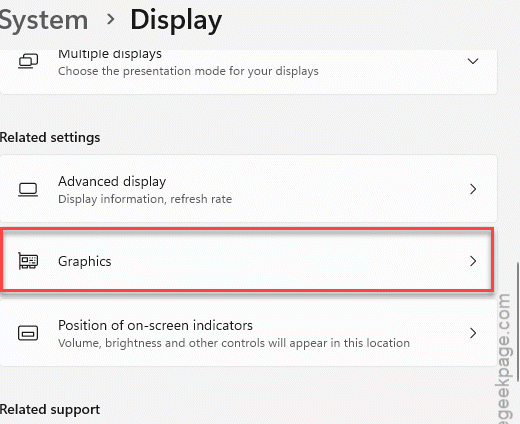
4 – Click Advanced graphics settings near the top.
5 – Quickly, turn off the toggle for Hardware-accelerated GPU scheduling.
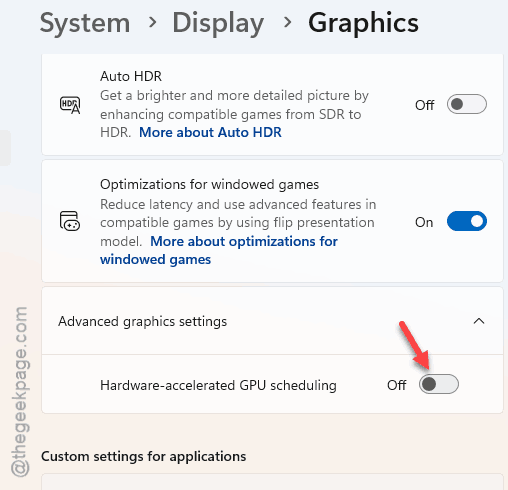
6 – Restart your PC. This setting only takes effect after a reboot.
Fix 5 – Let the App Run in the Background
Quick one. If Windows keeps suspending Snipping Tool mid-save, this stops it.
1 – At first, go to Settings. Then, click Apps. Later, proceed to the Installed apps.
2 – Do a search for Snipping Tool.
3 – Then, click the three dots (⋯), and click Advanced options.
4 – Under Background apps permissions, set the dropdown to Always.
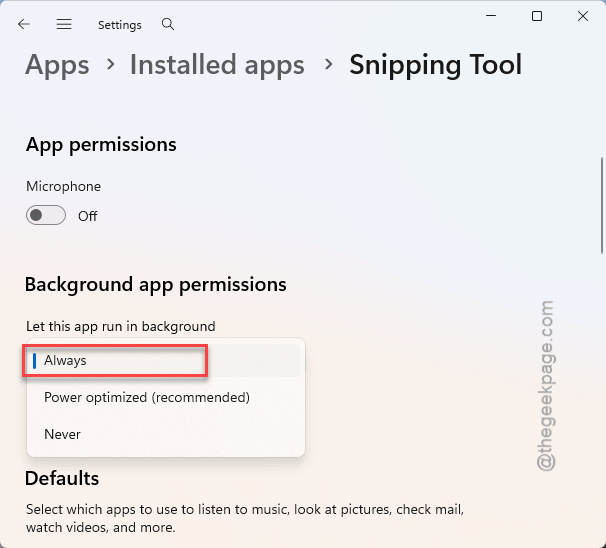
That’s it. Check if this works.
Fix 6 – Reinstall From Scratch
Nothing worked yet? Time for the deep clean. A normal uninstall leaves broken registry keys behind. Doing it through PowerShell clears those out too.
1 – At first, right-click the Start button and choose Terminal.
2 –Then, type this command in the powershell terminal, and press Enter:
Get-AppxPackage *SnippingTool* | Remove-AppxPackage
4 – The app disappears. Don’t panic — that’s the point.
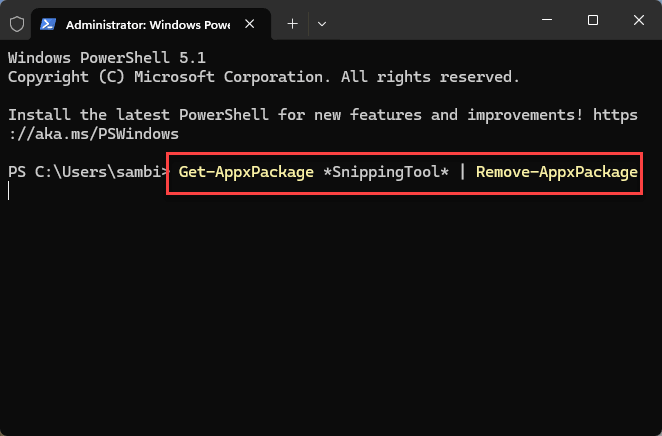
5 – Open the Microsoft Store, search for Snipping Tool, and reinstall it.
6 – Record a quick test clip to confirm the save works.
Check if this works.
How to Prevent This
– Keep your Videos folder in its default spot. Move it, and the save path breaks. Not worth the hassle.
– Clear that TempState folder now and then if you record a lot. Old junk builds up.
– Update Snipping Tool through the Microsoft Store when prompted. Microsoft has patched a few of these save bugs already.
– Leave background permissions on Always for the app. Saves you the mid-recording cutoff.
People Also Ask
Why is Snipping Tool recording not working?
Usually it’s a corrupted temp file in the app’s staging folder, or a Videos folder that got moved. The app records fine but chokes when it tries to save. Repairing the app through Settings clears the most common version of this. If that misses, clearing the TempState cache almost always does it.
How do I fix Snipping Tool not saving?
Start with a Repair from Settings > Apps > Snipping Tool > Advanced options. No luck? End the app in Task Manager, then delete everything in its TempState folder and restart. Those two cover most save failures. A full PowerShell reinstall is the backup if both come up short.
Where do Snipping Tool screen recordings save?
By default they land in your Videos folder. If you moved that folder to another drive, the app can lose track of it and fail the save. Restoring the Videos folder to its default location from its Properties > Location tab fixes that mismatch fast.