This error looks like your work Wi-Fi died. It didn’t. The network is fine, your password is fine, and getting back online takes about five minutes. But Windows won’t tell you any of that. You just get 0x80070285 and a laptop stuck on “Can’t connect to this network.”
Why This Happens
Basically? A recent Windows update got strict about an old way of signing in.
Most office Wi-Fi uses PEAP (a way of joining Wi-Fi with your work username and password instead of one shared key). Under the hood, a lot of PEAP setups still use MS-CHAPv2. That’s an old handshake built on NTLMv1, a login method Microsoft has wanted dead for years.
Before, Windows only logged NTLMv1 sign-ins and let them through. But now it blocks them whenever it tries to sign you in automatically with your saved Windows login (that auto sign-in is called SSO, or single sign-on). And automatic sign-in is exactly what your laptop does every time it sees the office network.
So the handshake gets killed, and you get a hex code. A plain-English message would have been nice. Why didn’t Microsoft add one? Your guess is as good as mine.
Fix 1 – Set NTLMv1 Single Sign-On Back to Audit Mode
This is the one that works for most people. You need admin rights on the PC, though. Company laptop and no admin? Skip to Fix 2, or forward this page to IT.
1 – Press Windows + R, type regedit, and press Enter.
2 – Click Yes when User Account Control asks for permission.
3 – Click into the address bar at the top of the Registry Editor, paste, and press Enter.:
HKEY_LOCAL_MACHINE\SYSTEM\CurrentControlSet\Control\Lsa
4 – Then, right-click an empty spot in the right pane, choose New, and click DWORD (32-bit) Value.
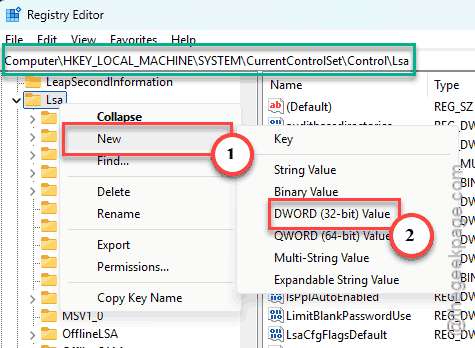
5 – Name it BlockNtlmv1SSO and press Enter.
6 – Double-click BlockNtlmv1SSO, change Value data to 0, and click OK.
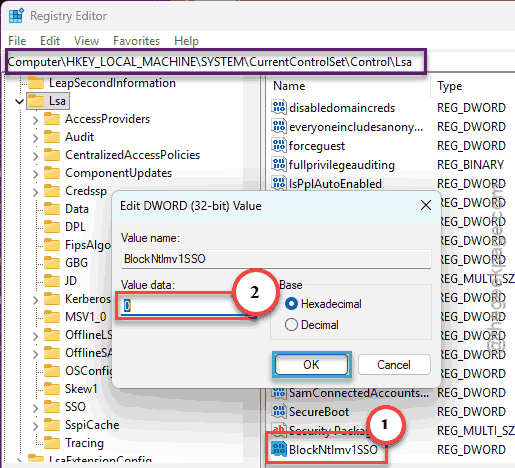
7 – Restart your computer and connect to the Wi-Fi again.
A value of 0 is audit mode. Windows goes back to writing these sign-ins down instead of blocking them. It’s a stopgap, not a cure (Fix 4 covers the real one).
Fix 2 – Type Your Work Login In Yourself
No admin rights? Try this.
1 – At first, click the Wi-Fi icon on the right side of your taskbar, next to the clock.
2 – Then, tap the small arrow next to the Wi-Fi button.
3 – Click your work network in the list.
4 – Uncheck Connect automatically.
5 – Click Connect.
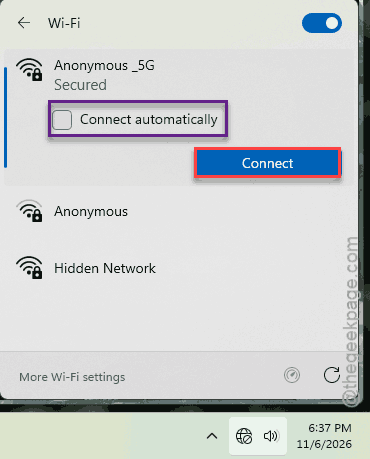
6 – Type your domain username and password when the sign-in boxes appear.
Your username may need the company domain in front, like COMPANY\yourname. If you are not sure, your IT team will know. And yes, you’ll have to do this every time you connect.
Fix 3 – Forget the Network and Reconnect
Quick one. Windows can hang on to a saved profile from before the update and keep retrying the automatic sign-in with it.
1 – Press Windows + I to open Settings,
2 – Then, tap Network & internet, then Wi-Fi,
3 – Later, tap the Manage known networks feature.

4 – Then, click Forget next to your work network.
And then connect again the way Fix 2 shows.
Fix 4 – Ask IT to Move the Network Off Passwords
Here’s the honest part. Fixes 1 to 3 dodge the block. They do not remove the reason for it. And NTLMv1 is not coming back. Microsoft is done with it.
The lasting fix is on IT’s side. They can switch the Wi-Fi to sign in with a device certificate (EAP-TLS, which never touches NTLMv1) instead of your password. Once that’s in place, you can delete the BlockNtlmv1SSO value from Fix 1 and keep the extra protection.
How to Prevent This
- Push for certificate sign-in. Password-based Wi-Fi is what broke here, and certificates skip NTLMv1 completely.
- Learn your exact username format. Typing it wrong three times can lock your account. Trust me.