Snipping Tool has been there in Windows since Windows Vista. Even in Windows 11, you will find the Snipping Tool! Even after the introduction of Snip & Sketch, a more appropriate tool, Snipping Tool is still there. In this article, we will discuss three distinct ways to get rid of the Snipping Tools in Windows 11/10.
How to disable the Snipping Tool in Windows 11/10
There are two distinct ways you can disable the Snipping Tool in Windows 11/10.
Way 1 – Using the Local GROUP Policy
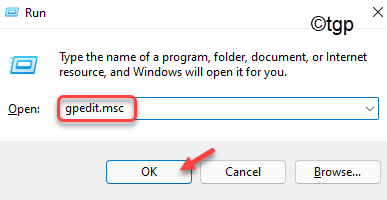
1. At first, press the Windows key+R keys together.
2. Then, type “gpedit.msc” and click on “OK“.

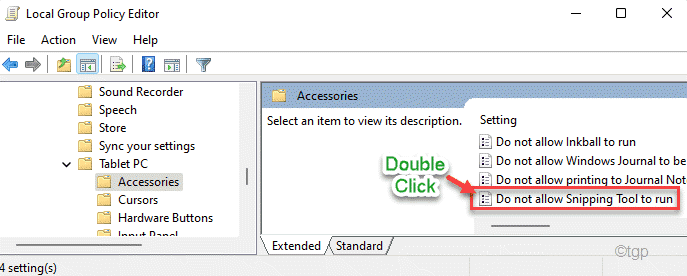
3. When the Local Group Policy Editor opens up, go this way ~
Computer Configuration > Administrative Templates > Windows Components > Tablet PC > Accessories
4. On the right-hand side, you will locate the “Do not allow Snipping Tool to run“.
5. Just, double-click on that policy to modify it.

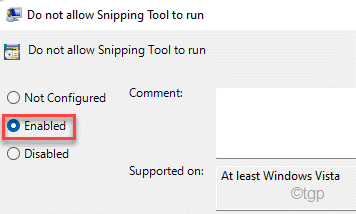
6. Now, set the policy to be “Enabled“.
7. Then, tap on “Apply” and “OK” to enable the policy on your computer.

Finally, close the Local Group Policy Editor. Then, restart your computer once to completely block the Snipping Tool on your system.
Way 2 – Using the Registry Editor
You can use the Registry Editor to block the Snipping Tool.
1. At first, press the Windows key+R keys together.
2. Then, write “regedit” to open up the Registry Editor.

NOTE –
In the next few steps, you will be editing a particular value in the registry. In some cases, this may lead to some additional issues in the system. So, we suggest you create a backup of the registry keys if you don’t have one yet.
1 – When the Registry Edit0r opens up, go to this location
HKEY_LOCAL_MACHINE\SOFTWARE\Policies\Microsoft
2. Now, on the left-hand side, look for a sub-key named “TabletPC” under ‘Microsoft’.
3. If you can’t find it, right-click on the “Microsoft” and then click on “New>” and then tap on “Key“.
4. Name this new key as “TabletPC“.

5. Now, on the right-hand side, try to find the “DisableSnippingTool” value.
6. If you can’t find it, right-click on the right pane and click on “New>” and then on the “DWORD (32-Bit) Value“.

7. Set the name of this value as “DisableSnippingTool“.
8. Then, double click on it to modify it further.

9. Set the value of this key as “1“.
10. Then, hit the Enter key to save the modify the value.

After that, close the Registry Editor and restart your computer. After restarting the system, you can’t use the Snipping Tool anymore.
Way 3 – Using the Services
There is another neat trick which you can use to solve your issue.
1. At first, press the Windows key+R keys together.
2. Here, type “services.msc” and hit Enter.

3. When the Services window opens up, scroll down to locate the “Snipping tool.exe“.
4. Further, double-click on the service to access it.
5. Then, click on the ‘Startup Type:’ and choose “Disabled” from the drop-down.

6. Finally, tap on “Apply” and “OK” to save the changes.

Once you are done, close the Services. Reboot the machine and check further.
Way 4 – Uninstall Snipping Tool
You can uninstall the Snipping tool from your computer if you don’t want it.
1. At first, press the Windows key and type “Snipping” in the search box.
2. Then, right-click on the “Snipping Tool” and click on “Uninstall“.

3. You will see an additional prompt to confirm the uninstallation.
4. Then, click on “Uninstall” to uninstall the app from your computer.

That’s it! This way you can get rid of the Snipping Tool on your machine.