Screen Snipping Tool is an excellent screen capture tool to take a quick screenshot of your screen. In Windows 11, Microsoft has gone a mile further to improve it with much more useful features. But, some users have complained about seeing this error message ‘A problem with Windows is preventing Screen Snipping from opening.’ while trying to access the Screen Snipping Tool on their devices. If you are one of these affected users, follow these fixes or use the alternative method to fix this issue.
Fix 1 – Directly open the app
You have to directly access the app from the C: drive.
1. At first, press the Windows key+E keys together.
2. Then, go this way –
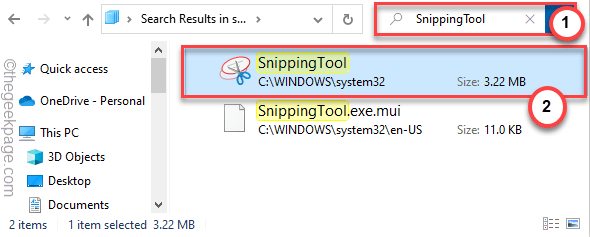
C:\Windows\System32
3. In the System32 folder, type “SnippingTool” in the search box on the top-left corner.
4. Then, double click on the “SnippingTool” app in the search results to open it.
This will open the Snipping Tool app on your system.
[NOTE –
If you have recently upgraded your system from an older version of Windows, you can try these steps also.
1. Open the File Explorer.
2. Then, go this way –
C:\Windows.old\
3. In here, navigate this way –
Windows\System32
4. Here, find out the “Snipping Tool” app and access it. This one should work as this is the tool from the previous version of Windows.
]
Fix 2 – Reset and set the date
Some users have fixed this issue quickly by altering the date settings to a previous date and then to the latest data on their system.
1. At first, press the Windows key+I keys together.
2. Then, tap on the “Time & language” on the left-hand side.
3. After that, click on the “Date & time” settings to access it.
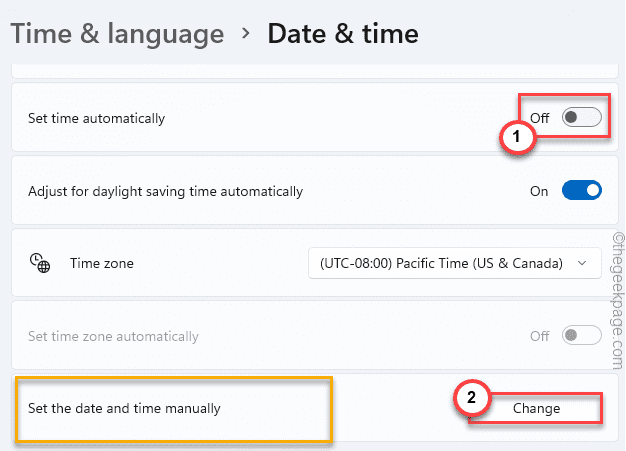
4. Now, on the right-hand side, toggle the “Set time automatically” settings to “Off“.
5. After that, click on “Change” in the “Set the date and time manually” settings.
6. Now, alter the date to a previous month (like 28th October).
7. Then, tap on “Change” to set this new date.
8. Again, tap on “Change” to alter the settings.
Now, open the Snipping Tool and try to take a screenshot.
9. Now, set the date to today’s date on your settings.
10. After that, tap on “Change“.
After doing this, check the Snipping Tool on your system. Check whether this works.
Fix 2 – Reset/ Repair Snipping Tool
Repairing or resetting the Snipping Tool should fix this issue.
1. At first, press the Windows key+I keys together.
2. Then, tap on the “Apps” on the left-hand side.
3. On the right-hand side, tap on the “Apps & Features“.

4. Then, type “Snipping Tool” in the search box.
5. Now, tap on the three-dot menu beside the Snipping Tool app and click on the “Advanced options” to access it.
6. There are two options. At first, try to repair the Snipping Tool.
Repair
Reset
7. Now, tap on “Repair” to repair the application.
After repairing the tool, try to use it and take a quick screenshot.
8. If the tool doesn’t work, tap on the “Reset” option.
9. You will see a prompt has appeared on your screen. Tap on “Reset” to confirm the process.
After resetting the app to the default settings, close the Settings. Now, quickly take a screenshot using the Snipping Tool. You won’t notice the error message further.
Fix 3 – Uninstall and Reinstall Snipping tool
If resetting or repairing the Snipping Tool doesn’t work, you have to just uninstall and reinstall it on your system.
1. At first, press the Windows key+X keys together.
2. Then, tap on the “Apps & Features“.
3. After that, type “Snipping Tool” in the search box.
4. Then, tap on the three-dot menu of ‘Snipping Tool’ and tap on “Uninstall” to access it.
5. Further, tap on “Uninstall” to uninstall the Snipping tool from your system.
After uninstalling the app, close the Settings.
1. Now, open the Microsoft Store.
2. After that, type “snipping” in the search box.
3. Next, tap on “Snip & Sketch” to access it.
4. Then, tap on “Install” to install the Snip & Sketch app on your system.
After that, close the Settings.
Fix 4 – Make sure the Windows Update is installed
Windows keeps releasing regular updates for Windows machines to remove these glitches.
1. At first, open the Settings.
2. Then, tap on the “Windows Updates“.
3. After that, click on “Check for updates” to check for new updates.
Allow Windows to download and install the latest update.
4. Next, tap on “Install“. Wait for Windows to install the update on your system.
5. Finally, click on “Restart now“.
After restarting the system, try to take a quick screenshot.


