Windows 11 has improved the ease of usage of the OS in so many ways. But, some of the users have already started to show their disregard for the new right-click context menu. The right-click context menu is a completely new, revamped menu with a reduced number of menu items and many icons for more items (like a copy, paste, rename). If you want to access the folder context menu, you have to just click on the “Show more options“. This feature has become tedious and bothersome for some users. Well, now you can just restore your old context menu with a simple tweak. Just follow these steps and you will get back the traditional context menu back in Windows 11 in no time at all.
How to disable ‘Show more options’ from right-click context menu in Windows 11
There are two methods you can use, according to your preference. On both desktop and in the File Explorer window,
Way 1 – Restore the older File Explorer
Way 2 – Restore the older context menu on the desktop
Follow any or both the ways according to your choice.
Way 1 – Restore the File Explorer of Windows 10
There is the simplest way to get back the traditional right-click context menu by restoring the older File Explorer back to your computer.
1. At first, open File Explorer on your computer.
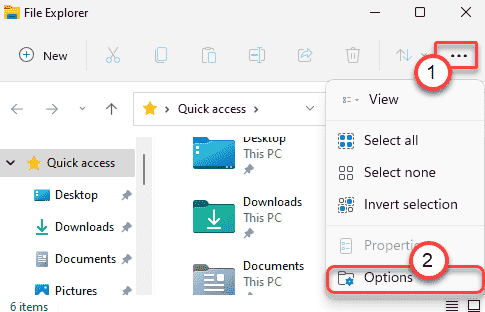
2. On the menu bar, click on the three-bar icon and then click on the “Options” from the drop-down list.

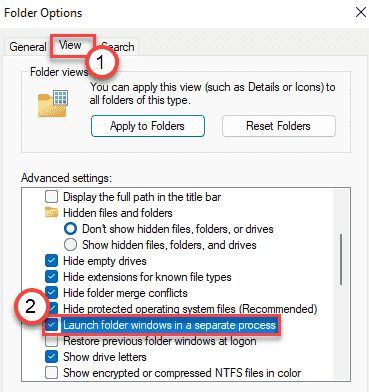
3. Now, go to the “View” section.
4. Then, scroll down and check the “Launch folder windows in a separate process“.

5. Finally, click on “Apply” and “OK” to save the changes.

Close the File Explorer window. Then, restart your computer once and you will experience the older File Explorer again, with the traditional right-click context menu.
Way 2 – Restore the older context menu in Desktop
You can tweak your registry to get back the original context menu of the desktop. Follow these steps minutely.
1. At first, tap the Windows key and the R key at the same time.
2. Once the Run terminal appears, write “regedit” and hit Enter.

IMPORTANT–
A single wrong alteration in the Registry Editor can crash your machine. If you haven’t taken a backup, you must follow these steps to create a backup.
a. Once you have opened the Registry Editor, you will need to click on the “File” and then click on “Export“.
b. Save the backup in a secure place.

If anything goes wrong, you can easily restore the registry to the original level.
3. Once the Registry Editor terminal appears, navigate to this location-
HKEY_LOCAL_MACHINE\SYSTEM\CurrentControlSet\Control\FeatureManagement\Overrides
4. Next, on the right-side pane, right-click on the “4” key and click on “New>“, select “Key” from the list to create a new key.
5. Name this new key as “586118283“.

6. On the right-hand pane, right-click and click on “New>” and click on “DWORD (32-bit) Value“.
7. Then, name the new key as “EnabledState“.

8. After that, double-click on the particular key to modify it.

9. At first, choose the “Hexadecimal” base.
10. Next, set the value to “1” and click on “OK“.

11. Same way, right-click on the empty space again, and click on “New>” and click on “DWORD (32-bit) Value”.

12. Then, name the new key as “EnabledStateOptions“.
13. Again, double-click on the particular key to modify it.

14. At first, choose the “Hexadecimal” base.
15. Next, set the value to “1” and click on “OK“.

16. Next, again create a new DWORD value.
17. Name the new key as “Variant“.
18. Double click on the particular value to edit it.

19. Set the base to “Hexadecimal“.
20. Put the value as “0” and hit Enter to save the settings.

21. Again, create a new DWORD and name it “VariantPayload“.
22. Finally, double-click on it.

23. Just like before, choose the “Hexadecimal” as the base, and set the value “0“.
24. Next, click on “OK“.

25. At last, you have to create one last DWORD value.
26. Set the name of the new key as “VariantPayloadKind“.
27. Then, double-click on the value to edit it.

28. Finally, set the value to “0” after choosing the base ‘Hexadecimal’ base system.
29. Click on “OK” to save it.

Close the Registry Editor window. Restart your computer to save these modifications.