One of the coolest features of LAN-connected Windows machines has that they can easily transfer files from one device to another via LAN. Apart from LAN, you can also transfer files via WiFi, but it has some obvious restrictions like speed, file integrity over big files, etc. So, whenever the query arises over transferring/sharing bigger files, ethernet is your go-to solution.
Requirements –
These are the preliminary things you need to establish a proper connection and transfer files via LAN from one computer to another.
1. Two Windows computers (doesn’t matter if they aren’t the same version)
2. Cat 5 or Cat 6 Ethernet cable to connect the computers.
How to share files between computers using LAN in Windows 11/10
Sharing or transferring files between computers involves a few steps. So, follow each and every step very carefully as this setup is just a one-time process.
Step 1 Use the Ethernet Cable to connect
Connect both computers using the LAN cable through the Ethernet port. You can additionally use any crossover or Ethernet cable to connect.
Step 2 – Modify the Network Sharing settings on both machines
You have to modify the Network Sharing settings on both systems so that the file transfer is possible.
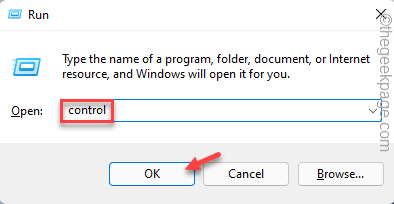
1. Open the Run box.
2. Type this in the box and click “OK“.
control
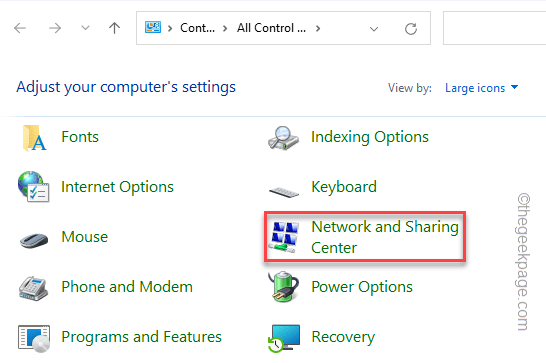
3. On the Control Panel page, click on “View by:” and set it to “Large icons“.
4. Then, click “Network and Sharing Center“*.
5. Next, tap “Change advanced sharing settings“.
6. Now, this will send you to Advanced Sharing Center in Windows 11.
7. So, make sure to turn these two options “Network discovery” and “File and printer sharing” to “On” mode.
[You can do it for the Current Profile or the All Networks as well.]
You may close the Settings and Control Panel page. Remember that you have to do this on both computers.
[
*NOTE –
If you are using a Windows 10 22H2 or a later version of Windows, Network and Sharing settings will be slightly different than this. There, you have to do these –
1. On the Advance sharing settings page, expand the “All Networks” section.
2. There, in the Public folder sharing section, choose “Turn on sharing so anyone with network access can read and write files in the Public folders“.
3. Next, set the Password protected sharing to “Turn off password protected sharing“.
4. After that, tap “Save changes“.
This way, you can enable the sharing setting.
]
Step 3 – Use the Static IP settings
Now, you have to set both computers to use a static IP address of the same class. To do this, these are the steps you have to adhere to –
Steps for Computer 1 –
1. Open a Run box by pressing the Win key and the R keys together.
2. Then, type this in the box and hit Enter.
ncpa.cpl
3. When you reach the list of networking devices, right-tap the Ethernet connection you have connected and tap “Properties“.
4. Then, select the “Internet Protocol Version 4 (IPv4)” properties to access it.
5. Next, tap “Properties” to open that.
6. Now, select the “Use following IP addresses:” option and input the following IP address, Subnet mask, and Default gateway.
IP Address - 192.168.1.1

Subnet Mask -225.225.225.0

Default Gateway - 192.168.1.2
7. Then, set the DNS Server addresses –
Preferred DNS server: 208.67.222.222
Alternate DNS server: 208.67.220.220
8. After this, tap “OK“.
It is not mandatory to set the IP Address, Subnet Mask, etc to the aforementioned set, you can choose your own set. But, if you don’t know much about IP Classes, you should adhere to this.
Steps for Computer 2 –
Now, you have to follow almost the same steps on Computer 2 except you just have to alter the IP address and Default Gateway a bit.
1. Press the Windows key once and type “network connections” in the search bar.
2. Then, tap “View network connections” to open the network connections on the Control Panel page.
3. After that, right-tap the same Ethernet network you have connected both computers to and tap “Properties“.
4. Again, double-tap the “Internet Protocol Version 4 (TCP/IPv4)” to edit it.
5. Just like the first computer, toggle the “Use following IP addresses:” option and input the following IP address, Subnet mask, and Default gateway.
IP Address - 192.168.1.2

Subnet Mask -225.225.225.0

Default Gateway - 192.168.1.1
6. The DNS server address should be the same. So, input these in proper boxes –
Preferred DNS server: 208.67.222.222
Alternate DNS server: 208.67.220.220
7. After this, tap “OK“.
Now, close the Control Panel and open the File Explorer.
Step 3 – Check the network tab
Now it is time to see whether the computer has appeared on the Network, i.e. ready for the file transfer process. If you have followed every step until these, you should see both the machines on both the systems. You can easily do this from File Explorer.
1. You have to open File Explorer. There is an easy shortcut to reach there. Press the Win key+E.
2. Then, on the left-hand pane, select the “Network” section.
3. On the right-hand pane, you will see all connected computers.
4. If you can’t see both machines there, right-tap on the space beside Network and tap “Show more options“.
5. After this, tap “Refresh” and wait for Windows to refresh the section.
Now, if you can see both computers here, then you can go to the next step and start the file transfer/share.
Step 4 – Share a file
Now, as you have connected both systems it is very easy to share documents or anything over the network with the other computer. You just have to give access to another system from the source system. This works both ways.
1. Now, go to the location of the folder which you want to share.
2. Then, right-tap the folder and tap “Show more options“.
3. Next, on the context menu, tap “Give access to>” and tap “Specific people…” to proceed to the next step.
4. Now, write “Everyone” in the box and tap “Add“.
[Additionally, you can specifically allow a user to the list by mentioning their account name in the box.]
5. Finally, tap “Share” to complete the process.
6. On the final screen, tap “Done” to close the page.
That’s it! Now, you can easily access the folder that you have shared.
Step 5 – Access the shared folder
Now, it is finally time to access the shared folder from another computer.
1. Open the other computer and access File Explorer there.
2. Head on to the “Network” area and double-tap the computer to access it.
3. Now, navigate to the location of the shared folder.
There you can find the shared folder.
This way, you can easily access the files inside the folder as well. Not only that, this shared folder can work like a file-sharing basket. Whatever items you will copy-paste inside the shared folder from one computer, will be accessible on the other device.
Points to remember –
Though the files and folders are shared, there are some things you should remember.
1. The sharing process will only work if your device is powered ON. Even if the system is sleeping or hibernating, you can’t use the shared folder.
2. This method won’t work on Mac or Linux devices.


