Among the many features and changes in settings in Windows 11, default printer settings have also got a slight change. The feature automatically sets the default printer as the one you used recently on your Windows 11 PC. This is useful when you are using a single printer, but when there are multiple printers, it can set an incorrect printer as the default one which can add up to your work.
It can be challenging to handle this feature if you are new to Windows 11. This is especially a trouble since you have been using Windows 10 all these days and all of a sudden the changes may be overwhelming. However, there are a couple of ways that can cam help you to set the default printer in Windows 11 and prevent it from automatically picking up the printer. So, if you don’t want Windows 11 to automatically set your default printer, here’s how you can set the default printer.
How to Select Your Default Printer in Windows 11
As mentioned above, Windows 11 automatically picks up the last printer you used and sets it as the default printer. But, if you have more than one printers, this feature can be frustrating as you may end up sending the print request to the incorrect printer. However, you can set your own default printer to avoid this issue, let’s see how:
Method 1: Through the Settings App (Recommended)
Step 1: Press the Win + I keys simultaneously on your keyboard to open the Settings app.
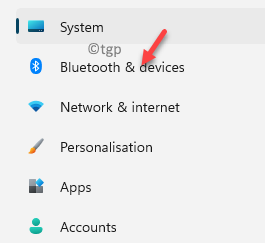
Step 2: In the Settings window, click on Bluetooth & devices option on the left side of the pane.

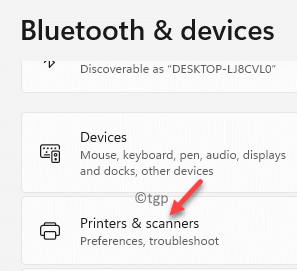
Step 3: On the right side, scroll down and click on Printers & scanners.

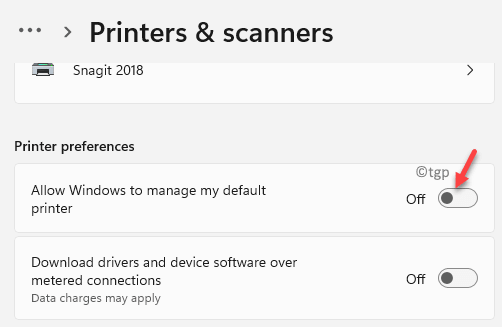
Step 4: Now, navigate to the right side of the window, scroll down and under the Printer preferences section, turn off the Allow Windows to manage my default printer option.

Step 5: Next, scroll up and select your desired printer that you want to set as default.

Step 6: Now, click on the Set as default button.

Close the Settings window.
You have successfully set the default printer in Windows 11.
Method 2: Through Control Panel
Step 1: Press the Win + R shortcut keys on your keyboard to open the Run command window.
Step 2: In the search bar, type control.exe and hit Enter to open the Control Panel window.

Step 3: In the Control Panel window, go to the upper right side and next to the View by section, select Category from the drop-down.
Click on Hardware and Sound in the list.

Step 4: In the next window, go to the right side and click on Devices and Printers.

Step 5: You will now reach the Devices and Printers window.
Here, under the Printers section, right-click on the printer that you want to set as default and select Set as default printer from the right-click menu.

That’s all. You have set the default printer of your choice and there should be no confusion anymore.
Method 3: Through Command Prompt
Step 1: Right-click on Start (Windows icon) and select Run from the list.

Step 2: This will open the Run command box.
Now, type cmd in the search bar and press OK to open the elevated Command Prompt.

Step 3: In the Command Prompt (admin), run the below command and hit Enter:
rundll32 printui.dll,PrintUIEntry /y /q /n “Printer name”

*Note – Replace the Printer name with the name of the printer you want to set as default.
Your desired printer is now set as the default printer.
Method 4: Through the Real Printer Folder
Step 1: Press the Win + R hotkeys to open the Run command window.
Step 2: In the Run command search box, type the below command to open the real printer location in the All Control Panel Items > Printers.
shell:PrintersFolder

Step 3: Go to the desired printer, right-click on it and select Set as Default Printer.

Exit the Printers window and you have now set your desired printer as the default one.
Method 5: By Creating a Desktop Shortcut of Devices and Printers
There are two ways you can create a shortcut for the Devices and Printers settings of the Control Panel on your desktop. Let’s see how;
Method 1: Drag and Drop Devices and Printers
Step 1: Press the Win + R keys together on your keyboard and the Run command window opens.
Step 2: Type control.exe in the search field and press OK to launch the Control Panel window.

Step 3: Now, go to the upper right side of the Control Panel and set the View by field to Category.
Select Hardware and Sound from the list.

Step 4: In the Hardware and Sound window, go to the right side and drag and drop the Devices and Printers settings to your desktop.

You can now double-click to open the Devices and Printers window from the desktop.
Method 2: By right-clicking on Devices and Printers
Alternatively, you can follow the Steps 1 through 3 as shown above to reach the Hardware and Sound window. Now, follow the below instructions to create a shortcut of the Devices and Printers settings on the desktop:
Step 1: Right-click on Devices and Printers and select Create shortcut.

Step 2: You will now see a prompt – Shortcut, asking – “Windows can’t create a shortcut here. Do you want the shortcut to be placed on the desktop instead?”
Select Yes to confirm the action.

Now, the shortcut is created on your desktop.
Exit the Control Panel window and you can now double-click on the shortcut to open the Devices and Printers directly from the desktop.