If the system resources are highly consumed for a particular task, the computer becomes very slow. If you open the Task Manager then you can see that the “Service Host: Agent activation runtime” is consuming higher CPU and memory. The reason behind this would be your system sound drivers may be corrupted or fewer times the Cortana service may also cause this issue. Sometimes a system restart may solve the issue, if this is not the case then in this article, we have noted down a few methods wherein you can apply those and get rid of the problem.
Method 1: Sign Out Of Cortana And Disable It From Startup In Task Manager
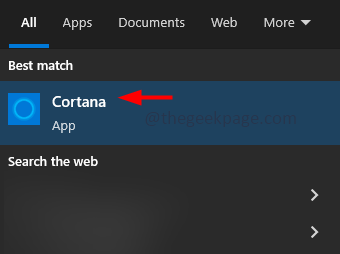
Step 1: Type Cortana in the windows search bar and click on the Cortana app from the search results
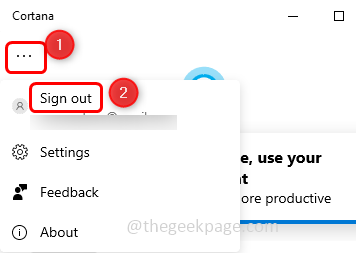
Step 2: In the opened app click on the three dots at the left corner
Step 3: Then click on sign out. This option is available only if you have signed in to Cortana
Step 4: There appears a confirmation pop up, click on sign out
Step 5: Right-click on the taskbar and from the appeared list uncheck Show Cortana Button by clicking on it (tick mark should not be present beside it)
Disable Cortana From Startup In Task Manager
Step 6: Right-click on the taskbar and click on the Task Manager to open it
Step 7: Go to the startup tab, right-click on the Cortana app and click on disable
Step 8: Type Cortana in the windows search bar and right-click on the Cortana app from the search results
Step 9: From the list click on App settings
Step 10: In the opened window under Runs at Log-in, turn off Cortana by clicking on the toggle bar
Step 11: Restart the system and check if the is solved.
Next Step : Now, Edit The Agent Activation Runtime Service Values In Registry Editor
Step 1: Stop the Agent Activation Runtime service [as shown in the above method 5]
Step 2: Type regedit.exe in the run prompt and hit enter. This will open the registry editor
Step 3: A user account control window will appear, click on yes
Step 4: Navigate to the following path in the registry editor
Computer\HKEY_LOCAL_MACHINE\SYSTEM\CurrentControlSet\Services\
Step 5: On the left side click on AarSvc
Step 6: At the right side, double click on its start value
Step 7: In the appeared window, in the value data field change its value to 4
Step 8: Click on OK
Step 9: Restart the system and check if the Agent Activation Runtime issue is solved.
Method 2: Re-start The Windows Audio Service
Step 1: Open the command prompt as an administrator. To do that type cmd in the windows search bar and hold Ctrl + Shift then enter
Step 2: A user account control window will appear, click on yes
Step 3: Copy the below commands and paste it in the command prompt then hit enter. Execute them one by one
net stop audiosrv
net start audiosrv
Step 4: Once the execution is done, exit from the Command Prompt. Now check if the CPU usage has decreased.
Method 3: Re-install The Sound Driver
Step 1: Go to OEM website and download the latest version of the sound driver of your system
Step 2: Press Windows + X keys together. In the appeared list click on Device Manager
Step 3: Expand Sound, video and game controllers by clicking on the arrow beside it
Step 4: Right click on your audio device and click on Uninstall device
Step 5: In the appeared pop up click on uninstall button
Step 6: Check if the issue is solved. Restart the system and default driver will be installed.
Step 7: If the CPU usage is normal then the issue is solved, if not then install the downloaded driver [step 1] as administrator and check if this resolves the issue.
Method 4: Disable the Agent Activation Runtime Service
Step 1: Open the run prompt using Windows + R keys together
Step 2: Type services.msc in the run prompt and hit enter. This will open windows services
Step 3: Find for Agent Activation Runtime service and double click on it
Step 4: In the opened window, from the start up type drop down select disabled
Step 5: Then click on Stop button to stop the service
Step 6: To save the changes click on Apply and ok
Step 7: Restart the system and check if the issue is solved.
That’s it! I hope this article is helpful and let us know which of the above method you applied to solve the issue. Thank you!!


