One of the problems related to the internet connection that is seen on Windows 11/10 computers is the “No Internet, Secured” error message. Basically, this error message indicates that the system is connected to the network but there is an issue with the connectivity due to which you are not able to open any web page and receive data. This error can be encountered in Windows while connecting to any network and preferably while connecting to the internet via a WiFi router that is not nearby.
Usually, a small yellow triangle is seen when you check the wireless icon on the bottom right side of the system tray and when you click on it the No Internet, secured message is displayed. There is no specific reason for this error message to appear, but a change in the configuration settings can cause your router to have problems connecting to the internet.
You need not worry if you are seeing this problem with your internet connection on your Windows 11/10 PC. Just go ahead and try the fixes mentioned in this article that have helped other users successfully resolve this issue on their systems.
Workarounds
1. Make sure that your PC and the internet router are close enough and that there are no barriers blocking the signal and making it weak.
2. Restart your router – Unplug the power cable to your router. After waiting for some 30 seconds you can connect back the power cable to the router. After the router starts up, check if you are able to connect to the network.
3. Reboot your PC and check if the problem with connecting to the Internet is resolved.
Method 1 – Reset your Network
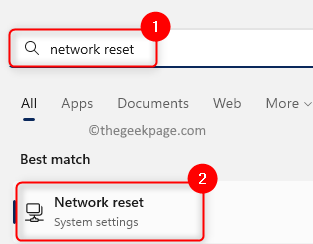
Step 1. Tap on the Windows Start button and type network reset in the Windows search bar.
Step 2. Click on Network Reset in the Best match result.
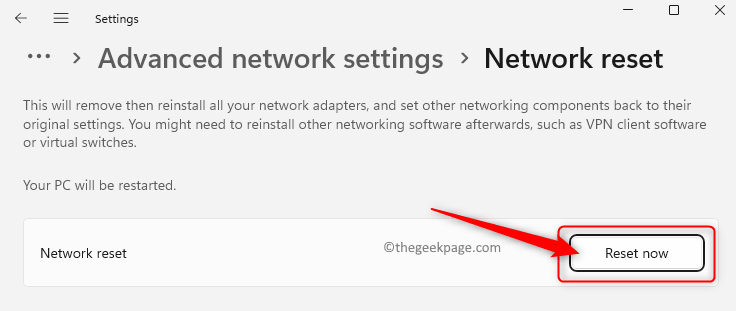
Step 3. Here, click on the Reset now button next to Network reset.
Step 4. Close any open windows and restart your computer.
Step 5. After the system startup, all the network settings will be removed. You will need to connect again and enter the Wi-Fi password.
Check if the ‘No Internet, secured’ message is resolved.
Method 2 – Modify WiFi Properties
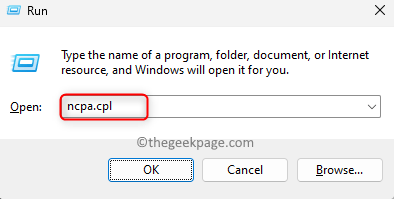
Step 1. Press Windows + R to open the Run box.
Step 2. Type ncpa.cpl and hit Enter to open the Network Connections window.
Step 3. Here, you will see a list of network connections on your computer.
Right-click on the WiFi connection and choose the option Properties in the context menu.
Step 4. Select the Networking tab.
Step 5. In the box below the text “The connection uses the following items”, check the boxes next to the options mentioned below:
- Client for Microsoft Networks
- File and Printer Sharing for Microsoft Networks
- QoS Packet Scheduler
- Internet Protocol Version 4 (TCP/IPv4)
- Microsoft LLDP Protocol Driver
- Link-Layer Topology Discovery Responder
- Link-Layer Topology Discovery Mapper I/O Driver
Step 6. If you see that the option Internet Protocol Protocol Version 6 (TCP/IPv6) is checked, uncheck the box next to it.
Then, click on OK.
Step 7: – Now, Right click and Disable the Network adapter .
Step 8: – Then after few seconds again enable it.

Step 7. Check if you are able to connect to the Internet without seeing the error message.
If the error still persists, then check the box next to Internet Protocol Protocol Version 6 (TCP/IPv6) that you had unchecked in Step 6 above.
Method 3 – Change the DNS Server Address
Step 1. Use Steps 1 – 3 mentioned in the Modify WiFi Properties method and open the Properties windows for the WiFi connection that you are using.
Step 2. Here, click on Internet Protocol Version 4 (TCP/IPv4) to select it.
Step 3. Then, click on the Properties button to open the Internet Protocol Version 4 (TCP/IPv4) Properties window.
Step 4. Select the option Use the following DNS server addresses.
Step 5. Enter the DNS server addresses as mentioned below:
Preferred DNS Server: 8.8.8.8
Alternate DNS Server: 8.8.4.4
Note: You can also try 9.9.9.9 and 1.1.1.1 for the Preferred DNS server and Alternate DNS server respectively.
Step 6. Click on OK to save the changes and exit the Properties window.
Step 7. Go back to your WiFi connection and see if the error is fixed and whether you are able to access the internet.
Method 4 – Use Windows Internet Troubleshooter
Step 1. Open the Run dialog using the Windows and R key combination.
Step 2. Type ms-settings:troubleshoot and hit Enter to open the Troubleshoot page in the Settings app.
Step 3. Here, click on Other troubleshooters.
Step 4. On this page, you will find two troubleshooters namely, Internet Connections and Network Adapter.
Step 5. Click on the Run button associated with Internet Connections.
Wait for the troubleshooter to run and detect any issues. Then, you can follow the onscreen instructions to complete the troubleshooting process.
Step 6. Next, run the Network Adapter troubleshooter and let it identify and fix any issues if found.
Step 7. Once the troubleshooting process is complete, check if you are able to access the internet by opening any webpage.
Step 8. If there are no issues found by the troubleshooter or the issues cannot be fixed, then move over to the next fix.
Method 5 – Forget the Network Connection
Step 1. Press Windows + I to open the Windows Settings app.
Step 2. On the left pane, click on the Network & Internet tab.
Step 3. Now, click on the box labeled Wi-Fi.
Step 4. On the Wi-Fi page, click on Manage known networks.
Step 5. Here, look for the Wi-Fi network with which you are facing this problem.
Step 6. Then, click on the Forget button next to this Wi-Fi network.
Step 7. Try reconnecting to the network again by entering the correct password.
Method 6 – Reinstall the Network Drivers
Step 1. Tap on the Windows start button in the taskbar and type device manager in the search box.
Step 2. In the displayed search result, select Device Manager.
Step 3. Once the Device Manager opens up, click on the small arrow next to Network adapters to expand it.
Step 4. Locate the Wi-Fi driver in the list of network adapters. Generally, the name will differ from one system to another, so look for Wi-Fi 6 or Wireless in the name of the adapter.
Step 5. Right-click on this driver and choose Uninstall device.
Step 6. In the Uninstall device window that opens, check the box next to Attempt to remove the driver for this device.
Step 7. Then, click on Uninstall button.
Step 8. Reboot your computer after the driver is uninstalled.
After the system startup, it will automatically scan for hardware changes and reinstall the Wireless driver.
Check if the problem is fixed.
Method 7 – Refresh the Internet Connection Via Command Prompt
Step 1. Just press and hold the Windows and R keys simultaneously to open the Run box.
Step 2. Type cmd and press Ctrl + Shift + Enter to run Command Prompt as an administrator.
Step 3. Execute the commands mentioned below by typing them and hitting Enter one after the other.
netsh winsock reset

netsh int ip reset

ipconfig /release

ipconfig /renew

ipconfig /flushdns
Step 4. Reboot your system.
Check if the error message ‘No Internet, Secured’ is resolved with your internet connection.
Method 8 – Use Random Hardware Addresses
Step 1. Press Windows + R to open Run.
Step 2. Type ms-settings:network-wifi and hit Enter to open the Wi-Fi page in the Settings app.
Step 3. Turn on the toggle associated with Random hardware addresses.
Step 4. Disconnect and reconnect the Wi-Fi network and check if the problem is resolved.
That’s it!
Thanks for reading.
Did you find this article useful in resolving the error “No Internet, Secured” with the internet connection on your Windows 11/10 PC? Please let us know the method that helped you fix the issue in the comments below.


