Sometimes, you may need to access to the Properties of a specific file/folder to check it’s type, size, location, previous version, to customize advanced sharing options or to modify its permissions through the Security tab. However, for some users the Security tab is missing from the file properties. The Security tab helps you to Edit the privacy to full or limited control, or take ownership of the file using the Advanced option for special permissions.
However, when the Security tab is missing, you will be unable to change the permissions for File/Folder. This can be inconvenient as there is a lot of times when you may need to set the Security permissions to get access to a certain file/folder and with the tab missing, it can be a concern. Fortunately, the security tab missing from file properties issue can be resolved. Let’s see how:
Method 1: Through Local Group Policy Editor
This method helps you to get back the missing Security tab in the file/folder Properties using the Group Policy Editor where you need to Disable the Remove Security tab option. Here’s how:
Step 1: Press the Win + R keys together on your keyboard to launch the Run command window.
Step 2: In the Run command search field type gpedit.msc and hit Enter to open the Group Policy Editor.

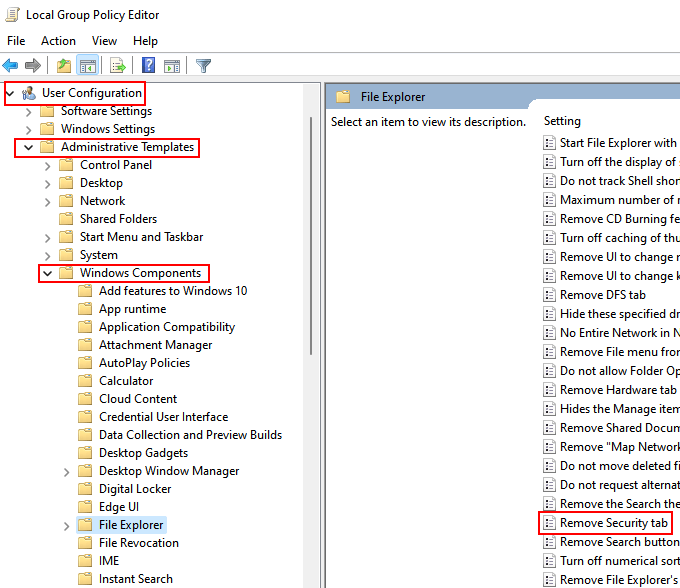
Step 3: In the Group Policy Editor window, on the left side of the pane, Go to
In the Group Policy Editor window, on the left side of the pane, click to expand User Configuration -> Administrative Templates section and then select Windows Components
Now, select File Explorer
Step 4: Now, go to the right side of the window Locate Remove Security Tab.

Step 5: double-click on to open Remove Security tab to open it’s Properties window.
Step 6: In the Remove Security tab Properties dialogue box, select the radio button next to Disabled and the missing Security tab in the file/folder Properties will be restored.
Press the Apply and the OK to save the changes.
Exit the Group Policy Editor window and now check the file/folder Properties. The Security tab should be back now.
*Note – However, if you want to remove the Security tab from the file/folder Properties, you can select Enabled and then press Apply and OK for the changes to be effective.
Method 2: Through Registry Editor
However, if you are using the Windows 10 Home edition, you may not have access to the Group Policy Editor and in such cases, you can try tweaking the Windows Registry Settings and see if it resolves the Security tab missing issue. Let’s see how to make changes to the registry editor:
Step 1: Press the Win + X shortcut keys on your keyboard and select Run from the menu.

Step 2: It opens the Run command window.
Here, type regedit in the search box and hit Enter to open the registry editor window.

Step 3: In the Registry Editor window, navigate to the below path
HKEY_CURRENT_USER\Software\Microsoft\Windows\CurrentVersion\Policies\Explorer

Now, go to the right side of the pane, right-click on an empty area, select New and then select DWORD (3-bit) Value.
Step 4: Rename the new DWORD value as NoSecurityTab.
Now, double-click on it.

Step 5: In the Edit DWORD (32-bit) Value dialogue box, set the Value data field as 0.
Press OK to save the changes.

Exit the registry editor window and the Security tab should be added to the file/folder Properties right-away. If it’s still not showing, restart your PC and the changes should be effective.
*Note – Before you proceed with making any changes to the Windows Registry, make sure that you create a backup of the registry settings, so that, you can recover any lost data during the process.
Method 3: Enable Security Tab Using Command Prompt
You can also try using the Command Line to enable the Security tab in the Windows Registry. This method will also help you to disable the security tab in the Windows registry using the command line. Follow the below instructions to add the Security tab to the file/folder Properties:
Step 1: Press the Win + R hotkey to open the Run command box.
Step 2: In the search field, type cmd and then press Ctrl + Shift + Enter keys together on your keyboard to launch the Command Prompt in admin mode.

Step 3: Copy and paste the below command in the elevated Command Prompt and hit Enter to Enable the Security tab:
REG add HKCU\Software\Microsoft\Windows\CurrentVersion\Policies\Explorer /v Nosecuritytab /t REG_DWORD /d 0 /f
Now, exit Command Prompt and check in the file/folder Properties. The missing Security tab should be back now.

*Note – To Disable the Security tab in the file/folder Properties, run the below command in the Command Prompt (admin) and hit Enter:
REG add HKCU\Software\Microsoft\Windows\CurrentVersion\Policies\Explorer /v Nosecuritytab /t REG_DWORD /d 1 /f
