By default, the location of the personal folders is stored in the C: drive when the windows OS is being installed on any system. But if there is a space crunch in the C: drive, what users do is they change/move the personal folder to another drive other than the C drive.
Some windows users have noticed that after they have changed their personal folder location, they are not able to restore it back to the old default location in C: drive. Instead, they are facing an error while moving the folder.
In this article, we are going to show windows users how to restore the default location of the Documents folder in your Windows 11 system without facing any errors.
How to Restore Default Location of Documents folder in Windows 11, 10
We are going to guide you with the steps below in this method where some windows users did not face any issues while changing the default location of the Documents folder as shown below.
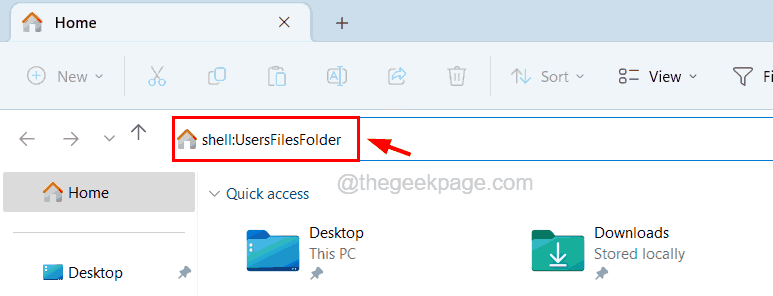
Step 1: Open the File Explorer on your system by pressing the Win +E keys together on your keyboard.
Step 2: Once it opens, type shell:UsersFilesFolder in the address bar and press Enter key.

Step 3: This opens the folder containing all your personal folders on the system.
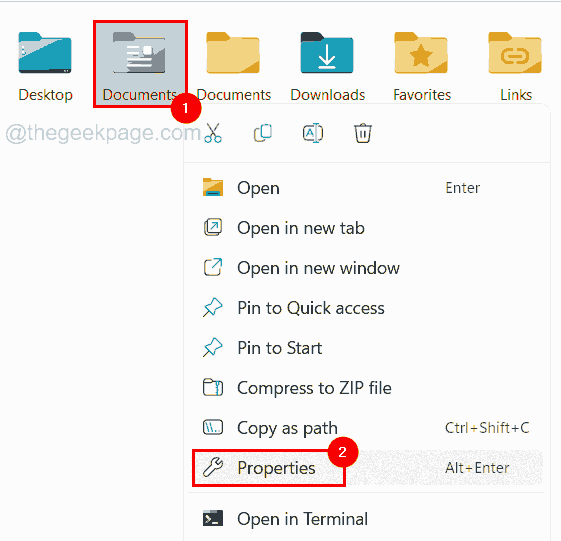
Step 4: Now locate the Documents folder and right-click on it.
Step 5: Select the Properties from the context menu by clicking on it as shown below.

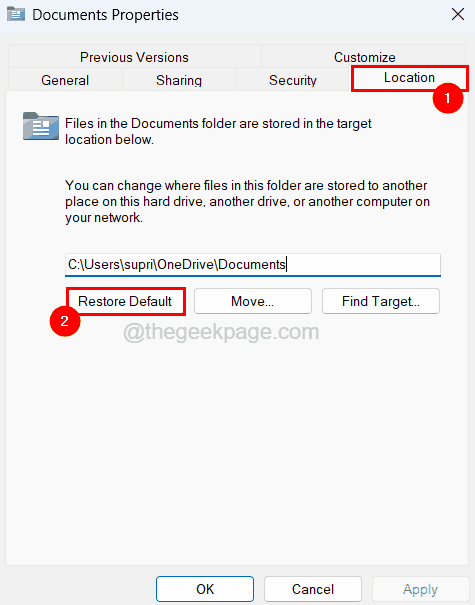
Step 6: In the Properties window, go to the Location tab.
Step 7: Now under the Location tab, click Restore Default.

Step 8: You will see that the default location (C:\Users\<Username>\Documents) will get populated in the location textbox as shown below.
Step 9: Now click Apply and then click OK.

Step 10: If this changes the default location of the Documents folder without any errors then it is well and good.
Step 11: While clicking Apply, if it throws an error that said “Can’t move the folder because there is a folder in the same location that can’t be redirected. Access is denied.” as shown below, then please follow the method explained below in this article.

Restore Default Location of Documents folder using Registry Editor
If you are receiving an error while changing the default location of any personal folders on your system, you need to change the registry file by changing its contents as explained below for resolving this error.
Before continuing with this method, we highly recommend our users to export or backup the registry file by referring to this article so that you can revert it back later if some changes done to the registry file goes terribly wrong, which might destroy the system.
Step 1: Press the Windows key and type registry editor and then press Enter key.

Step 2: This might throw a UAC prompt on the screen.
Step 3: Please accept it by clicking Yes.
Step 4: After the registry editor window opens, clear up its address bar and then you can copy the line below and paste it into the address bar.
HKEY_CURRENT_USER\SOFTWARE\Microsoft\Windows\CurrentVersion\Explorer\User Shell Folders
Step 5: Next, press Enter key to reach the registry key called User Shell Folders in the registry editor.
Step 6: Now make sure the User Shell Folders key is selected on the left panel.

Step 7: Then on the right side of the editor, look for an expandable string value by name Personal.
Step 8: Double-click on it for editing its value.

Step 9: In the Edit properties window, type the below line in the Value Data textbox and click OK.
%USERPROFILE%\Documents

Step 10: Once it is saved, you can close the registry editor and restart your system.
Step 11: After the system starts up, you can see that the Documents folder has changed its location to the default location on your system.