Steam client is a software / application which allows users to efficiently get various games and connect with other gamers. It also protects the game from getting pirated, which immensely helps the game publishers. Many Steam client users have reported that it suddenly stopped working or there is some issue which is causing them problems while playing. If you go by the obvious solution that is uninstalling and then installing the steam client, it will also delete all the stored data which can make any gamer frustrating to start playing from the beginning. Therefore in order to repair steam client without losing any data, we have compiled few fixes given below in this post which will help you in repairing the steam client in windows 11.
Fix 1: Replace Corrupted Game Files in Steam Client
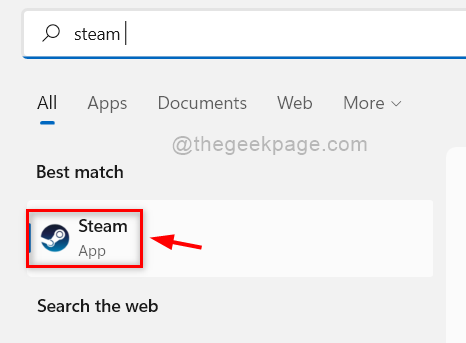
Step 1: Open Steam Client by pressing windows key and typing steam.
Step 2: Select Steam app from the search results as shown below.

Step 3: After the Steam app opens, please sign in with your credentials if you are not logged in.
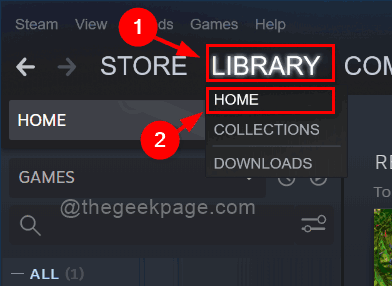
Step 4: Then, Go to LIBRARY at the top and then, Select HOME from the list as shown below.

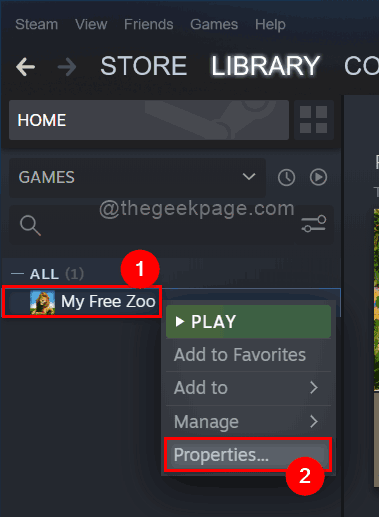
Step 5: Then, Right click on the game which you want to repair.
Step 6: Select Properties from the context menu as shown below.

Step 7: Select LOCAL FILES option on the left side menu and then click Verify integrity of game files option as shown below.

Step 8: It will immediately start validating the game data files as shown below.

Step 9: Please wait till the verification process completes and once it finishes, click CLOSE as shown.

Step 10: If there are any corrupt files after validating, please replace them and then try launching the game and see if it is working properly.
That’s all. Hope this solution fixed your issue. Otherwise try other solutions given below.
Fix 2: Repair Steam App using Command Prompt
Step 1: Open Command Prompt as administrator by pressing Windows + R keys together on your keyboard.
Step 2: Then, Type cmd in the run dialog box that just opened.
Step 3: Press CTRL+ SHIFT+ENTER keys together and accept the UAC prompt on your screen.

Step 4: Copy and paste the following path in the command prompt and hit the enter key.
"C:\Program Files (x86)\Steam\bin\SteamService.exe” /repair

Step 5: Close the Command Prompt window and start the Steam app.
Now see if it runs smoothly.
Fix 3: Refreshing Steam Data Files
Step 1: Close the Steam app if it is opened.
Step 2: Then, Go to Steam app folder by opening file explorer by pressing Windows + E keys together.
Step 3: Copy and paste the following path in the address bar and hit the Enter key.
C:\Program Files (x86)\Steam
Step 4: Press CTRL + A keys together to select everything and then unselect steamapps folder and steam.exe executable file by clicking on it while holding CTRL key.

Step 5: Now Press Delete key to delete everything in the Steam folder except steamapps and steam.exe file.
Step 6: Now close all the folders and applications that are open on your system.
Step 7: Restart your system once.
Step 8: After restarting, navigate to the Steam folder like we did earlier.
Step 9: Double click on steam.exe executable file in the Steam folder to run it.
NOTE: Don’t OPEN Steam app while or before the Steam refreshes/reinstalls all the files.
Step 10: This will reinstall all the necessary files again.
Step 11: Once everything is done, try opening the Steam app and see if there is any problem.
Fix 4: Reinstall the Steam Client again
NOTE: If none of the above solutions work for you, then this would be the last option where in you can lose your game data and settings. But this can make your steam app work again. Please follow below steps to reinstall your steam app again.
Step 1: Press Windows key on your keyboard and type installed apps.
Step 2: Then, Select Installed apps from the search results as shown below.

Step 3: Type steam in the search bar and then click three vertical dots option in the Steam app as shown below.
Step 4: Select Uninstall from the dropdown menu.

Step 5: Click Uninstall in the small window that appears below Steam app as shown below.

Step 6: Then, Accept the UAC prompt by clicking Yes button as shown below.

Step 7: Then, Click Uninstall button in the Steam Uninstall window to start uninstalling the Steam app from your system.

Step 8: It will immediately start uninstalling and then after the uninstallation is done, Click Close button to close the window as shown in the below image.

Step 9: Next, Open the downloads page on the Steam client to install it again by clicking here.
Step 10: After downloading the installation file, Double click on it to run it.
Step 11: Perform the on screen instructions to install the Steam app again on your system.
Step 12: After installation is complete, Try to launch the Steam app and check if the problem still occurs.
Hope this must solve the issue.
That’s all guys.
Hope this article was informative.
Thank you very much!