Windows allows its users to view the files and folders in different sizes, one can opt to have Large Icons, Medium Icons, or extra-large icons depending on their needs. However, when the users opt to have Large or extra-large icons, they have noticed a black background around the folder.
This is a bug in Windows. It is seen because of some graphical glitch in the system due to corrupt Icon Cache or System Files in the system.
If you are encountering this issue and are not sure, how to fix it on your system, don’t worry. In this article, we have curated a list of working fixes to help you remove the black square displayed behind the Folder Icons.
Fix 1 – Remove the Black Background of the folder individually
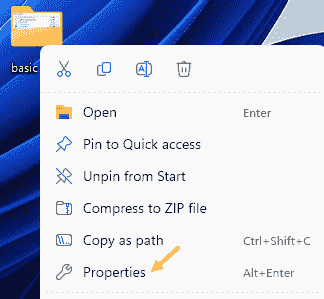
1 – Right click on folder and click Properties

2 – Click Customize Tab
3 -Now, click on Change Icon
![]()
4 – Now, select Folder icon from the list and click OK.
![]()
If you are having this issue with multiple folders , proceed with the methods given below.
Fix 2: Perform a Disk Cleanup to delete thumbnails
1 – Search Disk cleanup in Taskbar search box and click on Disk cleanup

2. Select C Drive and click OK

3 – Under the general tab, click on the Disk Cleanup button.
6. Under the Files to delete section, Make sure Thumbnails Options is selected

8. You will see a Dialog, Are you sure you want to permanently delete these files? Click on Delete Files.
Fix 3: Restore the Settings to default
1. Locate the folder with a black square behind the folder and right-click on it.
2. From the context menu, choose Properties.
3. Click on the Customize tab.
4. Under the Folder pictures section, click on Restore Default.
5. Click on Apply and then click on OK.
6. Check if this removes the black square behind the Folder icon. If not, try the next fix.
Fix 4: Delete the Icon Cache
First of all make sure Files are unhidden on your PC. Once , you are sure , files are not hidden, Proceed with steps
1. Open the Run Dialog using Windows+R.
2. In the opening dialog, enter the below path and press Enter.
C:\Users\%username%\AppData\Local
3. In this folder, check for the file named IconCache.
4. Once found, delete the file.
5. Now, open the Run Dialog again.
6. Enter the below location and press Enter.
C:\Users\%username%\AppData\Local\Microsoft\Windows\Explorer
7. In the opening window, delete all the files and folders.
Note: If you see a prompt saying the files are in use and cannot be deleted, select Do this for all current items and Try Again.
9. Restart your System.