You might have installed a lot of Printers or Printer Drivers over the time. You might want to remove them from your system because:
- They are not working
- They are no longer needed
- They are just the Duplicate Printer Drivers
In any case, if you want to remove a Printer from the system read through this article. In this article , let us discuss about the different ways to Remove or Delete or Uninstall the Printers from the system
Method 1: From Settings
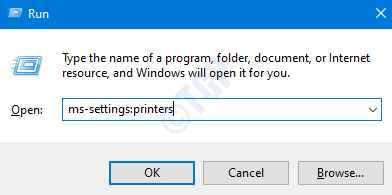
Step 1: Hold the keys ,Windows+r at the same time and open the Run window.
Step 2: Enter ms-settings:printers and press OK

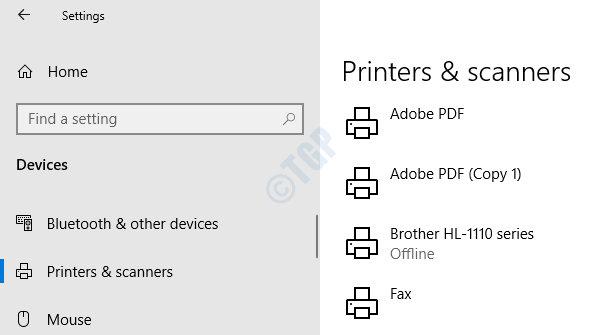
Step 3: In the appearing window, at the right-hand side, we see the list of printers installed in the system.

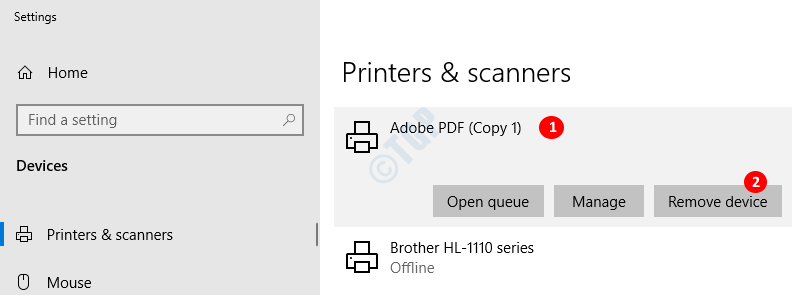
Step 4: In order to delete the printer
- Click on the printer you want to delete
- Press Remove device

Step 5: A confirmation Dialog appears , Click on Yes.

Now, you can see that the selected printer is removed from the system.
Method 2 : From Control Panel
Step 1: Hold the keys Windows+r together, this opens the Run window.
Step 2: Type control /name Microsoft.DevicesAndPrinters and click on OK

Step 3: In the Devices and Printers window, under the Printers section, you can see all the Printers listed. If you are not able to see the printers, expand the Printers section by pressing the arrow just before Printers heading.

Way 1 : From the Top Menu
1. Click on the device you want to delete.
2. In the top menu Click on Remove device

3. A dialog pops up asking for confirmation, Press Yes

Way 2 : From the Context Menu
1. Right-click on the device you want to delete.
2. Choose Remove device from the Context Menu

3. In the Remove device pop up that appears, Click on Yes

That’s all and the selected printer will be removed from your computer.
Method 3: From Command Prompt
Step 1: Press the keys Windows+r together to open the Run window.
Step 2: Type cmd and press Ctrl+Shift+Enter together. This opens Elevated Command Prompt(Command Prompt with Admin rights)

Step 3: In the command prompt window that opens, type the following command and hit Enter:
printui.exe /s /t2
Step 4: Now, select your printer which you want to remove and

Step 5: Now, select any option and click OK to remove it

Method 4: From PowerShell
Step 1: Press the keys Windows+r at the same time to open the Run window.
Step 2: Type powershell and hold the keys Ctrl+Shift+Enter to open the Powershell with elevated status

Step 3: In the power shell window, To List the names of the printer, run the below command
Get-Printer | Format-List Name

Step 4: Now, to remove or delete the printer enter the following command and hit Enter
Remove-Printer -Name "<Name of the Printer>"
From the above list , lets say we wat to delete “Brother HL-1110 series” printer we should tweak the command as follows:
Remove-Printer -Name "<Brother HL-1110 series>"

That’s All and the printer is removed.
Method 5 : From Printers folders
Step 1: Open the Run window with the shortcut Windows+r
Step 2: In the window, write explorer shell:PrintersFolder and press OK

Step 3: The Printers Folder opens and we can see all the Printers listed as shown below

Way 1 : From Top Menu
1. Click on the device you want to delete.
2. In the top menu Click on Delete this printer

3. In the Printers window confirmation dialog that appears, Click on Yes

Way 2 : From Context Menu
1. Right-click on the device you want to delete.
2. Choose Delete from the Context Menu

3. In the Printers dialog that appears, Click on Yes

Now, the selected printer will be deleted.
Method 6: From Device Manager
Step 1: Open the Run window by holding Windows+r keys together.
Step 2: In the run window, type explorer shell:PrintersFolder and press OK

Step 3: In the window that appears, expand Print queues section by clicking on the arrow next to it. From the list of printers, select the one that you want to delete.

Step 4: Right-Click on the printer you want to delete. In the context-menu that appears, Choose Uninstall device

Step 5: In the dialog that appears , select Uninstall

With these changes , the printer will be removed from your PC.
These were the six ways to remove the Printer from the system. We hope this has been informative. Thank you for reading.