Remote Desktop connections have become an integral part of the Windows 10 Pro and Enterprise editions. The idea of launching, controlling, and managing remote desktop connections (RDC) from an administrative system has eased many situations. But, no system can be an error-free one. In this guide, we are going to show you how to troubleshoot remote desktop connections on your own.
Fix 1 – Adjust the registry
Modify the registry to fix the issue.
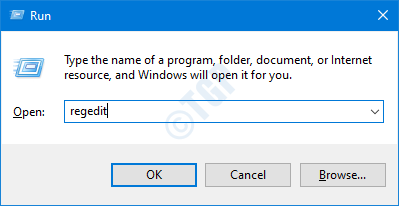
At first, just press the Windows key+R keys together.
2. Then, type “regedit” and click on “OK“.

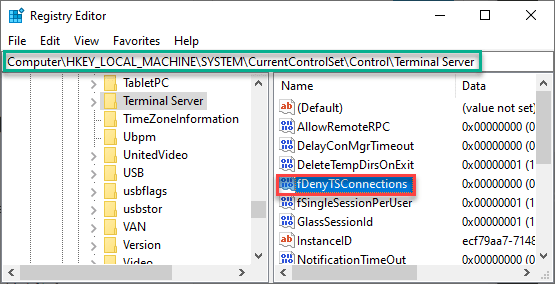
3. Next, proceed to this location on the Registry Editor screen –
Computer\HKEY_LOCAL_MACHINE\SYSTEM\CurrentControlSet\Control\Terminal Server
4. Once you have reached there, look for the “fDenyTSConnections” key.
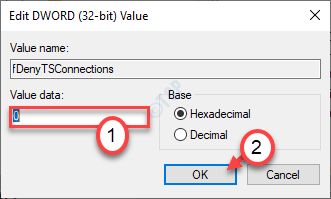
5. Then, simply double-click on the key to adjust it.

6. Click on the ‘Value Data:’ box and write “0“.
7. Finally, click on “OK“.

This should enable the Remote Desktop Connection.
NOTE–
If you want to modify the registry editor on the remote computer, you have to do this-
1. On the remote machine, right-click on the Windows icon and click on the “Windows PowerShell(Admin)“.

2. Then, just paste this command and hit Enter.
Set-ItemProperty -Path 'HKLM:\System\CurrentControlSet\Control\Terminal Server'-name "fDenyTSConnections" -Value 0

Once you have executed the command, close the PowerShell.
Again, check the status of the problem again.
Fix 2 – Check the status of the GPO
It is possible that the RDP connection is blocked on your local computer with certain GPO restrictions in place.
1. At first, access the local computer that you are facing the problem with.
2.Then, type “cmd” in the search box.
3. After that, right-click on “Command Prompt” and choose “Run as administrator“.

4. Once the Command Prompt appears on your screen, type or paste this code and hit Enter.
gpresult /H c:\gpresult.html

The report on the GPO status will be generated in a moment. Wait for the computer to save the results.
Close the Command Prompt window.
5. Press the Windows key+R keys together.
6. Then, paste this address and hit Enter.
C:\gpresult.html

The report will open in your browser.

Now, if you notice that the ‘Allow users to connect remotely by using Remote Desktop Services‘ policy is “denied” or “Disabled”, follow these steps –
7. In the browser window, go this way –
Computer Configuration\Administrative Templates\Windows Components\Remote Desktop Services\Remote Desktop Session Host\Connections,
8. Here you have to look for the Allow users to connect remotely by using the Remote Desktop Services policy.

If this policy is ‘Enabled‘ then this is not the cause you are facing this issue on your computer.
If this policy is set to ‘Disabled‘, check the Winning GPO section.
Fix 3 – Check the GPO on a remote computer
1. At first, log in to the remote computer.
2. Then, type “cmd” in the search box beside the Windows icon.
3. After that, right-click on “Command Prompt” and choose “Run as administrator“.

4. Once the Command Prompt appears on your screen, paste this code and hit Enter.
gpresult /S <computer name> /H c:\gpresult-<computer name>.html
[The <computer name> symbolizes the name of the remote computer. Just replace it with the remote computer name. ]
gpresult /S RM1 /H c:\gpresult-RM1.html

5. Now, open the File Explorer window.
6. Go find the “gpresult-RM1.html” from the C: drive. Open it to access it.
Check out which group policy is hindering the incoming remote connection. Disable/enable it from the Local Group Policy Editor.
Then, try to reconnect to the remote computer again.
Fix 4 – Modify the GPO
1. You have to press the Windows key+R keys together.
2. Then, write “gpedit.msc” and click on “OK“.

3. Once the Group Policy Editor opens up, go to this place –
Computer Configuration > Administrative Templates > Windows Components > Remote Desktop Services > Remote Desktop Session Host > Connections
4. Now, on the right-hand side, double click on the “Allow users to connect remotely by using Remote Desktop Services“.

5. Just check the “Enabled” option to enable new RDP connections.
6. Click on “Apply” and “OK” to apply the settings.

Close the Local Group Policy Editor.
7. Now, you have to force the group policy update on the remote computer.
8. Open an elevated command prompt window with administrative rights. Paste this command and hit Enter.
gpupdate /force

9. Now you have to navigate to the Organizational Unit (OU) which contains the restricting policy that is affecting the computers.
10. Just delete the problematic policy and you are done!
This way you can remove the problematic policy settings that are restricting the RDP connections.
Fix 5 – Add a firewall rule
Sometimes the default firewall, if deleted, can prohibit RDP connection through the firewall.
1. Press the Windows key+X keys together.
2. Then, click on “Windows PowerShell(Admin)”.

3. Then, paste these codes in the terminal and hit Enter to execute these codes.
Enable-NetFirewallRule -DisplayGroup "Remote Desktop"
netsh advfirewall firewall add rule name="allow RemoteDesktop" dir=in protocol=TCP localport=3389 action=allow

Close the PowerShell window. This will allow the firewall to create a new RDP connection. Test if this was your issue.
Fix 6 – Automate the RDP services
There are some crucial remote services that are required to run in the background to connect and operate remote machines.
1. First of all, right-click on the Windows icon and click on the “Run“.
2. Type “services.msc” and click on “OK“.

3. Once the Services screen appears, check for the “Remote Desktop Services“. Double click on the particular service.

4. There, set the ‘Startup type’ to “Automatic“. Next, click on “Start” to start the service.

5. Click on “Apply” and “OK” to save the changes.

6. Then, double click on the “Remote Desktop Services UserMode Port Redirector“.

7. Just like the Termservice, set the startup type of this one to “Automatic” also.
8. Start the service by clicking on “Start“, if it is already not running.

9. To save the changes, click on “Apply” and “OK“.
Make sure you have ensured these changes in both the remote computer and the local computer.
Restart both the machines once to save the changes.
NOTE –
If you don’t want to modify the services from the Services screen, you can do it just by passing a command.
1. Press the Windows key+X keys together.
2. Then, click on “Windows PowerShell(Admin)”.

3. Then, type this code and hit Enter to run it.
"TermService","UmRdpService" | ForEach-Object{ (Get-WmiObject Win32_service -ComputerName [RemoteComputer] -Filter "Name = '$_' ").StartService() }

This will start the service on the remote client. Though, you will need to manually configure the above-mentioned services (TermService and UmRdpService) to startup automatically.