VPN is a very useful feature and continues to encourage Internet Freedom. Using VPN, one can hide their actual online presence, wrapping up an extra layer of privacy. But using a VPN to connect to a remote computer can sometimes spew up error messages, bugs, and glitches. One of these error messages is “A connection to the remote computer could not be established.“, which is usually caused by the VPN connection itself.
Fix 1 – Flush the DNS
One of the key reasons behind this issue is the corrupted DNS configuration.
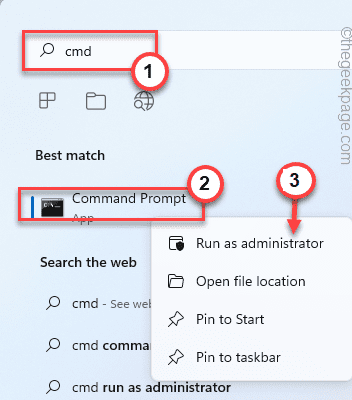
1. You can do it from the CMD terminal. So, press the Win key once and start to type “cmd“.
2. Then, right-tap the “Command Prompt” and tap “Run as administrator“.
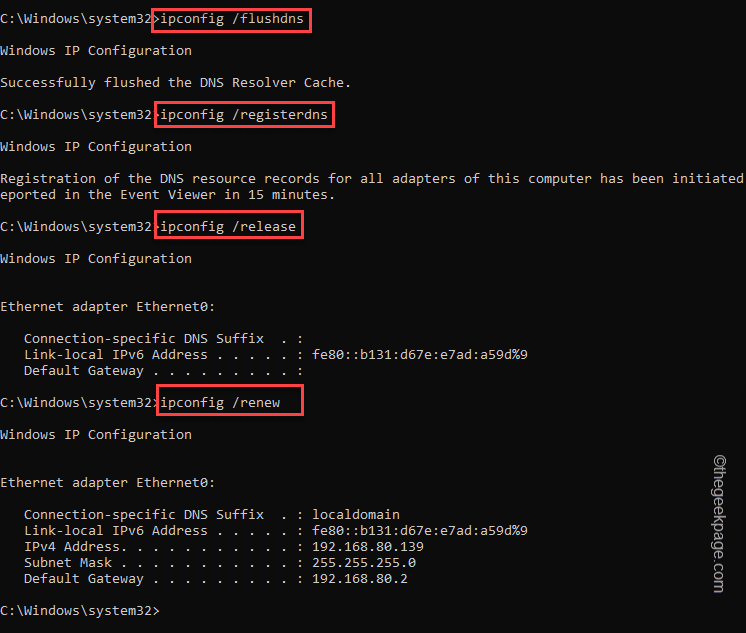
3. In the CMD terminal, write these commands one by one and hit Enter to flush the DNS cache and renew the IP configuration as well.
ipconfig /flushdns
ipconfig /registerdns
ipconfig /release
ipconfig /renew
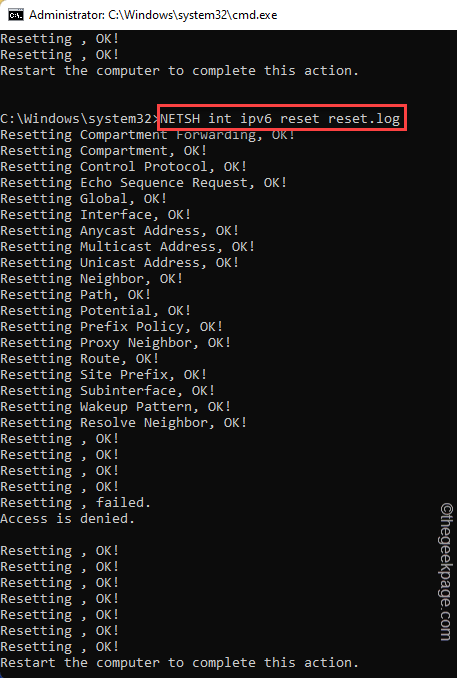
4. After you have executed all those four commands, execute these three codes to reset both the IPv4 and IPv6 settings.
NETSH winsock reset catalog
NETSH int ipv4 reset reset.log
NETSH int ipv6 reset reset.log
Once the “Restart the computer to complete this action.” message appears in the Command Prompt, the execution process is complete.
All you have to do is to close the Command Prompt screen and reboot the system.
Fix 2 – Edit the VPN settings
You can edit the VPN settings and correct the misconfigured VPN settings.
1. Open the Settings page, and click on the “Network & Internet” settings.
2. Tap “VPN” from the right-hand section.
3. On the right-hand pane, you will notice your VPN connection.
4. Just click on the VPN to expand it and tap “Advanced options” to access it.
5. You will see the current status of the VPN.
6. Tap “Edit” to modify the current VPN settings.
7. Now, correctly set the ‘Server name or address’ option. Additionally, you can also change any other settings if you want.
8. Once you are done, tap “Save“.
Now, using this VPN connection, try to connect to the remote computer once again. Test if this works.
Fix 3 – Manually edit the IP
You can manually adjust the IP address.
1. Just press the Windows key+R keys together.
2. Here, type “cmd” and press the Ctlr+Shift+Enter three keys together.
3. Type this code and hit Enter to know the detailed configuration of your network connection.
ipconfig
You will see the IP information and Default gateway of the current network adapter.
Note down the IPv4 Address, Subnet Mask, and Default Gateway from there.
4. Once you have done that, press the Win key and R key once more.
5. Then, type this word and click the “OK” option.
ncpa.cpl
6. Look for the network adapter on the Network Connection page.
7. Now, right-tap the adapter and tap “Properties“.
8. Now, double-tap the “Internet Protocol Version 4 (TCP/IPv4)” option to access it.
9. Now, select the “Use the following IP address” option.
10. Here, input those in the particular box and click “OK” to save the changes.
Now, check whether the VPN works.
Fix 4 – Reinstall the network driver
If the previous solutions have failed to resolve the issue, you should uninstall and reinstall the network driver.
1. Use the search icon beside the Windows icon to search for “device“.
2. Tap “Device Manager” to access it.
3. When you have opened up the Device Manager, expand the “Network adapters” section.
4. If you see there are one or two adapters only, you should tap on “View” from the menu bar and further, click on “Show hidden devices“.
5. Just right-tap the WAN Miniport and tap “Uninstall device“.
6. Tap “Uninstall” to uninstall the device from your system.
7. This way, uninstall all the WAN Miniport devices in the section.
8. Once you have uninstalled all these, tap “Action” and click “Scan for hardware changes“.
This way, all the devices that you have uninstalled will be reinstalled. Now, test the VPN once more.
Alternative Tips –
1. Try using another VPN service. If you are on a free VPN service, consider using premium VPN services.
2. Check the network connection without the VPN. If the network connects, there is some issue with the VPN itself.


