While trying to get into your world in Minecraft, you may see this error message on the Minecraft Java screen “java.net.ConnectException: Connection refused: no further information:“. This seems to be a normal Minecraft issue but it isn’t the problem of the Minecraft game, the firewall settings of your computer are responsible for this debacle.
Quick Tips –
Close the Minecraft game and the Minecraft Launcher. Then, reboot your computer. Launch the game after rebooting the machine. Check if that solves the issue.
Fix 1 – Allow Minecraft game through the firewall
Minecraft can get restricted through your system firewall and can’t get through to the servers.
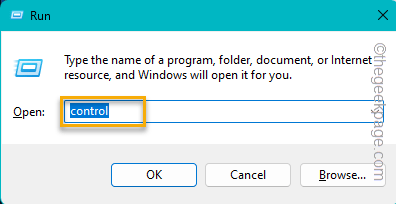
Step 1 – Using the Windows key+R keys together, open a Run box.
Step 2 – Then, type this in that box. Then, you have to click “OK“.
control
Wait until the Control Panel window opens up.
Step 3 – There, you have to click the “View by:” and set the option to “Small icons“.
This way, you can view all the items in Control Panel.
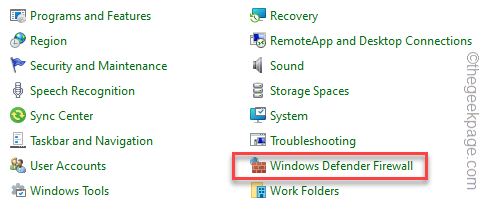
Step 4 – Here, find out “Windows Defender Firewall” and open that.
Step 5 – There, you shall find an option called “Allow an app through Windows Defender Firewall” on the same page.
Step 6 – In the next screen, you will notice all the installed apps with their permissions of both Private and Public network types.
Step 7 – But, to change this setting, tap “Change settings“.
Step 8 – What you have to do next is to find “Java(TM) Platform SE Binary” or “OpenJDK Platform binary” app.
Step 9 – Just tick the both the boxes for the “Public” and “Private” options.
This way, you are allowing Minecraft access through the Windows Defender Firewall in all network types.
Step 10 – Next, check whether you can find any Minecraft entry in the list, like – Minecraft Launcher, Minecraft Java Edition, etc.
Step 11 – If you can see such an entry, check the “Allow” box for both the “Public” and “Private” options.
Step 12 – At the end, don’t forget to tap “OK” to save the alterations.
Close the Control Panel window after this. Start up a Minecraft game and test whether any JavaException message is appearing or not.
Fix 2 – Add the IP address before joining
Add the IP address to the Minecraft database using File Explorer.
Step 1 – Check the IP address
Check which IP configuration you are using.
Step 1 – Write down “command” in the search box.
Step 2 – There, you may right-tap the “Command Prompt“. Then, tap “Run as administrator” in the context menu.
Step 3 – While the Command Prompt window opens, wait. Then, write this code and hit Enter.
ipconfig
This will show the complete information about your network configuration.
Step 4 – Scroll down and notice the IP address you are currently using.
Once you have noted that, you may exit the Command Prompt page.
Step 2 – Note down the Server Port
After you have noted the IP address, next is the Server Port.
Step 1 – Open a new File Explorer page, using the Win+E hotkey.
Step 2 – Find the Minecraft Server folder on your system. Inside this folder, you shall find the Server.properties text file.
Step 3 – Open the file in Notepad. Then, note down which Server Port the machine is using. .
Step 3 – Check the Port, Server Address in Minecraft Multiplayer
Now, you have to check whether that same IP address is present in the Minecraft Server settings or not.
Step 1 – Launch Minecraft, if you haven’t already.
Step 2 – Then, open the “Multiplayer” settings.
Step 3 – Now you shall see the list of Minecraft servers at one place. So, select the server that you want to connect.
Step 4 – Then, tap “Edit” to edit the server setting.
Step 5 – Make sure the Server Address here matches with the IPv4 address that you have noted before. If not, adjust the Server Address according to the IPv4 address.
Step 6 – Then, tap “Done” to save the changes.
Now, try to reconnect to that particular Minecraft server and check the status.
Fix 3 – Update the Java Runtime
Update the Java Runtime Libraries on your system should help you attain a resolution.
Step 1 – Search “Java” from the search box.
Step 2 – Then, click “Configure Java” in the search results.
Step 3 – On Java Control Panel opens up, head on to the “Update” panel.
Step 4 – Just, click “Update now” to start updating the Jave Runtime Libraries.
This whole process is automatic and you won’t have to do anything but to wait for it’s completion.
When the Java Runtime Libraries are installed on your system, restart it. Give Minecraft another go and test.
Fix 4 – Disable/Uninstall all the mod
Minecraft without mods isn’t Minecraft. But these mods sometimes can crash the game completely. So, apart from the popular ones, if you have recently installed a mod that may be corrupted, disable it in Minecraft.
Step 1 – Open the Minecraft Launcher.
Step 2 – Select the Minecraft Java Edition.
Step 3 – Then, head on to the “Installations” tab. There, you will view all the installed mods.
Step 4 – Click the three-dot bar beside the mod that you want to remove and tap “Delete” to delete a particular mod.
There is another thing you may try if you have only a handful of mods installed. In that case, disable all the mods in Minecraft and enable it one-by-one. This way, you can narrow down your search to the main corrupted mod. Get rid of the corrupted mod or look for an updated version of that mod.
Fix 5 – Reset the Network parameters
Resetting the network parameters should help you solve this “No further information” issue in Minecraft.
Step 1 – Open a CMD terminal with administrative rights. Just open a Run box.
Step 2 – Type this there and hit the Ctrl, Shift and Enter all three keys together.
cmd

Step 3 – There, in the terminal, input all these network resetting codes one by one and hit Enter to run all of them.
ipconfig /flushdns
ipconfig /release
ipconfig /renew
netsh winsock reset
netsh int ip reset
Exit the terminal and try reaching the Minecraft server again. Test if that solves the issue.
Fix 5 – Uninstall and reinstall Minecraft
If everything else so far hasn’t fixed the Java error, you can uninstall Minecraft and reinstall the same.
Step 1 – Open Settings. Pressing the Win key and the I key should do that.
Step 2 – Directly go to the “Apps“.
Step 3 – If you look at the other part of Settings, you will find “Installed apps“. You can directly open that.
Step 4 – You may find a search box on the right side. Just, type “Minecraft” in the box.
Step 5 – You will find the Minecraft Launcher there.
Step 6 – Directly tap ⋮ button beside the app and tap “Uninstall“.
Step 7 – To uninstall the Minecraft launcher, you have to click “Uninstall” once again to remove it.
Step 8 – Look for the “Minecraft Java Edition“.
Step 9 – Tap the dot button and click “Uninstall“.
Step 10 – Confirm the uninstallation with another tap on “Uninstall” message again.
Now, you can install Minecraft Java Edition from anywhere you prefer –
Xbox (It actually reverts you to Microsoft Store)
The very next time you try to launch Minecraft Java Edition, Firewall will show you a prompt to allow Java RunTime through it. Make sure to check both the boxes and tap “Allow” to allow it though.
You won’t see the java.net.ConnectException: Connection refused: no further information:” error message ever again.

