If you are a Windows user and also using Microsoft Word then sometimes you might face the ‘server could not complete this action 0x88ffc009 error’. This happens when you try to access the word document or perform some action on it that requires communication with a server or network and that network is unresponsive. When this error occurs it will not let you use the Word document. This might be because of corrupted files, cache issues, unstable network connectivity, conflicting documents, etc. In this article, we have different methods that can help you to resolve the 0x88ffc009 word error. Let us start!
Method 1 – Close The Conflicting Word Documents And Restart The Microsoft Word App
Step 1 – Save all the opened word documents and close it
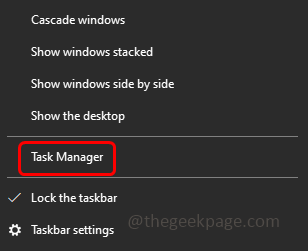
Step 2 – Check and close if there are any background processes running related to the word app. To do that, right-click on the taskbar at the bottom and click on the task manager
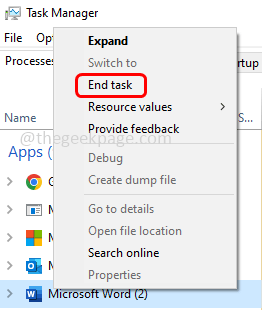
Step 3 – Search for the Microsoft Word in the processes tab and right-click on it
Step 4 – Click on the end task
Step 5 – Any opened Microsoft Word document will be closed. Now again re-open the word and then check if the issue is solved.
Method 2 – Check For The Network Connectivity
Check if your internet is working correctly without any glitches. To check the stability of the network you can go to the speed test website and click on Go button. If the network is not good then there might be chances of getting the error. If so then try to restart your router or modem or try to switch the network, use the wi-fi hotspot or other connectivity that is stable. Then try if the error goes away.
Method 3 – Clear The DNS Cache
Step 1 – Open the command prompt as an administrator. To do that, type cmd in the windows search then hold Ctrl + Shift keys together and hit enter
Step 2 – A user account control window will open click on yes
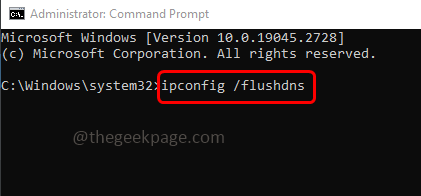
Step 3 – Copy the below command and paste it in the command prompt window then hit enter
ipconfig /flushdns
Step 4 – Wait the execution to complete and then restart the computer. Now open the word document and check if the issue is solved.
Method 4 – Modify The One Drive Location
Step 1 – Open the file explorer using Windows + E key together
Step 2 – On the left side, click on OneDrive
Step 3 – In the One drive folder check for the unrecognized folders that you are not familiar with or you have not created
Step 4 – If present open that folder and check for that particular word document which is giving you the error
Step 5 – If the document is not present in the unrecognized folder then check in other One drive folders as well. If found cut or copy the word document
Step 6 – Now in the One drive folder there will be documents folder, paste the word document in the documents folder
Step 7 – Once done, try to open the word document and check if the issue is resolved.
Method 5 – Repair The Microsoft Word App
Since the Microsoft Word is bundled with Microsoft Office, if you are performing the repair then it should be for the entire Microsoft Office suite. So save and close all the opened Microsoft documents and then follow the below steps
Step 1 – Open the windows settings using Windows + I keys together
Step 2 – Click on apps
Step 3 – In the apps & features window, scroll down and find Microsoft Office (Microsoft 365)
Step 4 – Click on Microsoft 365 and select modify
Step 5 – A user account control window will open, click on yes
Step 6 – In the next window, it will ask you for how would you like to repair your office programs. Select online repair by clicking on the radio button beside it. This option requires a good internet connection. If you do not have one then you can select quick repair option
Step 7 – Then click on repair button. Again to proceed with the repair process, click on repair
Step 8 – It might take sometime to finish the process. Once done restart the system and then check if the issue is resolved.
That’s it! I hope the above provided information is helpful and easy to follow. Let us know which method did you apply and got the issue resolved. Thank you!!


