While trying to play Minecraft on a new machine, you may see this error message “GLFW error 65542: WGL: The driver does not appear to support OpenGL.” There is a definite reason behind this issue and that is the absence of a particular set of DLL files. You just have to download the missing dll file and put it in the particular folder of your system. Just follow these steps we have mentioned and you will be building your base again in no time.
Fix 1 – Download and place the DLL file
You have to download the DLL file and copy it to a particular folder on your computer.
1. Download this Minecraft_OpenGL on your computer.
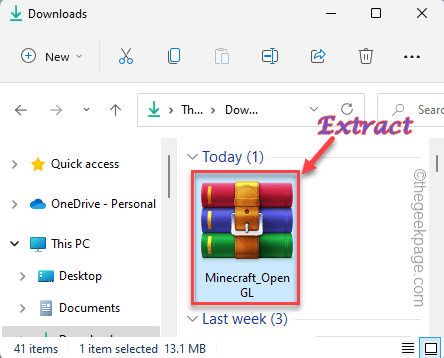
2. Once you have downloaded it, extract the “Minecraft _OpenGL” in a folder of your choice.
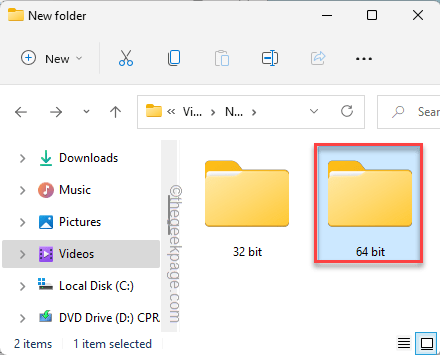
3. Once you have extracted the contents of the zip file, you will find two folders.
4. Open the “64-bit” folder to access it.
[If you are using a 32-bit folder, ]
5. Inside this folder, you will find a DLL file “opengl32.dll“.
6. Select the file and tap the copy icon to copy that particular dll file.
7. Go here once you have copied the file –
C:\Program Files\Java
8. Now, here double-tap on the JRE folder to access it. It may alter system to system depending upon the version of Java Runtime Environment you are using.
9. Inside the JRE folder, you will find several folders and files.
10. Double-tap the “bin” folder to access it.
11. Now, just paste the copied dll file inside this folder.
Close the File Explorer and restart your computer.
Then, after restarting the machine, launch Minecraft and check again.
Fix 2 – Check for Updates
Windows sometimes push important redistributable package updates through update channels. Install all the pending updates.
1. Open the Settings window.
2. Now, tap “Windows Update” from the left pane.
3. On the right-hand pane, there will be an option “Check for updates“. Tap it.
Allow Windows a while to determine the latest update package and install it on your computer.
4. Just leave your computer for a while as it will download and install the update package.
5. Once the installation process is done, you will be asked to restart the machine. Tap “Restart now” to do so.
Once you have restarted your computer, launch Minecraft and test if this works out.
Fix 3 – Install the latest redistributable package
If there is no impending Windows Update, you can download and install the latest redistributable package yourself and install it manually.
Step 1 – Check Device Specs
1. Open the Settings page.
2. Later, click on the “System” from the left pane.
3. Now, on the right-hand pane, scroll all the down and tap “About“.
4. You will see all the device specifications.
Just check the processor type. Whether it is “x64-bit” or “x86-bit“.
You can close the Settings page after this.
STEP 2 – DOWNLOAD THE VISUAL STUDIO FILES
1. Now, you have to navigate to the Visual Studio C++ Redistributable Package.
2. This page contains many redistributable packages. Look for the “Visual Studio 2015, 2017, 2019, and 2022” package.
3. In this section, tap on the link associated with your system specifications (“X64“).
This will download the redistributable package on your machine. After downloading it, minimize the browser window.
4. Now, go to the location housing the downloaded vcredist file.
5. Then, double-tap the file to access it.
6. You will receive a prompt on whether to run this tool on your system. Tap “Run“.
7. When the Installer page opens up, tap “Install” to proceed.
Very quickly the installation process will be complete.
9. Once it is successfully installed, tap “Restart” to reboot your computer.
Once you restart the system, launch Minecraft and test if this works out.
Fix 4 – Uninstall the Display link driver
If you are using the Display Link driver, it can be the root cause of this problem.
1. You have to access the Programs & Features page to uninstall the Display Link Driver.
2. To do that, press the ⊞ Win key+R keys together.
3. Later, type “appwiz.cpl” and tap “OK“.
4. When you land on that particular page, look for the “DisplayLink Graphics Driver” app.
5. Later, right-tap the app and tap “Uninstall“.
Confirm your step and click “Yes“. Once you have done that, close everything and reboot your PC/laptop. Later, open Minecraft and check if this works out.
Fix 5 – Disable/pause the antivirus
If you are using an antivirus, disable it for a brief moment and relaunch Minecraft.
1. Look carefully at the left corner of your taskbar. You will notice an upward arrow icon. Click on it.
2. Here, you will find several hidden icons alongside the antivirus that you are using.
3. Just right-tap the antivirus software and tap “Pause protection” to pause it temporarily.
Once you have paused it, relaunch Minecraft and test again.
Fix 6 – Uninstall the graphics card
You may uninstall the graphics card from your computer.
1. You have to open the Device Manager.
2. To do that type “device manager” in the search box.
3. Later, tap “Device Manager” to access the utility.
4. In the Device Manager, just tap “Display adapters” to expand it.
3. To uninstall the driver, right-tap the display driver and tap “Uninstall device“.
4. Tap “Uninstall” when you are prompted with the warning message.
This should uninstall the display driver from your system. Then reboot your device. Windows will reinstall the default graphics adapter driver while your system starts up.
Fix 7 – Uninstall Minecraft and reinstall
If the rest of the solution fails, you can uninstall and reinstall Minecraft from your computer.
1. Pressing the Windows key+X keys together should open a shortcut menu.
2. Here, tap “Apps and Features“.
3. This will send you directly to the apps list page in Settings.
4. Now, check whether you can find the “Minecraft Launcher” among the apps.
5. Just tap on the three-dot menu and tap “Uninstall“.
4. You have to click “Uninstall” to proceed.
Once you have uninstalled Minecraft, you may close the Settings.
1. Quickly download the MinecraftInstaller on your system.
2. Once you have done that, double click on “MinecraftInstaller“.

Complete the installation following the on-screen instructions.
If you are using Minecraft for Windows 11, you have to do this –
1. You have to open the Store.
2. Type “Minecraft” in the search box.
3. Next, click on the “Minecraft for Windows + Launcher” to access it.
4. You can now easily install it with a tap on “Install” to access it.
After installing the app, close the Store and open Minecraft, and test if this works out for you.


